- Python 3.6 以降
- Windows / macOS / Linux
Azure ポータルから Face API を利用するためのリソースを作成します。
1-1. Face APIs と検索し、[作成] をクリックします。

1-2. 必要事項を記入します。
| 項目 | 記入・設定例 |
|---|---|
| サブスクリプション | Azure for Students |
| リソースグループ | rg-mstechcamp9 |
| リージョン | 東日本 |
| 名前 | cog-mstechcamp9 |
| 価格レベル | Free F0 |
| 米国警察によって使用されないことの証明 | チェックをする |
※サブスクリプションが Azure for Students の場合、価格レベル [Free F0] ではリソースを作成できない場合があります。作成に失敗する場合、価格レベル [Standard S1] をお試しください。[Standard S1] では 1000 トランザクションにつき 112 円(価格表)かかりますが、Azure for Students では 100$ 分まで無料でご利用頂けます。
1-3. [確認および作成] をクリックし、完了次第リソースへ移動しておきます。
Face API を利用するための環境を構築します。
2-1. 任意のリポジトリで本リポジトリをクローンし移動します。
git clone https://github.com/yakkun0521/20210721-FaceAPI.git
cd 20210721-FaceAPI/
2-2. 必要なライブラリのインストール
以下のコマンドで "requirements.txt" に記載された Python ライブラリを一括インストールします。
pip install -r requirements.txt
2-3. 本リポジトリ直下に ".env" ファイルを作成し、Azure ポータルで作成した Cognitive Service リソース内、[キーとエンドポイント] を参考に以下を記入します。
※ ".env" ファイルに記述した値は、リポジトリ固有の環境変数として参照されます。".env" ファイルに記入された Cognitive Service のキーとエンドポイントの値は GitHub などで公開すると他人に悪用される恐れがあるため、".gitignore" ファイルに .env と追記することで追跡対象から除外します。(本リポジトリでは既に設定済み)
COG_SERVICE_ENDPOINT=[エンドポイント]
COG_SERVICE_KEY=[キー 1]
下記画像の場合、以下のように記入します。
COG_SERVICE_ENDPOINT=https://cog-mstechcamp9.cognitiveservices.azure.com/
COG_SERVICE_KEY=ace0738c04cd4fXXXXXXXXXXX

サンプルで用意したプログラムを実行し、画像から顔を検出してみましょう。
3-1. 'detect_faces.py' 実行します。
python detect_faces.py
以下のような出力が確認できれば成功です。
Detecting faces in images/people.jpg
2 faces detected.

Results saved in detected_faces.jpg
3-2. リポジトリ内に 'detected_faces.jpg' というファイルができます。開くと、下記のように顔がアノテーションされており、それぞれ ID が振られていることが分かります。

検出された顔から、メガネに関する情報を取得してみましょう。
4-1. 'detect_faces.py' の35行目 detected_faces = face_client.face.detect_with_stream(image=image_data) に、取得したい顔の要素タイプを配列として第2引数へ与えることができます。今回はメガネに関する情報 (FaceAttributeType.glasses) のみなので、第2引数には return_face_attributes=[FaceAttributeType.glasses] を与えてください。35行目は以下のようになります。
detected_faces = face_client.face.detect_with_stream(image=image_data, return_face_attributes=[FaceAttributeType.glasses])
4-2. 各顔のメガネに関する情報を出力します。'detect_faces.py' の51~54行目(# 顔情報の取得 の下)を以下のように変更してください。※48行目 for face in detected_faces: のループに入るよう、インデントに注意してください。
print('\nFace ID: {}'.format(face.face_id))
detected_attributes = face.face_attributes.as_dict()
if 'glasses' in detected_attributes:
    print(' - Glasses: {}'.format(detected_attributes['glasses']))
4-3. 再度 'detect_faces.py' を実行してください。
python detect-faces.py
以下のような出力が確認できれば成功です。
Detecting faces in images/people.jpg
2 faces detected.

Face ID: 4df8b9ed-103f-4c16-9b59-f63e81abd867
 - Glasses:noGlasses

Face ID: 972d7535-cdaa-42b6-900c-206a00a87acb
 - Glasses:readingGlasses

Results saved in detected_faces.jpg
上記の例では、画像内の2人の顔のメガネに関する情報(Glasses)を出力しています。'detected_faces.jpg' にアノテーションされた Face ID と照らし合わせて確認してください。noGlasses は「メガネをかけていない」、readingGlasses は「通常の眼鏡(視力補助用のもの)をかけている」ことを示しています。その他にも、サングラスの場合は sunglasses、水泳用ゴーグルの場合は swimmingGoggles などと出力されます。
メガネに関する情報以外にも様々な要素を取得できます。詳しくは 'FaceAttributes' クラスのドキュメント の Properties を参照してください。
他のサイトでは,例が上がっていなかった Attributes.Smile プログラムと実行結果を示す.
34行目return_face_attributes と出力の仕方を変更すればよい.
detected_faces = face_client.face.detect_with_stream(image=image_data,
return_face_attributes=[FaceAttributeType.smile])
print('¥nFace ID: {}'.format(face.face_id))
 detected_attributes = face.face_attributes.as_dict()
 print(' - Smile: {}'.format(detected_attributes['smile']))
値は0以上 1以下の少数で返され,1 に近づくほど笑顔と判断されている.
Detecting faces in images¥personA.jpg
1 faces detected.
Face ID: 3074c745-e985-41bd-932e-90a608aa55ca
 - Smile: 0.983
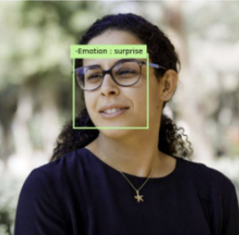
Attributes.emotion だと出力の仕方を変更しなければいけない.
34: detected_faces = face_client.face.detect_with_stream(image=image_data,
35: return_face_attributes=[FaceAttributeType.emotion])

49: print('¥nFace ID: {}'.format(face.face_id))
50: detected_attributes = face.face_attributes.as_dict()
51: print(' -Emotion : {}'.format(detected_attributes['emotion']))

60: annotation = ' -Emotion : {}'.format(max((detected_attributes['emotion'])))
実行結果は以下のようになる.
Detecting faces in images¥personA.jpg
1 faces detected.
Face ID: 435e1da0-becf-4783-b628-84618f417ad8
-Emotion : {'anger': 0.0, 'contempt': 0.0, 'disgust': 0.0, 'fear': 0.0, 'happiness': 0.983, 'neutral':
0.017, 'sadness': 0.0, 'surprise': 0.0}
Results saved in detected_faces.jpg
1人の顔の映った画像 'personA.jpg' と、複数人の顔の映った画像 'people1.jpg' があります。'people1.jpg' から 'personA.jpg' に映った人を探してみましょう。
5-1. 'compare_faces.py' を実行してください。60行目の face_client.face.find_similar でメソッドで、第1引数に与えた顔が第2引数で与えた複数の顔の中に存在するか探しています。
python compare_faces.py
5-2. 成功すると以下のような出力とともに、'face_to_match.jpg' と 'matched_faces.jpg' が出力されます。
Comparing faces in images/personA.jpg and images/people1.jpg
以下の 'face_to_match.jpg' は、'personA.jpg' から顔検出されたもので、この顔を 'people1.jpg' から探しています。

以下の 'matched_faces.jpg' は、上記の顔にマッチした 'people1.jpg' 内の顔をアノテーションしたものです。

5-3. 探す顔を左側の人に変更してみます。'compare_faces.py' の24行目 personA.jpg を personB.jpg に変更してください。24行目は以下のようになります。
person_image = os.path.join('images','personB.jpg')5-4. 再度 'compare_faces.py' を実行してください。
python compare_faces.py
5-5. 出力された 'matched_faces.jpg' を確認すると、左側の人にマッチしていることが分かります。
