MCP servers are programs that expose specific capabilities to AI applications through standardized protocol interfaces.
Common examples include file system servers for document access, database servers for data queries, GitHub servers for code management, Slack servers for team communication, and calendar servers for scheduling.
Servers provide functionality through three building blocks:
| Feature | Explanation | Examples | Who controls it |
|---|---|---|---|
| Tools | Functions that your LLM can actively call, and decides when to use them based on user requests. Tools can write to databases, call external APIs, modify files, or trigger other logic. | Search flights Send messages Create calendar events |
Model |
| Resources | Passive data sources that provide read-only access to information for context, such as file contents, database schemas, or API documentation. | Retrieve documents Access knowledge bases Read calendars |
Application |
| Prompts | Pre-built instruction templates that tell the model to work with specific tools and resources. | Plan a vacation Summarize my meetings Draft an email |
User |
We will use a hypothetical scenario to demonstrate the role of each of these features, and show how they can work together.
Tools enable AI models to perform actions. Each tool defines a specific operation with typed inputs and outputs. The model requests tool execution based on context.
Tools are schema-defined interfaces that LLMs can invoke. MCP uses JSON Schema for validation. Each tool performs a single operation with clearly defined inputs and outputs. Tools may require user consent prior to execution, helping to ensure users maintain control over actions taken by a model.
Protocol operations:
| Method | Purpose | Returns |
|---|---|---|
tools/list |
Discover available tools | Array of tool definitions with schemas |
tools/call |
Execute a specific tool | Tool execution result |
Example tool definition:
{
  name: "searchFlights",
  description: "Search for available flights",
  inputSchema: {
    type: "object",
    properties: {
      origin: { type: "string", description: "Departure city" },
      destination: { type: "string", description: "Arrival city" },
      date: { type: "string", format: "date", description: "Travel date" }
    },
    required: ["origin", "destination", "date"]
  }
}Tools enable AI applications to perform actions on behalf of users. In a travel planning scenario, the AI application might use several tools to help book a vacation:
Flight Search
searchFlights(origin: "NYC", destination: "Barcelona", date: "2024-06-15")
Queries multiple airlines and returns structured flight options.
Calendar Blocking
createCalendarEvent(title: "Barcelona Trip", startDate: "2024-06-15", endDate: "2024-06-22")
Marks the travel dates in the user's calendar.
Email notification
sendEmail(to: "team@work.com", subject: "Out of Office", body: "...")
Sends an automated out-of-office message to colleagues.
Tools are model-controlled, meaning AI models can discover and invoke them automatically. However, MCP emphasizes human oversight through several mechanisms.
For trust and safety, applications can implement user control through various mechanisms, such as:
- Displaying available tools in the UI, enabling users to define whether a tool should be made available in specific interactions
- Approval dialogs for individual tool executions
- Permission settings for pre-approving certain safe operations
- Activity logs that show all tool executions with their results
Resources provide structured access to information that the AI application can retrieve and provide to models as context.
Resources expose data from files, APIs, databases, or any other source that an AI needs to understand context. Applications can access this information directly and decide how to use it - whether that's selecting relevant portions, searching with embeddings, or passing it all to the model.
Each resource has a unique URI (like file:///path/to/document.md) and declares its MIME type for appropriate content handling. They declare MIME types for appropriate content handling and support two discovery patterns:
- Direct Resources - fixed URIs that point to specific data. Example:
calendar://events/2024- returns calendar availability for 2024 - Resource Templates - dynamic URIs with parameters for flexible queries. Example:
travel://activities/{city}/{category}- returns activities by city and categorytravel://activities/barcelona/museums- returns all museums in Barcelona
Resource Templates include metadata such as title, description, and expected MIME type, making them discoverable and self-documenting.
Protocol operations:
| Method | Purpose | Returns |
|---|---|---|
resources/list |
List available direct resources | Array of resource descriptors |
resources/templates/list |
Discover resource templates | Array of resource template definitions |
resources/read |
Retrieve resource contents | Resource data with metadata |
resources/subscribe |
Monitor resource changes | Subscription confirmation |
Continuing with the travel planning example, resources provide the AI application with access to relevant information:
- Calendar data (
calendar://events/2024) - Checks user availability - Travel documents (
file:///Documents/Travel/passport.pdf) - Accesses important documents - Previous itineraries (
trips://history/barcelona-2023) - References past trips and preferences
The AI application retrieves these resources and decides how to process them, whether selecting a subset of data using embeddings or keyword search, or passing raw data directly to the model.
In this case, it provides calendar data, weather information, and travel preferences to the model, enabling it to check availability, look up weather patterns, and reference past travel preferences.
Resource Template Examples:
{
  "uriTemplate": "weather://forecast/{city}/{date}",
  "name": "weather-forecast",
  "title": "Weather Forecast",
  "description": "Get weather forecast for any city and date",
  "mimeType": "application/json"
}

{
  "uriTemplate": "travel://flights/{origin}/{destination}",
  "name": "flight-search",
  "title": "Flight Search",
  "description": "Search available flights between cities",
  "mimeType": "application/json"
}
These templates enable flexible queries. For weather data, users can access forecasts for any city/date combination. For flights, they can search routes between any two airports. When a user has input "NYC" as the origin airport and begins to input "Bar" as the destination airport, the system can suggest "Barcelona (BCN)" or "Barbados (BGI)".
Dynamic resources support parameter completion. For example:
- Typing "Par" as input for
weather://forecast/{city}might suggest "Paris" or "Park City" - Typing "JFK" for
flights://search/{airport}might suggest "JFK - John F. Kennedy International"
The system helps discover valid values without requiring exact format knowledge.
Resources are application-driven, giving them flexibility in how they retrieve, process, and present available context. Common interaction patterns include:
- Tree or list views for browsing resources in familiar folder-like structures
- Search and filter interfaces for finding specific resources
- Automatic context inclusion or smart suggestions based on heuristics or AI selection
- Manual or bulk selection interfaces for including single or multiple resources
Applications are free to implement resource discovery through any interface pattern that suits their needs. The protocol doesn't mandate specific UI patterns, allowing for resource pickers with preview capabilities, smart suggestions based on current conversation context, bulk selection for including multiple resources, or integration with existing file browsers and data explorers.
Prompts provide reusable templates. They allow MCP server authors to provide parameterized prompts for a domain, or showcase how to best use the MCP server.
Prompts are structured templates that define expected inputs and interaction patterns. They are user-controlled, requiring explicit invocation rather than automatic triggering. Prompts can be context-aware, referencing available resources and tools to create comprehensive workflows. Similar to resources, prompts support parameter completion to help users discover valid argument values.
Protocol operations:
| Method | Purpose | Returns |
|---|---|---|
prompts/list |
Discover available prompts | Array of prompt descriptors |
prompts/get |
Retrieve prompt details | Full prompt definition with arguments |
Prompts provide structured templates for common tasks. In the travel planning context:
"Plan a vacation" prompt:
{
  "name": "plan-vacation",
  "title": "Plan a vacation",
  "description": "Guide through vacation planning process",
  "arguments": [
    { "name": "destination", "type": "string", "required": true },
    { "name": "duration", "type": "number", "description": "days" },
    { "name": "budget", "type": "number", "required": false },
    { "name": "interests", "type": "array", "items": { "type": "string" } }
  ]
}
Rather than unstructured natural language input, the prompt system enables:
- Selection of the "Plan a vacation" template
- Structured input: Barcelona, 7 days, $3000, ["beaches", "architecture", "food"]
- Consistent workflow execution based on the template
Prompts are user-controlled, requiring explicit invocation. The protocol gives implementers freedom to design interfaces that feel natural within their application. Key principles include:
- Easy discovery of available prompts
- Clear descriptions of what each prompt does
- Natural argument input with validation
- Transparent display of the prompt's underlying template
Applications typically expose prompts through various UI patterns such as:
- Slash commands (typing "/" to see available prompts like /plan-vacation)
- Command palettes for searchable access
- Dedicated UI buttons for frequently used prompts
- Context menus that suggest relevant prompts
MCP TypeScript SDK NPM Version MIT licensed Table of Contents Overview Installation Quickstart What is MCP? Core Concepts Server Resources Tools Prompts Completions Sampling Running Your Server stdio Streamable HTTP Testing and Debugging Examples Echo Server SQLite Explorer Advanced Usage Dynamic Servers Low-Level Server Writing MCP Clients Proxy Authorization Requests Upstream Backwards Compatibility Documentation Contributing License Overview The Model Context Protocol allows applications to provide context for LLMs in a standardized way, separating the concerns of providing context from the actual LLM interaction. This TypeScript SDK implements the full MCP specification, making it easy to:
Create MCP servers that expose resources, prompts and tools Build MCP clients that can connect to any MCP server Use standard transports like stdio and Streamable HTTP Installation npm install @modelcontextprotocol/sdk Quick Start Let's create a simple MCP server that exposes a calculator tool and some data. Save the following as server.ts:
import { McpServer, ResourceTemplate } from '@modelcontextprotocol/sdk/server/mcp.js'; import { StreamableHTTPServerTransport } from '@modelcontextprotocol/sdk/server/streamableHttp.js'; import express from 'express'; import { z } from 'zod';
// Create an MCP server const server = new McpServer({ name: 'demo-server', version: '1.0.0' });
// Add an addition tool server.registerTool( 'add', { title: 'Addition Tool', description: 'Add two numbers', inputSchema: { a: z.number(), b: z.number() }, outputSchema: { result: z.number() } }, async ({ a, b }) => { const output = { result: a + b }; return { content: [{ type: 'text', text: JSON.stringify(output) }], structuredContent: output }; } );
// Add a dynamic greeting resource
server.registerResource(
'greeting',
new ResourceTemplate('greeting://{name}', { list: undefined }),
{
title: 'Greeting Resource', // Display name for UI
description: 'Dynamic greeting generator'
},
async (uri, { name }) => ({
contents: [
{
uri: uri.href,
text: Hello, ${name}!
}
]
})
);
// Set up Express and HTTP transport const app = express(); app.use(express.json());
app.post('/mcp', async (req, res) => { // Create a new transport for each request to prevent request ID collisions const transport = new StreamableHTTPServerTransport({ sessionIdGenerator: undefined, enableJsonResponse: true });
res.on('close', () => {
    transport.close();
});

await server.connect(transport);
await transport.handleRequest(req, res, req.body);
});
const port = parseInt(process.env.PORT || '3000');
app.listen(port, () => {
console.log(Demo MCP Server running on http://localhost:${port}/mcp);
}).on('error', error => {
console.error('Server error:', error);
process.exit(1);
});
Install the deps with npm install @modelcontextprotocol/sdk express zod@3, and run with npx -y tsx server.ts.
You can connect to it using any MCP client that supports streamable http, such as:
MCP Inspector: npx @modelcontextprotocol/inspector and connect to the streamable HTTP URL http://localhost:3000/mcp Claude Code: claude mcp add --transport http my-server http://localhost:3000/mcp VS Code: code --add-mcp "{"name":"my-server","type":"http","url":"http://localhost:3000/mcp\"}" Cursor: Click this deeplink Then try asking your agent to add two numbers using its new tool!
Core Concepts Server The McpServer is your core interface to the MCP protocol. It handles connection management, protocol compliance, and message routing:
const server = new McpServer({ name: 'my-app', version: '1.0.0' }); Tools Tools let LLMs take actions through your server. Tools can perform computation, fetch data and have side effects. Tools should be designed to be model-controlled - i.e. AI models will decide which tools to call, and the arguments.
// Simple tool with parameters server.registerTool( 'calculate-bmi', { title: 'BMI Calculator', description: 'Calculate Body Mass Index', inputSchema: { weightKg: z.number(), heightM: z.number() }, outputSchema: { bmi: z.number() } }, async ({ weightKg, heightM }) => { const output = { bmi: weightKg / (heightM * heightM) }; return { content: [ { type: 'text', text: JSON.stringify(output) } ], structuredContent: output }; } );
// Async tool with external API call
server.registerTool(
'fetch-weather',
{
title: 'Weather Fetcher',
description: 'Get weather data for a city',
inputSchema: { city: z.string() },
outputSchema: { temperature: z.number(), conditions: z.string() }
},
async ({ city }) => {
const response = await fetch(https://api.weather.com/${city});
const data = await response.json();
const output = { temperature: data.temp, conditions: data.conditions };
return {
content: [{ type: 'text', text: JSON.stringify(output) }],
structuredContent: output
};
}
);
// Tool that returns ResourceLinks server.registerTool( 'list-files', { title: 'List Files', description: 'List project files', inputSchema: { pattern: z.string() }, outputSchema: { count: z.number(), files: z.array(z.object({ name: z.string(), uri: z.string() })) } }, async ({ pattern }) => { const output = { count: 2, files: [ { name: 'README.md', uri: 'file:///project/README.md' }, { name: 'index.ts', uri: 'file:///project/src/index.ts' } ] }; return { content: [ { type: 'text', text: JSON.stringify(output) }, // ResourceLinks let tools return references without file content { type: 'resource_link', uri: 'file:///project/README.md', name: 'README.md', mimeType: 'text/markdown', description: 'A README file' }, { type: 'resource_link', uri: 'file:///project/src/index.ts', name: 'index.ts', mimeType: 'text/typescript', description: 'An index file' } ], structuredContent: output }; } ); ResourceLinks Tools can return ResourceLink objects to reference resources without embedding their full content. This can be helpful for performance when dealing with large files or many resources - clients can then selectively read only the resources they need using the provided URIs.
Resources Resources can also expose data to LLMs, but unlike tools shouldn't perform significant computation or have side effects.
Resources are designed to be used in an application-driven way, meaning MCP client applications can decide how to expose them. For example, a client could expose a resource picker to the human, or could expose them to the model directly.
// Static resource server.registerResource( 'config', 'config://app', { title: 'Application Config', description: 'Application configuration data', mimeType: 'text/plain' }, async uri => ({ contents: [ { uri: uri.href, text: 'App configuration here' } ] }) );
// Dynamic resource with parameters
server.registerResource(
'user-profile',
new ResourceTemplate('users://{userId}/profile', { list: undefined }),
{
title: 'User Profile',
description: 'User profile information'
},
async (uri, { userId }) => ({
contents: [
{
uri: uri.href,
text: Profile data for user ${userId}
}
]
})
);
// Resource with context-aware completion
server.registerResource(
'repository',
new ResourceTemplate('github://repos/{owner}/{repo}', {
list: undefined,
complete: {
// Provide intelligent completions based on previously resolved parameters
repo: (value, context) => {
if (context?.arguments?.['owner'] === 'org1') {
return ['project1', 'project2', 'project3'].filter(r => r.startsWith(value));
}
return ['default-repo'].filter(r => r.startsWith(value));
}
}
}),
{
title: 'GitHub Repository',
description: 'Repository information'
},
async (uri, { owner, repo }) => ({
contents: [
{
uri: uri.href,
text: Repository: ${owner}/${repo}
}
]
})
);
Prompts
Prompts are reusable templates that help humans prompt models to interact with your server. They're designed to be user-driven, and might appear as slash commands in a chat interface.
import { completable } from '@modelcontextprotocol/sdk/server/completable.js';
server.registerPrompt(
'review-code',
{
title: 'Code Review',
description: 'Review code for best practices and potential issues',
argsSchema: { code: z.string() }
},
({ code }) => ({
messages: [
{
role: 'user',
content: {
type: 'text',
text: Please review this code:\n\n${code}
}
}
]
})
);
// Prompt with context-aware completion
server.registerPrompt(
'team-greeting',
{
title: 'Team Greeting',
description: 'Generate a greeting for team members',
argsSchema: {
department: completable(z.string(), value => {
// Department suggestions
return ['engineering', 'sales', 'marketing', 'support'].filter(d => d.startsWith(value));
}),
name: completable(z.string(), (value, context) => {
// Name suggestions based on selected department
const department = context?.arguments?.['department'];
if (department === 'engineering') {
return ['Alice', 'Bob', 'Charlie'].filter(n => n.startsWith(value));
} else if (department === 'sales') {
return ['David', 'Eve', 'Frank'].filter(n => n.startsWith(value));
} else if (department === 'marketing') {
return ['Grace', 'Henry', 'Iris'].filter(n => n.startsWith(value));
}
return ['Guest'].filter(n => n.startsWith(value));
})
}
},
({ department, name }) => ({
messages: [
{
role: 'assistant',
content: {
type: 'text',
text: Hello ${name}, welcome to the ${department} team!
}
}
]
})
);
Completions
MCP supports argument completions to help users fill in prompt arguments and resource template parameters. See the examples above for resource completions and prompt completions.
Client Usage // Request completions for any argument const result = await client.complete({ ref: { type: 'ref/prompt', // or "ref/resource" name: 'example' // or uri: "template://..." }, argument: { name: 'argumentName', value: 'partial' // What the user has typed so far }, context: { // Optional: Include previously resolved arguments arguments: { previousArg: 'value' } } }); Display Names and Metadata All resources, tools, and prompts support an optional title field for better UI presentation. The title is used as a display name (e.g. 'Create a new issue'), while name remains the unique identifier (e.g. create_issue).
Note: The register* methods (registerTool, registerPrompt, registerResource) are the recommended approach for new code. The older methods (tool, prompt, resource) remain available for backwards compatibility.
Title Precedence for Tools For tools specifically, there are two ways to specify a title:
title field in the tool configuration annotations.title field (when using the older tool() method with annotations) The precedence order is: title → annotations.title → name
// Using registerTool (recommended) server.registerTool( 'my_tool', { title: 'My Tool', // This title takes precedence annotations: { title: 'Annotation Title' // This is ignored if title is set } }, handler );
// Using tool with annotations (older API) server.tool( 'my_tool', 'description', { title: 'Annotation Title' // This is used as title }, handler ); When building clients, use the provided utility to get the appropriate display name:
import { getDisplayName } from '@modelcontextprotocol/sdk/shared/metadataUtils.js';
// Automatically handles the precedence: title → annotations.title → name const displayName = getDisplayName(tool); Sampling MCP servers can request LLM completions from connected clients that support sampling.
import { McpServer } from '@modelcontextprotocol/sdk/server/mcp.js'; import { StreamableHTTPServerTransport } from '@modelcontextprotocol/sdk/server/streamableHttp.js'; import express from 'express'; import { z } from 'zod';
const mcpServer = new McpServer({ name: 'tools-with-sample-server', version: '1.0.0' });
// Tool that uses LLM sampling to summarize any text
mcpServer.registerTool(
'summarize',
{
title: 'Text Summarizer',
description: 'Summarize any text using an LLM',
inputSchema: {
text: z.string().describe('Text to summarize')
},
outputSchema: { summary: z.string() }
},
async ({ text }) => {
// Call the LLM through MCP sampling
const response = await mcpServer.server.createMessage({
messages: [
{
role: 'user',
content: {
type: 'text',
text: Please summarize the following text concisely:\n\n${text}
}
}
],
maxTokens: 500
});
    const summary = response.content.type === 'text' ? response.content.text : 'Unable to generate summary';
    const output = { summary };
    return {
        content: [{ type: 'text', text: JSON.stringify(output) }],
        structuredContent: output
    };
}
);
const app = express(); app.use(express.json());
app.post('/mcp', async (req, res) => { const transport = new StreamableHTTPServerTransport({ sessionIdGenerator: undefined, enableJsonResponse: true });
res.on('close', () => {
    transport.close();
});

await mcpServer.connect(transport);
await transport.handleRequest(req, res, req.body);
});
const port = parseInt(process.env.PORT || '3000');
app.listen(port, () => {
console.log(MCP Server running on http://localhost:${port}/mcp);
}).on('error', error => {
console.error('Server error:', error);
process.exit(1);
});
Running Your Server
MCP servers in TypeScript need to be connected to a transport to communicate with clients. How you start the server depends on the choice of transport:
Streamable HTTP For remote servers, use the Streamable HTTP transport.
Without Session Management (Recommended) For most use cases where session management isn't needed:
import { McpServer } from '@modelcontextprotocol/sdk/server/mcp.js'; import { StreamableHTTPServerTransport } from '@modelcontextprotocol/sdk/server/streamableHttp.js'; import express from 'express'; import { z } from 'zod';
const app = express(); app.use(express.json());
// Create the MCP server once (can be reused across requests) const server = new McpServer({ name: 'example-server', version: '1.0.0' });
// Set up your tools, resources, and prompts
server.registerTool(
'echo',
{
title: 'Echo Tool',
description: 'Echoes back the provided message',
inputSchema: { message: z.string() },
outputSchema: { echo: z.string() }
},
async ({ message }) => {
const output = { echo: Tool echo: ${message} };
return {
content: [{ type: 'text', text: JSON.stringify(output) }],
structuredContent: output
};
}
);
app.post('/mcp', async (req, res) => { // In stateless mode, create a new transport for each request to prevent // request ID collisions. Different clients may use the same JSON-RPC request IDs, // which would cause responses to be routed to the wrong HTTP connections if // the transport state is shared.
try {
    const transport = new StreamableHTTPServerTransport({
        sessionIdGenerator: undefined,
        enableJsonResponse: true
    });

    res.on('close', () => {
        transport.close();
    });

    await server.connect(transport);
    await transport.handleRequest(req, res, req.body);
} catch (error) {
    console.error('Error handling MCP request:', error);
    if (!res.headersSent) {
        res.status(500).json({
            jsonrpc: '2.0',
            error: {
                code: -32603,
                message: 'Internal server error'
            },
            id: null
        });
    }
}
});
const port = parseInt(process.env.PORT || '3000');
app.listen(port, () => {
console.log(MCP Server running on http://localhost:${port}/mcp);
}).on('error', error => {
console.error('Server error:', error);
process.exit(1);
});
With Session Management
In some cases, servers need stateful sessions. This can be achieved by session management in the MCP protocol.
import express from 'express'; import { randomUUID } from 'node:crypto'; import { McpServer } from '@modelcontextprotocol/sdk/server/mcp.js'; import { StreamableHTTPServerTransport } from '@modelcontextprotocol/sdk/server/streamableHttp.js'; import { isInitializeRequest } from '@modelcontextprotocol/sdk/types.js';
const app = express(); app.use(express.json());
// Map to store transports by session ID const transports: { [sessionId: string]: StreamableHTTPServerTransport } = {};
// Handle POST requests for client-to-server communication app.post('/mcp', async (req, res) => { // Check for existing session ID const sessionId = req.headers['mcp-session-id'] as string | undefined; let transport: StreamableHTTPServerTransport;
if (sessionId && transports[sessionId]) {
    // Reuse existing transport
    transport = transports[sessionId];
} else if (!sessionId && isInitializeRequest(req.body)) {
    // New initialization request
    transport = new StreamableHTTPServerTransport({
        sessionIdGenerator: () => randomUUID(),
        onsessioninitialized: sessionId => {
            // Store the transport by session ID
            transports[sessionId] = transport;
        }
        // DNS rebinding protection is disabled by default for backwards compatibility. If you are running this server
        // locally, make sure to set:
        // enableDnsRebindingProtection: true,
        // allowedHosts: ['127.0.0.1'],
    });

    // Clean up transport when closed
    transport.onclose = () => {
        if (transport.sessionId) {
            delete transports[transport.sessionId];
        }
    };
    const server = new McpServer({
        name: 'example-server',
        version: '1.0.0'
    });

    // ... set up server resources, tools, and prompts ...

    // Connect to the MCP server
    await server.connect(transport);
} else {
    // Invalid request
    res.status(400).json({
        jsonrpc: '2.0',
        error: {
            code: -32000,
            message: 'Bad Request: No valid session ID provided'
        },
        id: null
    });
    return;
}

// Handle the request
await transport.handleRequest(req, res, req.body);
});
// Reusable handler for GET and DELETE requests const handleSessionRequest = async (req: express.Request, res: express.Response) => { const sessionId = req.headers['mcp-session-id'] as string | undefined; if (!sessionId || !transports[sessionId]) { res.status(400).send('Invalid or missing session ID'); return; }
const transport = transports[sessionId];
await transport.handleRequest(req, res);
};
// Handle GET requests for server-to-client notifications via SSE app.get('/mcp', handleSessionRequest);
// Handle DELETE requests for session termination app.delete('/mcp', handleSessionRequest);
app.listen(3000); CORS Configuration for Browser-Based Clients If you'd like your server to be accessible by browser-based MCP clients, you'll need to configure CORS headers. The Mcp-Session-Id header must be exposed for browser clients to access it:
import cors from 'cors';
// Add CORS middleware before your MCP routes app.use( cors({ origin: '*', // Configure appropriately for production, for example: // origin: ['https://your-remote-domain.com', 'https://your-other-remote-domain.com'], exposedHeaders: ['Mcp-Session-Id'], allowedHeaders: ['Content-Type', 'mcp-session-id'] }) ); This configuration is necessary because:
The MCP streamable HTTP transport uses the Mcp-Session-Id header for session management Browsers restrict access to response headers unless explicitly exposed via CORS Without this configuration, browser-based clients won't be able to read the session ID from initialization responses DNS Rebinding Protection The Streamable HTTP transport includes DNS rebinding protection to prevent security vulnerabilities. By default, this protection is disabled for backwards compatibility.
Important: If you are running this server locally, enable DNS rebinding protection:
const transport = new StreamableHTTPServerTransport({ sessionIdGenerator: () => randomUUID(), enableDnsRebindingProtection: true,
allowedHosts: ['127.0.0.1', ...], allowedOrigins: ['https://yourdomain.com', 'https://www.yourdomain.com'] }); stdio For local integrations spawned by another process, you can use the stdio transport:
import { McpServer } from '@modelcontextprotocol/sdk/server/mcp.js'; import { StdioServerTransport } from '@modelcontextprotocol/sdk/server/stdio.js';
const server = new McpServer({ name: 'example-server', version: '1.0.0' });
// ... set up server resources, tools, and prompts ...
const transport = new StdioServerTransport(); await server.connect(transport); Testing and Debugging To test your server, you can use the MCP Inspector. See its README for more information.
Examples Echo Server A simple server demonstrating resources, tools, and prompts:
import { McpServer, ResourceTemplate } from '@modelcontextprotocol/sdk/server/mcp.js'; import { z } from 'zod';
const server = new McpServer({ name: 'echo-server', version: '1.0.0' });
server.registerTool(
'echo',
{
title: 'Echo Tool',
description: 'Echoes back the provided message',
inputSchema: { message: z.string() },
outputSchema: { echo: z.string() }
},
async ({ message }) => {
const output = { echo: Tool echo: ${message} };
return {
content: [{ type: 'text', text: JSON.stringify(output) }],
structuredContent: output
};
}
);
server.registerResource(
'echo',
new ResourceTemplate('echo://{message}', { list: undefined }),
{
title: 'Echo Resource',
description: 'Echoes back messages as resources'
},
async (uri, { message }) => ({
contents: [
{
uri: uri.href,
text: Resource echo: ${message}
}
]
})
);
server.registerPrompt(
'echo',
{
title: 'Echo Prompt',
description: 'Creates a prompt to process a message',
argsSchema: { message: z.string() }
},
({ message }) => ({
messages: [
{
role: 'user',
content: {
type: 'text',
text: Please process this message: ${message}
}
}
]
})
);
SQLite Explorer
A more complex example showing database integration:
import { McpServer } from '@modelcontextprotocol/sdk/server/mcp.js'; import sqlite3 from 'sqlite3'; import { promisify } from 'util'; import { z } from 'zod';
const server = new McpServer({ name: 'sqlite-explorer', version: '1.0.0' });
// Helper to create DB connection const getDb = () => { const db = new sqlite3.Database('database.db'); return { all: promisify<string, any[]>(db.all.bind(db)), close: promisify(db.close.bind(db)) }; };
server.registerResource( 'schema', 'schema://main', { title: 'Database Schema', description: 'SQLite database schema', mimeType: 'text/plain' }, async uri => { const db = getDb(); try { const tables = await db.all("SELECT sql FROM sqlite_master WHERE type='table'"); return { contents: [ { uri: uri.href, text: tables.map((t: { sql: string }) => t.sql).join('\n') } ] }; } finally { await db.close(); } } );
server.registerTool(
'query',
{
title: 'SQL Query',
description: 'Execute SQL queries on the database',
inputSchema: { sql: z.string() },
outputSchema: {
rows: z.array(z.record(z.any())),
rowCount: z.number()
}
},
async ({ sql }) => {
const db = getDb();
try {
const results = await db.all(sql);
const output = { rows: results, rowCount: results.length };
return {
content: [
{
type: 'text',
text: JSON.stringify(output, null, 2)
}
],
structuredContent: output
};
} catch (err: unknown) {
const error = err as Error;
return {
content: [
{
type: 'text',
text: Error: ${error.message}
}
],
isError: true
};
} finally {
await db.close();
}
}
);
Advanced Usage
Dynamic Servers
If you want to offer an initial set of tools/prompts/resources, but later add additional ones based on user action or external state change, you can add/update/remove them after the Server is connected. This will automatically emit the corresponding listChanged notifications:
import { McpServer } from '@modelcontextprotocol/sdk/server/mcp.js'; import { StreamableHTTPServerTransport } from '@modelcontextprotocol/sdk/server/streamableHttp.js'; import express from 'express'; import { z } from 'zod';
const server = new McpServer({ name: 'Dynamic Example', version: '1.0.0' });
const listMessageTool = server.registerTool( 'listMessages', { title: 'List Messages', description: 'List messages in a channel', inputSchema: { channel: z.string() }, outputSchema: { messages: z.array(z.string()) } }, async ({ channel }) => { const messages = await listMessages(channel); const output = { messages }; return { content: [{ type: 'text', text: JSON.stringify(output) }], structuredContent: output }; } );
const putMessageTool = server.registerTool(
'putMessage',
{
title: 'Put Message',
description: 'Send a message to a channel',
inputSchema: { channel: z.string(), message: z.string() },
outputSchema: { success: z.boolean() }
},
async ({ channel, message }) => {
await putMessage(channel, message);
const output = { success: true };
return {
content: [{ type: 'text', text: JSON.stringify(output) }],
structuredContent: output
};
}
);
// Until we upgrade auth, putMessage is disabled (won't show up in listTools)
putMessageTool.disable();
const upgradeAuthTool = server.registerTool(
'upgradeAuth',
{
title: 'Upgrade Authorization',
description: 'Upgrade user authorization level',
inputSchema: { permission: z.enum(['write', 'admin']) },
outputSchema: {
success: z.boolean(),
newPermission: z.string()
}
},
// Any mutations here will automatically emit listChanged notifications
async ({ permission }) => {
const { ok, err, previous } = await upgradeAuthAndStoreToken(permission);
if (!ok) {
return {
content: [{ type: 'text', text: Error: ${err} }],
isError: true
};
}
    // If we previously had read-only access, 'putMessage' is now available
    if (previous === 'read') {
        putMessageTool.enable();
    }

    if (permission === 'write') {
        // If we've just upgraded to 'write' permissions, we can still call 'upgradeAuth'
        // but can only upgrade to 'admin'.
        upgradeAuthTool.update({
            paramsSchema: { permission: z.enum(['admin']) } // change validation rules
        });
    } else {
        // If we're now an admin, we no longer have anywhere to upgrade to, so fully remove that tool
        upgradeAuthTool.remove();
    }

    const output = { success: true, newPermission: permission };
    return {
        content: [{ type: 'text', text: JSON.stringify(output) }],
        structuredContent: output
    };
}
);
// Connect with HTTP transport const app = express(); app.use(express.json());
app.post('/mcp', async (req, res) => { const transport = new StreamableHTTPServerTransport({ sessionIdGenerator: undefined, enableJsonResponse: true });
res.on('close', () => {
    transport.close();
});

await server.connect(transport);
await transport.handleRequest(req, res, req.body);
});
const port = parseInt(process.env.PORT || '3000');
app.listen(port, () => {
console.log(MCP Server running on http://localhost:${port}/mcp);
});
Improving Network Efficiency with Notification Debouncing
When performing bulk updates that trigger notifications (e.g., enabling or disabling multiple tools in a loop), the SDK can send a large number of messages in a short period. To improve performance and reduce network traffic, you can enable notification debouncing.
This feature coalesces multiple, rapid calls for the same notification type into a single message. For example, if you disable five tools in a row, only one notifications/tools/list_changed message will be sent instead of five.
[!IMPORTANT] This feature is designed for "simple" notifications that do not carry unique data in their parameters. To prevent silent data loss, debouncing is automatically bypassed for any notification that contains a params object or a relatedRequestId. Such notifications will always be sent immediately.
This is an opt-in feature configured during server initialization.
import { McpServer } from "@modelcontextprotocol/sdk/server/mcp.js";
const server = new McpServer( { name: "efficient-server", version: "1.0.0" }, { // Enable notification debouncing for specific methods debouncedNotificationMethods: [ 'notifications/tools/list_changed', 'notifications/resources/list_changed', 'notifications/prompts/list_changed' ] } );
// Now, any rapid changes to tools, resources, or prompts will result // in a single, consolidated notification for each type. server.registerTool("tool1", ...).disable(); server.registerTool("tool2", ...).disable(); server.registerTool("tool3", ...).disable(); // Only one 'notifications/tools/list_changed' is sent. Low-Level Server For more control, you can use the low-level Server class directly:
import { Server } from '@modelcontextprotocol/sdk/server/index.js'; import { StdioServerTransport } from '@modelcontextprotocol/sdk/server/stdio.js'; import { ListPromptsRequestSchema, GetPromptRequestSchema } from '@modelcontextprotocol/sdk/types.js';
const server = new Server( { name: 'example-server', version: '1.0.0' }, { capabilities: { prompts: {} } } );
server.setRequestHandler(ListPromptsRequestSchema, async () => { return { prompts: [ { name: 'example-prompt', description: 'An example prompt template', arguments: [ { name: 'arg1', description: 'Example argument', required: true } ] } ] }; });
server.setRequestHandler(GetPromptRequestSchema, async request => { if (request.params.name !== 'example-prompt') { throw new Error('Unknown prompt'); } return { description: 'Example prompt', messages: [ { role: 'user', content: { type: 'text', text: 'Example prompt text' } } ] }; });
const transport = new StdioServerTransport(); await server.connect(transport); Eliciting User Input MCP servers can request additional information from users through the elicitation feature. This is useful for interactive workflows where the server needs user input or confirmation:
// Server-side: Restaurant booking tool that asks for alternatives server.registerTool( 'book-restaurant', { title: 'Book Restaurant', description: 'Book a table at a restaurant', inputSchema: { restaurant: z.string(), date: z.string(), partySize: z.number() }, outputSchema: { success: z.boolean(), booking: z .object({ restaurant: z.string(), date: z.string(), partySize: z.number() }) .optional(), alternatives: z.array(z.string()).optional() } }, async ({ restaurant, date, partySize }) => { // Check availability const available = await checkAvailability(restaurant, date, partySize);
    if (!available) {
        // Ask user if they want to try alternative dates
        const result = await server.server.elicitInput({
            message: `No tables available at ${restaurant} on ${date}. Would you like to check alternative dates?`,
            requestedSchema: {
                type: 'object',
                properties: {
                    checkAlternatives: {
                        type: 'boolean',
                        title: 'Check alternative dates',
                        description: 'Would you like me to check other dates?'
                    },
                    flexibleDates: {
                        type: 'string',
                        title: 'Date flexibility',
                        description: 'How flexible are your dates?',
                        enum: ['next_day', 'same_week', 'next_week'],
                        enumNames: ['Next day', 'Same week', 'Next week']
                    }
                },
                required: ['checkAlternatives']
            }
        });

        if (result.action === 'accept' && result.content?.checkAlternatives) {
            const alternatives = await findAlternatives(restaurant, date, partySize, result.content.flexibleDates as string);
            const output = { success: false, alternatives };
            return {
                content: [
                    {
                        type: 'text',
                        text: JSON.stringify(output)
                    }
                ],
                structuredContent: output
            };
        }

        const output = { success: false };
        return {
            content: [
                {
                    type: 'text',
                    text: JSON.stringify(output)
                }
            ],
            structuredContent: output
        };
    }

    // Book the table
    await makeBooking(restaurant, date, partySize);
    const output = {
        success: true,
        booking: { restaurant, date, partySize }
    };
    return {
        content: [
            {
                type: 'text',
                text: JSON.stringify(output)
            }
        ],
        structuredContent: output
    };
}
); Client-side: Handle elicitation requests
// This is a placeholder - implement based on your UI framework async function getInputFromUser( message: string, schema: any ): Promise<{ action: 'accept' | 'decline' | 'cancel'; data?: Record<string, any>; }> { // This should be implemented depending on the app throw new Error('getInputFromUser must be implemented for your platform'); }
client.setRequestHandler(ElicitRequestSchema, async request => { const userResponse = await getInputFromUser(request.params.message, request.params.requestedSchema);
return {
    action: userResponse.action,
    content: userResponse.action === 'accept' ? userResponse.data : undefined
};
}); Note: Elicitation requires client support. Clients must declare the elicitation capability during initialization.
Writing MCP Clients The SDK provides a high-level client interface:
import { Client } from '@modelcontextprotocol/sdk/client/index.js'; import { StdioClientTransport } from '@modelcontextprotocol/sdk/client/stdio.js';
const transport = new StdioClientTransport({ command: 'node', args: ['server.js'] });
const client = new Client({ name: 'example-client', version: '1.0.0' });
await client.connect(transport);
// List prompts const prompts = await client.listPrompts();
// Get a prompt const prompt = await client.getPrompt({ name: 'example-prompt', arguments: { arg1: 'value' } });
// List resources const resources = await client.listResources();
// Read a resource const resource = await client.readResource({ uri: 'file:///example.txt' });
// Call a tool const result = await client.callTool({ name: 'example-tool', arguments: { arg1: 'value' } }); Proxy Authorization Requests Upstream You can proxy OAuth requests to an external authorization provider:
import express from 'express'; import { ProxyOAuthServerProvider } from '@modelcontextprotocol/sdk/server/auth/providers/proxyProvider.js'; import { mcpAuthRouter } from '@modelcontextprotocol/sdk/server/auth/router.js';
const app = express();
const proxyProvider = new ProxyOAuthServerProvider({ endpoints: { authorizationUrl: 'https://auth.external.com/oauth2/v1/authorize', tokenUrl: 'https://auth.external.com/oauth2/v1/token', revocationUrl: 'https://auth.external.com/oauth2/v1/revoke' }, verifyAccessToken: async token => { return { token, clientId: '123', scopes: ['openid', 'email', 'profile'] }; }, getClient: async client_id => { return { client_id, redirect_uris: ['http://localhost:3000/callback'] }; } });
app.use( mcpAuthRouter({ provider: proxyProvider, issuerUrl: new URL('http://auth.external.com'), baseUrl: new URL('http://mcp.example.com'), serviceDocumentationUrl: new URL('https://docs.example.com/') }) ); This setup allows you to:
Forward OAuth requests to an external provider Add custom token validation logic Manage client registrations Provide custom documentation URLs Maintain control over the OAuth flow while delegating to an external provider Backwards Compatibility Clients and servers with StreamableHttp transport can maintain backwards compatibility with the deprecated HTTP+SSE transport (from protocol version 2024-11-05) as follows
Client-Side Compatibility For clients that need to work with both Streamable HTTP and older SSE servers:
import { Client } from '@modelcontextprotocol/sdk/client/index.js'; import { StreamableHTTPClientTransport } from '@modelcontextprotocol/sdk/client/streamableHttp.js'; import { SSEClientTransport } from '@modelcontextprotocol/sdk/client/sse.js'; let client: Client | undefined = undefined; const baseUrl = new URL(url); try { client = new Client({ name: 'streamable-http-client', version: '1.0.0' }); const transport = new StreamableHTTPClientTransport(new URL(baseUrl)); await client.connect(transport); console.log('Connected using Streamable HTTP transport'); } catch (error) { // If that fails with a 4xx error, try the older SSE transport console.log('Streamable HTTP connection failed, falling back to SSE transport'); client = new Client({ name: 'sse-client', version: '1.0.0' }); const sseTransport = new SSEClientTransport(baseUrl); await client.connect(sseTransport); console.log('Connected using SSE transport'); } Server-Side Compatibility For servers that need to support both Streamable HTTP and older clients:
import express from 'express'; import { McpServer } from '@modelcontextprotocol/sdk/server/mcp.js'; import { StreamableHTTPServerTransport } from '@modelcontextprotocol/sdk/server/streamableHttp.js'; import { SSEServerTransport } from '@modelcontextprotocol/sdk/server/sse.js';
const server = new McpServer({ name: 'backwards-compatible-server', version: '1.0.0' });
// ... set up server resources, tools, and prompts ...
const app = express(); app.use(express.json());
// Store transports for each session type const transports = { streamable: {} as Record<string, StreamableHTTPServerTransport>, sse: {} as Record<string, SSEServerTransport> };
// Modern Streamable HTTP endpoint app.all('/mcp', async (req, res) => { // Handle Streamable HTTP transport for modern clients // Implementation as shown in the "With Session Management" example // ... });
// Legacy SSE endpoint for older clients app.get('/sse', async (req, res) => { // Create SSE transport for legacy clients const transport = new SSEServerTransport('/messages', res); transports.sse[transport.sessionId] = transport;
res.on('close', () => {
    delete transports.sse[transport.sessionId];
});

await server.connect(transport);
});
// Legacy message endpoint for older clients app.post('/messages', async (req, res) => { const sessionId = req.query.sessionId as string; const transport = transports.sse[sessionId]; if (transport) { await transport.handlePostMessage(req, res, req.body); } else { res.status(400).send('No transport found for sessionId'); } });
app.listen(3000); Note: The SSE transport is now deprecated in favor of Streamable HTTP. New implementations should use Streamable HTTP, and existing SSE implementations should plan to migrate.
Documentation Model Context Protocol documentation MCP Specification Example Servers Contributing Issues and pull requests are welcome on GitHub at https://github.com/modelcontextprotocol/typescript-sdk.
License This project is licensed under the MIT License—see the LICENSE file for details.
Monica Monica Repo Summary Supports the most advanced models to help you quickly understand the contents of the repo About The official TypeScript SDK for Model Context Protocol servers and clients
modelcontextprotocol.io Resources Readme License MIT license Code of conduct Code of conduct Contributing Contributing Security policy Security policy Activity Custom properties Stars 10.2k stars Watchers 84 watching Forks 1.3k forks Report repository Releases 59 1.19.0 Latest last week
- 58 releases Contributors 116 @jspahrsummers @ihrpr @ochafik @bhosmer-ant @jerome3o-anthropic @cliffhall @allenzhou101 @claude @pcarleton @dsp-ant @KKonstantinov @ddworken @felixweinberger @Achintha444
- 102 contributors Deployments 61 release last week
- 60 deployments Languages TypeScript 98.7%
Ja
The real power of MCP emerges when multiple servers work together, combining their specialized capabilities through a unified interface.
Consider a personalized AI travel planner application, with three connected servers:
- Travel Server - Handles flights, hotels, and itineraries
- Weather Server - Provides climate data and forecasts
- Calendar/Email Server - Manages schedules and communications
-
User invokes a prompt with parameters:
{ "prompt": "plan-vacation", "arguments": { "destination": "Barcelona", "departure_date": "2024-06-15", "return_date": "2024-06-22", "budget": 3000, "travelers": 2 } } -
User selects resources to include:
calendar://my-calendar/June-2024(from Calendar Server)travel://preferences/europe(from Travel Server)travel://past-trips/Spain-2023(from Travel Server)
-
AI processes the request using tools:
The AI first reads all selected resources to gather context - identifying available dates from the calendar, learning preferred airlines and hotel types from travel preferences, and discovering previously enjoyed locations from past trips.
Using this context, the AI then executes a series of Tools:
searchFlights()- Queries airlines for NYC to Barcelona flightscheckWeather()- Retrieves climate forecasts for travel dates
The AI then uses this information to create the booking and following steps, requesting approval from the user where necessary:
bookHotel()- Finds hotels within the specified budgetcreateCalendarEvent()- Adds the trip to the user's calendarsendEmail()- Sends confirmation with trip details
The result: Through multiple MCP servers, the user researched and booked a Barcelona trip tailored to their schedule. The "Plan a Vacation" prompt guided the AI to combine Resources (calendar availability and travel history) with Tools (searching flights, booking hotels, updating calendars) across different servers—gathering context and executing the booking. A task that could've taken hours was completed in minutes using MCP.
This overview of the Model Context Protocol (MCP) discusses its scope and core concepts, and provides an example demonstrating each core concept.
Because MCP SDKs abstract away many concerns, most developers will likely find the data layer protocol section to be the most useful. It discusses how MCP servers can provide context to an AI application.
For specific implementation details, please refer to the documentation for your language-specific SDK.
The Model Context Protocol includes the following projects:
- MCP Specification: A specification of MCP that outlines the implementation requirements for clients and servers.
- MCP SDKs: SDKs for different programming languages that implement MCP.
- MCP Development Tools: Tools for developing MCP servers and clients, including the MCP Inspector
- MCP Reference Server Implementations: Reference implementations of MCP servers.
MCP follows a client-server architecture where an MCP host — an AI application like Claude Code or Claude Desktop — establishes connections to one or more MCP servers. The MCP host accomplishes this by creating one MCP client for each MCP server. Each MCP client maintains a dedicated one-to-one connection with its corresponding MCP server.
The key participants in the MCP architecture are:
- MCP Host: The AI application that coordinates and manages one or multiple MCP clients
- MCP Client: A component that maintains a connection to an MCP server and obtains context from an MCP server for the MCP host to use
- MCP Server: A program that provides context to MCP clients
For example: Visual Studio Code acts as an MCP host. When Visual Studio Code establishes a connection to an MCP server, such as the Sentry MCP server, the Visual Studio Code runtime instantiates an MCP client object that maintains the connection to the Sentry MCP server. When Visual Studio Code subsequently connects to another MCP server, such as the local filesystem server, the Visual Studio Code runtime instantiates an additional MCP client object to maintain this connection, hence maintaining a one-to-one relationship of MCP clients to MCP servers.
graph TB
    subgraph "MCP Host (AI Application)"
        Client1["MCP Client 1"]
        Client2["MCP Client 2"]
        Client3["MCP Client 3"]
    end

    Server1["MCP Server 1<br/>(e.g., Sentry)"]
    Server2["MCP Server 2<br/>(e.g., Filesystem)"]
    Server3["MCP Server 3<br/>(e.g., Database)"]

    Client1 ---|"One-to-one<br/>connection"| Server1
    Client2 ---|"One-to-one<br/>connection"| Server2
    Client3 ---|"One-to-one<br/>connection"| Server3

    style Client1 fill:#e1f5fe
    style Client2 fill:#e1f5fe
    style Client3 fill:#e1f5fe
    style Server1 fill:#f3e5f5
    style Server2 fill:#f3e5f5
    style Server3 fill:#f3e5f5
Note that MCP server refers to the program that serves context data, regardless of where it runs. MCP servers can execute locally or remotely. For example, when Claude Desktop launches the filesystem server, the server runs locally on the same machine because it uses the STDIO transport. This is commonly referred to as a "local" MCP server. The official Sentry MCP server runs on the Sentry platform, and uses the Streamable HTTP transport. This is commonly referred to as a "remote" MCP server.
MCP consists of two layers:
- Data layer: Defines the JSON-RPC based protocol for client-server communication, including lifecycle management, and core primitives, such as tools, resources, prompts and notifications.
- Transport layer: Defines the communication mechanisms and channels that enable data exchange between clients and servers, including transport-specific connection establishment, message framing, and authorization.
Conceptually the data layer is the inner layer, while the transport layer is the outer layer.
The data layer implements a JSON-RPC 2.0 based exchange protocol that defines the message structure and semantics. This layer includes:
- Lifecycle management: Handles connection initialization, capability negotiation, and connection termination between clients and servers
- Server features: Enables servers to provide core functionality including tools for AI actions, resources for context data, and prompts for interaction templates from and to the client
- Client features: Enables servers to ask the client to sample from the host LLM, elicit input from the user, and log messages to the client
- Utility features: Supports additional capabilities like notifications for real-time updates and progress tracking for long-running operations
The transport layer manages communication channels and authentication between clients and servers. It handles connection establishment, message framing, and secure communication between MCP participants.
MCP supports two transport mechanisms:
- Stdio transport: Uses standard input/output streams for direct process communication between local processes on the same machine, providing optimal performance with no network overhead.
- Streamable HTTP transport: Uses HTTP POST for client-to-server messages with optional Server-Sent Events for streaming capabilities. This transport enables remote server communication and supports standard HTTP authentication methods including bearer tokens, API keys, and custom headers. MCP recommends using OAuth to obtain authentication tokens.
The transport layer abstracts communication details from the protocol layer, enabling the same JSON-RPC 2.0 message format across all transport mechanisms.
A core part of MCP is defining the schema and semantics between MCP clients and MCP servers. Developers will likely find the data layer — in particular, the set of primitives — to be the most interesting part of MCP. It is the part of MCP that defines the ways developers can share context from MCP servers to MCP clients.
MCP uses JSON-RPC 2.0 as its underlying RPC protocol. Client and servers send requests to each other and respond accordingly. Notifications can be used when no response is required.
MCP is a stateful protocol that requires lifecycle management. The purpose of lifecycle management is to negotiate the capabilities that both client and server support. Detailed information can be found in the specification, and the example showcases the initialization sequence.
MCP primitives are the most important concept within MCP. They define what clients and servers can offer each other. These primitives specify the types of contextual information that can be shared with AI applications and the range of actions that can be performed.
MCP defines three core primitives that servers can expose:
- Tools: Executable functions that AI applications can invoke to perform actions (e.g., file operations, API calls, database queries)
- Resources: Data sources that provide contextual information to AI applications (e.g., file contents, database records, API responses)
- Prompts: Reusable templates that help structure interactions with language models (e.g., system prompts, few-shot examples)
Each primitive type has associated methods for discovery (*/list), retrieval (*/get), and in some cases, execution (tools/call).
MCP clients will use the */list methods to discover available primitives. For example, a client can first list all available tools (tools/list) and then execute them. This design allows listings to be dynamic.
As a concrete example, consider an MCP server that provides context about a database. It can expose tools for querying the database, a resource that contains the schema of the database, and a prompt that includes few-shot examples for interacting with the tools.
For more details about server primitives see server concepts.
MCP also defines primitives that clients can expose. These primitives allow MCP server authors to build richer interactions.
- Sampling: Allows servers to request language model completions from the client's AI application. This is useful when servers' authors want access to a language model, but want to stay model independent and not include a language model SDK in their MCP server. They can use the
sampling/completemethod to request a language model completion from the client's AI application. - Elicitation: Allows servers to request additional information from users. This is useful when servers' authors want to get more information from the user, or ask for confirmation of an action. They can use the
elicitation/requestmethod to request additional information from the user. - Logging: Enables servers to send log messages to clients for debugging and monitoring purposes.
For more details about client primitives see client concepts.
The protocol supports real-time notifications to enable dynamic updates between servers and clients. For example, when a server's available tools change—such as when new functionality becomes available or existing tools are modified—the server can send tool update notifications to inform connected clients about these changes. Notifications are sent as JSON-RPC 2.0 notification messages (without expecting a response) and enable MCP servers to provide real-time updates to connected clients.
This section provides a step-by-step walkthrough of an MCP client-server interaction, focusing on the data layer protocol. We'll demonstrate the lifecycle sequence, tool operations, and notifications using JSON-RPC 2.0 messages.
MCP begins with lifecycle management through a capability negotiation handshake. As described in the [lifecycle management](#lifecycle-management) section, the client sends an `initialize` request to establish the connection and negotiate supported features.<CodeGroup>
```json Initialize Request theme={null}
{
"jsonrpc": "2.0",
"id": 1,
"method": "initialize",
"params": {
"protocolVersion": "2025-06-18",
"capabilities": {
"elicitation": {}
},
"clientInfo": {
"name": "example-client",
"version": "1.0.0"
}
}
}
```
```json Initialize Response theme={null}
{
"jsonrpc": "2.0",
"id": 1,
"result": {
"protocolVersion": "2025-06-18",
"capabilities": {
"tools": {
"listChanged": true
},
"resources": {}
},
"serverInfo": {
"name": "example-server",
"version": "1.0.0"
}
}
}
```
</CodeGroup>
#### Understanding the Initialization Exchange
The initialization process is a key part of MCP's lifecycle management and serves several critical purposes:
1. **Protocol Version Negotiation**: The `protocolVersion` field (e.g., "2025-06-18") ensures both client and server are using compatible protocol versions. This prevents communication errors that could occur when different versions attempt to interact. If a mutually compatible version is not negotiated, the connection should be terminated.
2. **Capability Discovery**: The `capabilities` object allows each party to declare what features they support, including which [primitives](#primitives) they can handle (tools, resources, prompts) and whether they support features like [notifications](#notifications). This enables efficient communication by avoiding unsupported operations.
3. **Identity Exchange**: The `clientInfo` and `serverInfo` objects provide identification and versioning information for debugging and compatibility purposes.
In this example, the capability negotiation demonstrates how MCP primitives are declared:
**Client Capabilities**:
* `"elicitation": {}` - The client declares it can work with user interaction requests (can receive `elicitation/create` method calls)
**Server Capabilities**:
* `"tools": {"listChanged": true}` - The server supports the tools primitive AND can send `tools/list_changed` notifications when its tool list changes
* `"resources": {}` - The server also supports the resources primitive (can handle `resources/list` and `resources/read` methods)
After successful initialization, the client sends a notification to indicate it's ready:
```json Notification theme={null}
{
"jsonrpc": "2.0",
"method": "notifications/initialized"
}
```
#### How This Works in AI Applications
During initialization, the AI application's MCP client manager establishes connections to configured servers and stores their capabilities for later use. The application uses this information to determine which servers can provide specific types of functionality (tools, resources, prompts) and whether they support real-time updates.
```python Pseudo-code for AI application initialization theme={null}
# Pseudo Code
async with stdio_client(server_config) as (read, write):
async with ClientSession(read, write) as session:
init_response = await session.initialize()
if init_response.capabilities.tools:
app.register_mcp_server(session, supports_tools=True)
app.set_server_ready(session)
```
<CodeGroup>
  ```json Tools List Request theme={null}
  {
    "jsonrpc": "2.0",
    "id": 2,
    "method": "tools/list"
  }
  ```

  ```json Tools List Response theme={null}
  {
    "jsonrpc": "2.0",
    "id": 2,
    "result": {
      "tools": [
        {
          "name": "calculator_arithmetic",
          "title": "Calculator",
          "description": "Perform mathematical calculations including basic arithmetic, trigonometric functions, and algebraic operations",
          "inputSchema": {
            "type": "object",
            "properties": {
              "expression": {
                "type": "string",
                "description": "Mathematical expression to evaluate (e.g., '2 + 3 * 4', 'sin(30)', 'sqrt(16)')"
              }
            },
            "required": ["expression"]
          }
        },
        {
          "name": "weather_current",
          "title": "Weather Information",
          "description": "Get current weather information for any location worldwide",
          "inputSchema": {
            "type": "object",
            "properties": {
              "location": {
                "type": "string",
                "description": "City name, address, or coordinates (latitude,longitude)"
              },
              "units": {
                "type": "string",
                "enum": ["metric", "imperial", "kelvin"],
                "description": "Temperature units to use in response",
                "default": "metric"
              }
            },
            "required": ["location"]
          }
        }
      ]
    }
  }
  ```
</CodeGroup>

#### Understanding the Tool Discovery Request

The `tools/list` request is simple, containing no parameters.

#### Understanding the Tool Discovery Response

The response contains a `tools` array that provides comprehensive metadata about each available tool. This array-based structure allows servers to expose multiple tools simultaneously while maintaining clear boundaries between different functionalities.

Each tool object in the response includes several key fields:

* **`name`**: A unique identifier for the tool within the server's namespace. This serves as the primary key for tool execution and should follow a clear naming pattern (e.g., `calculator_arithmetic` rather than just `calculate`)
* **`title`**: A human-readable display name for the tool that clients can show to users
* **`description`**: Detailed explanation of what the tool does and when to use it
* **`inputSchema`**: A JSON Schema that defines the expected input parameters, enabling type validation and providing clear documentation about required and optional parameters

#### How This Works in AI Applications

The AI application fetches available tools from all connected MCP servers and combines them into a unified tool registry that the language model can access. This allows the LLM to understand what actions it can perform and automatically generates the appropriate tool calls during conversations.

```python Pseudo-code for AI application tool discovery theme={null}
# Pseudo-code using MCP Python SDK patterns
available_tools = []
for session in app.mcp_server_sessions():
    tools_response = await session.list_tools()
    available_tools.extend(tools_response.tools)
conversation.register_available_tools(available_tools)
```
#### Understanding the Tool Execution Request

The `tools/call` request follows a structured format that ensures type safety and clear communication between client and server. Note that we're using the proper tool name from the discovery response (`weather_current`) rather than a simplified name:

<CodeGroup>
  ```json Tool Call Request theme={null}
  {
    "jsonrpc": "2.0",
    "id": 3,
    "method": "tools/call",
    "params": {
      "name": "weather_current",
      "arguments": {
        "location": "San Francisco",
        "units": "imperial"
      }
    }
  }
  ```

  ```json Tool Call Response theme={null}
  {
    "jsonrpc": "2.0",
    "id": 3,
    "result": {
      "content": [
        {
          "type": "text",
          "text": "Current weather in San Francisco: 68°F, partly cloudy with light winds from the west at 8 mph. Humidity: 65%"
        }
      ]
    }
  }
  ```
</CodeGroup>

#### Key Elements of Tool Execution

The request structure includes several important components:

1. **`name`**: Must match exactly the tool name from the discovery response (`weather_current`). This ensures the server can correctly identify which tool to execute.

2. **`arguments`**: Contains the input parameters as defined by the tool's `inputSchema`. In this example:
   * `location`: "San Francisco" (required parameter)
   * `units`: "imperial" (optional parameter, defaults to "metric" if not specified)

3. **JSON-RPC Structure**: Uses standard JSON-RPC 2.0 format with unique `id` for request-response correlation.

#### Understanding the Tool Execution Response

The response demonstrates MCP's flexible content system:

1. **`content` Array**: Tool responses return an array of content objects, allowing for rich, multi-format responses (text, images, resources, etc.)

2. **Content Types**: Each content object has a `type` field. In this example, `"type": "text"` indicates plain text content, but MCP supports various content types for different use cases.

3. **Structured Output**: The response provides actionable information that the AI application can use as context for language model interactions.

This execution pattern allows AI applications to dynamically invoke server functionality and receive structured responses that can be integrated into conversations with language models.

#### How This Works in AI Applications

When the language model decides to use a tool during a conversation, the AI application intercepts the tool call, routes it to the appropriate MCP server, executes it, and returns the results back to the LLM as part of the conversation flow. This enables the LLM to access real-time data and perform actions in the external world.

```python  theme={null}
# Pseudo-code for AI application tool execution
async def handle_tool_call(conversation, tool_name, arguments):
    session = app.find_mcp_session_for_tool(tool_name)
    result = await session.call_tool(tool_name, arguments)
    conversation.add_tool_result(result.content)
```
#### Understanding Tool List Change Notifications

When the server's available tools change—such as when new functionality becomes available, existing tools are modified, or tools become temporarily unavailable—the server can proactively notify connected clients:

```json Request theme={null}
{
  "jsonrpc": "2.0",
  "method": "notifications/tools/list_changed"
}
```

#### Key Features of MCP Notifications

1. **No Response Required**: Notice there's no `id` field in the notification. This follows JSON-RPC 2.0 notification semantics where no response is expected or sent.

2. **Capability-Based**: This notification is only sent by servers that declared `"listChanged": true` in their tools capability during initialization (as shown in Step 1).

3. **Event-Driven**: The server decides when to send notifications based on internal state changes, making MCP connections dynamic and responsive.

#### Client Response to Notifications

Upon receiving this notification, the client typically reacts by requesting the updated tool list. This creates a refresh cycle that keeps the client's understanding of available tools current:

```json Request theme={null}
{
  "jsonrpc": "2.0",
  "id": 4,
  "method": "tools/list"
}
```

#### Why Notifications Matter

This notification system is crucial for several reasons:

1. **Dynamic Environments**: Tools may come and go based on server state, external dependencies, or user permissions
2. **Efficiency**: Clients don't need to poll for changes; they're notified when updates occur
3. **Consistency**: Ensures clients always have accurate information about available server capabilities
4. **Real-time Collaboration**: Enables responsive AI applications that can adapt to changing contexts

This notification pattern extends beyond tools to other MCP primitives, enabling comprehensive real-time synchronization between clients and servers.

#### How This Works in AI Applications

When the AI application receives a notification about changed tools, it immediately refreshes its tool registry and updates the LLM's available capabilities. This ensures that ongoing conversations always have access to the most current set of tools, and the LLM can dynamically adapt to new functionality as it becomes available.

```python  theme={null}
# Pseudo-code for AI application notification handling
async def handle_tools_changed_notification(session):
    tools_response = await session.list_tools()
    app.update_available_tools(session, tools_response.tools)
    if app.conversation.is_active():
        app.conversation.notify_llm_of_new_capabilities()
```
MCP servers are programs that expose specific capabilities to AI applications through standardized protocol interfaces.
Common examples include file system servers for document access, database servers for data queries, GitHub servers for code management, Slack servers for team communication, and calendar servers for scheduling.
Servers provide functionality through three building blocks:
| Feature | Explanation | Examples | Who controls it |
|---|---|---|---|
| Tools | Functions that your LLM can actively call, and decides when to use them based on user requests. Tools can write to databases, call external APIs, modify files, or trigger other logic. | Search flights Send messages Create calendar events |
Model |
| Resources | Passive data sources that provide read-only access to information for context, such as file contents, database schemas, or API documentation. | Retrieve documents Access knowledge bases Read calendars |
Application |
| Prompts | Pre-built instruction templates that tell the model to work with specific tools and resources. | Plan a vacation Summarize my meetings Draft an email |
User |
We will use a hypothetical scenario to demonstrate the role of each of these features, and show how they can work together.
Tools enable AI models to perform actions. Each tool defines a specific operation with typed inputs and outputs. The model requests tool execution based on context.
Tools are schema-defined interfaces that LLMs can invoke. MCP uses JSON Schema for validation. Each tool performs a single operation with clearly defined inputs and outputs. Tools may require user consent prior to execution, helping to ensure users maintain control over actions taken by a model.
Protocol operations:
| Method | Purpose | Returns |
|---|---|---|
tools/list |
Discover available tools | Array of tool definitions with schemas |
tools/call |
Execute a specific tool | Tool execution result |
Example tool definition:
{
  name: "searchFlights",
  description: "Search for available flights",
  inputSchema: {
    type: "object",
    properties: {
      origin: { type: "string", description: "Departure city" },
      destination: { type: "string", description: "Arrival city" },
      date: { type: "string", format: "date", description: "Travel date" }
    },
    required: ["origin", "destination", "date"]
  }
}Tools enable AI applications to perform actions on behalf of users. In a travel planning scenario, the AI application might use several tools to help book a vacation:
Flight Search
searchFlights(origin: "NYC", destination: "Barcelona", date: "2024-06-15")
Queries multiple airlines and returns structured flight options.
Calendar Blocking
createCalendarEvent(title: "Barcelona Trip", startDate: "2024-06-15", endDate: "2024-06-22")
Marks the travel dates in the user's calendar.
Email notification
sendEmail(to: "team@work.com", subject: "Out of Office", body: "...")
Sends an automated out-of-office message to colleagues.
Tools are model-controlled, meaning AI models can discover and invoke them automatically. However, MCP emphasizes human oversight through several mechanisms.
For trust and safety, applications can implement user control through various mechanisms, such as:
- Displaying available tools in the UI, enabling users to define whether a tool should be made available in specific interactions
- Approval dialogs for individual tool executions
- Permission settings for pre-approving certain safe operations
- Activity logs that show all tool executions with their results
Resources provide structured access to information that the AI application can retrieve and provide to models as context.
Resources expose data from files, APIs, databases, or any other source that an AI needs to understand context. Applications can access this information directly and decide how to use it - whether that's selecting relevant portions, searching with embeddings, or passing it all to the model.
Each resource has a unique URI (like file:///path/to/document.md) and declares its MIME type for appropriate content handling. They declare MIME types for appropriate content handling and support two discovery patterns:
- Direct Resources - fixed URIs that point to specific data. Example:
calendar://events/2024- returns calendar availability for 2024 - Resource Templates - dynamic URIs with parameters for flexible queries. Example:
travel://activities/{city}/{category}- returns activities by city and categorytravel://activities/barcelona/museums- returns all museums in Barcelona
Resource Templates include metadata such as title, description, and expected MIME type, making them discoverable and self-documenting.
Protocol operations:
| Method | Purpose | Returns |
|---|---|---|
resources/list |
List available direct resources | Array of resource descriptors |
resources/templates/list |
Discover resource templates | Array of resource template definitions |
resources/read |
Retrieve resource contents | Resource data with metadata |
resources/subscribe |
Monitor resource changes | Subscription confirmation |
Continuing with the travel planning example, resources provide the AI application with access to relevant information:
- Calendar data (
calendar://events/2024) - Checks user availability - Travel documents (
file:///Documents/Travel/passport.pdf) - Accesses important documents - Previous itineraries (
trips://history/barcelona-2023) - References past trips and preferences
The AI application retrieves these resources and decides how to process them, whether selecting a subset of data using embeddings or keyword search, or passing raw data directly to the model.
In this case, it provides calendar data, weather information, and travel preferences to the model, enabling it to check availability, look up weather patterns, and reference past travel preferences.
Resource Template Examples:
{
  "uriTemplate": "weather://forecast/{city}/{date}",
  "name": "weather-forecast",
  "title": "Weather Forecast",
  "description": "Get weather forecast for any city and date",
  "mimeType": "application/json"
}

{
  "uriTemplate": "travel://flights/{origin}/{destination}",
  "name": "flight-search",
  "title": "Flight Search",
  "description": "Search available flights between cities",
  "mimeType": "application/json"
}
These templates enable flexible queries. For weather data, users can access forecasts for any city/date combination. For flights, they can search routes between any two airports. When a user has input "NYC" as the origin airport and begins to input "Bar" as the destination airport, the system can suggest "Barcelona (BCN)" or "Barbados (BGI)".
Dynamic resources support parameter completion. For example:
- Typing "Par" as input for
weather://forecast/{city}might suggest "Paris" or "Park City" - Typing "JFK" for
flights://search/{airport}might suggest "JFK - John F. Kennedy International"
The system helps discover valid values without requiring exact format knowledge.
Resources are application-driven, giving them flexibility in how they retrieve, process, and present available context. Common interaction patterns include:
- Tree or list views for browsing resources in familiar folder-like structures
- Search and filter interfaces for finding specific resources
- Automatic context inclusion or smart suggestions based on heuristics or AI selection
- Manual or bulk selection interfaces for including single or multiple resources
Applications are free to implement resource discovery through any interface pattern that suits their needs. The protocol doesn't mandate specific UI patterns, allowing for resource pickers with preview capabilities, smart suggestions based on current conversation context, bulk selection for including multiple resources, or integration with existing file browsers and data explorers.
Prompts provide reusable templates. They allow MCP server authors to provide parameterized prompts for a domain, or showcase how to best use the MCP server.
Prompts are structured templates that define expected inputs and interaction patterns. They are user-controlled, requiring explicit invocation rather than automatic triggering. Prompts can be context-aware, referencing available resources and tools to create comprehensive workflows. Similar to resources, prompts support parameter completion to help users discover valid argument values.
Protocol operations:
| Method | Purpose | Returns |
|---|---|---|
prompts/list |
Discover available prompts | Array of prompt descriptors |
prompts/get |
Retrieve prompt details | Full prompt definition with arguments |
Prompts provide structured templates for common tasks. In the travel planning context:
"Plan a vacation" prompt:
{
  "name": "plan-vacation",
  "title": "Plan a vacation",
  "description": "Guide through vacation planning process",
  "arguments": [
    { "name": "destination", "type": "string", "required": true },
    { "name": "duration", "type": "number", "description": "days" },
    { "name": "budget", "type": "number", "required": false },
    { "name": "interests", "type": "array", "items": { "type": "string" } }
  ]
}
Rather than unstructured natural language input, the prompt system enables:
- Selection of the "Plan a vacation" template
- Structured input: Barcelona, 7 days, $3000, ["beaches", "architecture", "food"]
- Consistent workflow execution based on the template
Prompts are user-controlled, requiring explicit invocation. The protocol gives implementers freedom to design interfaces that feel natural within their application. Key principles include:
- Easy discovery of available prompts
- Clear descriptions of what each prompt does
- Natural argument input with validation
- Transparent display of the prompt's underlying template
Applications typically expose prompts through various UI patterns such as:
- Slash commands (typing "/" to see available prompts like /plan-vacation)
- Command palettes for searchable access
- Dedicated UI buttons for frequently used prompts
- Context menus that suggest relevant prompts
The real power of MCP emerges when multiple servers work together, combining their specialized capabilities through a unified interface.
Consider a personalized AI travel planner application, with three connected servers:
- Travel Server - Handles flights, hotels, and itineraries
- Weather Server - Provides climate data and forecasts
- Calendar/Email Server - Manages schedules and communications
-
User invokes a prompt with parameters:
{ "prompt": "plan-vacation", "arguments": { "destination": "Barcelona", "departure_date": "2024-06-15", "return_date": "2024-06-22", "budget": 3000, "travelers": 2 } } -
User selects resources to include:
calendar://my-calendar/June-2024(from Calendar Server)travel://preferences/europe(from Travel Server)travel://past-trips/Spain-2023(from Travel Server)
-
AI processes the request using tools:
The AI first reads all selected resources to gather context - identifying available dates from the calendar, learning preferred airlines and hotel types from travel preferences, and discovering previously enjoyed locations from past trips.
Using this context, the AI then executes a series of Tools:
searchFlights()- Queries airlines for NYC to Barcelona flightscheckWeather()- Retrieves climate forecasts for travel dates
The AI then uses this information to create the booking and following steps, requesting approval from the user where necessary:
bookHotel()- Finds hotels within the specified budgetcreateCalendarEvent()- Adds the trip to the user's calendarsendEmail()- Sends confirmation with trip details
The result: Through multiple MCP servers, the user researched and booked a Barcelona trip tailored to their schedule. The "Plan a Vacation" prompt guided the AI to combine Resources (calendar availability and travel history) with Tools (searching flights, booking hotels, updating calendars) across different servers—gathering context and executing the booking. A task that could've taken hours was completed in minutes using MCP.
MCP clients are instantiated by host applications to communicate with particular MCP servers. The host application, like Claude.ai or an IDE, manages the overall user experience and coordinates multiple clients. Each client handles one direct communication with one server.
Understanding the distinction is important: the host is the application users interact with, while clients are the protocol-level components that enable server connections.
In addition to making use of context provided by servers, clients may provide several features to servers. These client features allow server authors to build richer interactions.
| Feature | Explanation | Example |
|---|---|---|
| Sampling | Sampling allows servers to request LLM completions through the client, enabling an agentic workflow. This approach puts the client in complete control of user permissions and security measures. | A server for booking travel may send a list of flights to an LLM and request that the LLM pick the best flight for the user. |
| Roots | Roots allow clients to specify which directories servers should focus on, communicating intended scope through a coordination mechanism. | A server for booking travel may be given access to a specific directory, from which it can read a user's calendar. |
| Elicitation | Elicitation enables servers to request specific information from users during interactions, providing a structured way for servers to gather information on demand. | A server booking travel may ask for the user's preferences on airplane seats, room type or their contact number to finalise a booking. |
Elicitation enables servers to request specific information from users during interactions, creating more dynamic and responsive workflows.
Elicitation provides a structured way for servers to gather necessary information on demand. Instead of requiring all information up front or failing when data is missing, servers can pause their operations to request specific inputs from users. This creates more flexible interactions where servers adapt to user needs rather than following rigid patterns.
Elicitation flow:
sequenceDiagram
    participant User
    participant Client
    participant Server

    Note over Server,Client: Server initiates elicitation
    Server->>Client: elicitation/create

    Note over Client,User: Human interaction
    Client->>User: Present elicitation UI
    User-->>Client: Provide requested information

    Note over Server,Client: Complete request
    Client-->>Server: Return user response

    Note over Server: Continue processing with new information
The flow enables dynamic information gathering. Servers can request specific data when needed, users provide information through appropriate UI, and servers continue processing with the newly acquired context.
Elicitation components example:
{
  method: "elicitation/requestInput",
  params: {
    message: "Please confirm your Barcelona vacation booking details:",
    schema: {
      type: "object",
      properties: {
        confirmBooking: {
          type: "boolean",
          description: "Confirm the booking (Flights + Hotel = $3,000)"
        },
        seatPreference: {
          type: "string",
          enum: ["window", "aisle", "no preference"],
          description: "Preferred seat type for flights"
        },
        roomType: {
          type: "string",
          enum: ["sea view", "city view", "garden view"],
          description: "Preferred room type at hotel"
        },
        travelInsurance: {
          type: "boolean",
          default: false,
          description: "Add travel insurance ($150)"
        }
      },
      required: ["confirmBooking"]
    }
  }
}A travel booking server demonstrates elicitation's power through the final booking confirmation process. When a user has selected their ideal vacation package to Barcelona, the server needs to gather final approval and any missing details before proceeding.
The server elicits booking confirmation with a structured request that includes the trip summary (Barcelona flights June 15-22, beachfront hotel, total $3,000) and fields for any additional preferences—such as seat selection, room type, or travel insurance options.
As the booking progresses, the server elicits contact information needed to complete the reservation. It might ask for traveler details for flight bookings, special requests for the hotel, or emergency contact information.
Elicitation interactions are designed to be clear, contextual, and respectful of user autonomy:
Request presentation: Clients display elicitation requests with clear context about which server is asking, why the information is needed, and how it will be used. The request message explains the purpose while the schema provides structure and validation.
Response options: Users can provide the requested information through appropriate UI controls (text fields, dropdowns, checkboxes), decline to provide information with optional explanation, or cancel the entire operation. Clients validate responses against the provided schema before returning them to servers.
Privacy considerations: Elicitation never requests passwords or API keys. Clients warn about suspicious requests and let users review data before sending.
Roots define filesystem boundaries for server operations, allowing clients to specify which directories servers should focus on.
Roots are a mechanism for clients to communicate filesystem access boundaries to servers. They consist of file URIs that indicate directories where servers can operate, helping servers understand the scope of available files and folders. Rather than giving servers unrestricted filesystem access, roots guide them to relevant working directories. While roots communicate intended boundaries, actual security is always maintained by the client's access controls.
Root structure:
{
  "uri": "file:///Users/agent/travel-planning",
  "name": "Travel Planning Workspace"
}
Roots are exclusively filesystem paths and always use the file:// URI scheme. They help servers understand project boundaries, workspace organization, and accessible directories. The roots list can be updated dynamically as users work with different projects or folders, with servers receiving notifications through roots/list_changed when boundaries change.
A travel agent working with multiple client trips benefits from roots to organize filesystem access. Consider a workspace with different directories for various aspects of travel planning.
The client provides filesystem roots to the travel planning server:
file:///Users/agent/travel-planning- Main workspace containing all travel filesfile:///Users/agent/travel-templates- Reusable itinerary templates and resourcesfile:///Users/agent/client-documents- Client passports and travel documents
When the agent creates a Barcelona itinerary, well-behaved servers respect these boundaries—accessing templates, saving the new itinerary, and referencing client documents within the specified roots. Servers typically access files within roots by using relative paths from the root directories or by utilizing file search tools that respect the root boundaries.
If the agent opens an archive folder like file:///Users/agent/archive/2023-trips, the client updates the roots list via roots/list_changed.
For a complete implementation of a server that respects roots, see the filesystem server in the official servers repository.
Roots serve as a coordination mechanism between clients and servers, not a security boundary. The specification requires that servers "SHOULD respect root boundaries," and not that they "MUST enforce" them, because servers run code the client cannot control. This design is pragmatic: clients enforce security while roots communicate intent.
Roots work best when servers are trusted or vetted, users understand their advisory nature, and the goal is preventing accidents rather than stopping malicious behavior. They excel at context scoping (telling servers where to focus), accident prevention (helping well-behaved servers stay in bounds), and workflow organization (such as managing project boundaries automatically).
Roots are typically managed automatically by host applications based on user actions, though some applications may expose manual root management:
Automatic root detection: When users open folders, clients automatically expose them as roots. Opening a travel workspace allows the client to expose that directory as a root, helping servers understand which itineraries and documents are in scope for the current work.
Manual root configuration: Advanced users can specify roots through configuration. For example, adding /travel-templates for reusable resources while excluding directories with financial records.
Sampling allows servers to request language model completions through the client, enabling agentic behaviors while maintaining security and user control.
Sampling enables servers to perform AI-dependent tasks without directly integrating with or paying for AI models. Instead, servers can request that the client—which already has AI model access—handle these tasks on their behalf. This approach puts the client in complete control of user permissions and security measures. Because sampling requests occur within the context of other operations—like a tool analyzing data—and are processed as separate model calls, they maintain clear boundaries between different contexts, allowing for more efficient use of the context window.
Sampling flow:
sequenceDiagram
    participant LLM
    participant User
    participant Client
    participant Server

    Note over Server,Client: Server initiates sampling
    Server->>Client: sampling/createMessage

    Note over Client,User: Human-in-the-loop review
    Client->>User: Present request for approval
    User-->>Client: Review and approve/modify

    Note over Client,LLM: Model interaction
    Client->>LLM: Forward approved request
    LLM-->>Client: Return generation

    Note over Client,User: Response review
    Client->>User: Present response for approval
    User-->>Client: Review and approve/modify

    Note over Server,Client: Complete request
    Client-->>Server: Return approved response
The flow ensures security through multiple human-in-the-loop checkpoints. Users review and can modify both the initial request and the generated response before it returns to the server.
Request parameters example:
{
  messages: [
    {
      role: "user",
      content: "Analyze these flight options and recommend the best choice:\n" +
               "[47 flights with prices, times, airlines, and layovers]\n" +
               "User preferences: morning departure, max 1 layover"
    }
  ],
  modelPreferences: {
    hints: [{
      name: "claude-3-5-sonnet"  // Suggested model
    }],
    costPriority: 0.3,      // Less concerned about API cost
    speedPriority: 0.2,     // Can wait for thorough analysis
    intelligencePriority: 0.9  // Need complex trade-off evaluation
  },
  systemPrompt: "You are a travel expert helping users find the best flights based on their preferences",
  maxTokens: 1500
}Consider a travel booking server with a tool called findBestFlight that uses sampling to analyze available flights and recommend the optimal choice. When a user asks "Book me the best flight to Barcelona next month," the tool needs AI assistance to evaluate complex trade-offs.
The tool queries airline APIs and gathers 47 flight options. It then requests AI assistance to analyze these options: "Analyze these flight options and recommend the best choice: [47 flights with prices, times, airlines, and layovers] User preferences: morning departure, max 1 layover."
The client initiates the sampling request, allowing the AI to evaluate trade-offs—like cheaper red-eye flights versus convenient morning departures. The tool uses this analysis to present the top three recommendations.
While not a requirement, sampling is designed to allow human-in-the-loop control. Users can maintain oversight through several mechanisms:
Approval controls: Sampling requests may require explicit user consent. Clients can show what the server wants to analyze and why. Users can approve, deny, or modify requests.
Transparency features: Clients can display the exact prompt, model selection, and token limits, allowing users to review AI responses before they return to the server.
Configuration options: Users can set model preferences, configure auto-approval for trusted operations, or require approval for everything. Clients may provide options to redact sensitive information.
Security considerations: Both clients and servers must handle sensitive data appropriately during sampling. Clients should implement rate limiting and validate all message content. The human-in-the-loop design ensures that server-initiated AI interactions cannot compromise security or access sensitive data without explicit user consent.
The Model Context Protocol uses string-based version identifiers following the format
YYYY-MM-DD, to indicate the last date backwards incompatible changes were made.
Revisions may be marked as:
- Draft: in-progress specifications, not yet ready for consumption.
- Current: the current protocol version, which is ready for use and may continue to receive backwards compatible changes.
- Final: past, complete specifications that will not be changed.
The current protocol version is 2025-06-18.
Version negotiation happens during initialization. Clients and servers MAY support multiple protocol versions simultaneously, but they MUST agree on a single version to use for the session.
The protocol provides appropriate error handling if version negotiation fails, allowing clients to gracefully terminate connections when they cannot find a version compatible with the server.
Learn how to extend Claude Desktop with local MCP servers to enable file system access and other powerful integrations
Model Context Protocol (MCP) servers extend AI applications' capabilities by providing secure, controlled access to local resources and tools. Many clients support MCP, enabling diverse integration possibilities across different platforms and applications.
This guide demonstrates how to connect to local MCP servers using Claude Desktop as an example, one of the many clients that support MCP. While we focus on Claude Desktop's implementation, the concepts apply broadly to other MCP-compatible clients. By the end of this tutorial, Claude will be able to interact with files on your computer, create new documents, organize folders, and search through your file system—all with your explicit permission for each action.

Before starting this tutorial, ensure you have the following installed on your system:
Download and install Claude Desktop for your operating system. Claude Desktop is currently available for macOS and Windows. Linux support is coming soon.
If you already have Claude Desktop installed, verify you're running the latest version by clicking the Claude menu and selecting "Check for Updates..."
The Filesystem Server and many other MCP servers require Node.js to run. Verify your Node.js installation by opening a terminal or command prompt and running:
node --versionIf Node.js is not installed, download it from nodejs.org. We recommend the LTS (Long Term Support) version for stability.
MCP servers are programs that run on your computer and provide specific capabilities to Claude Desktop through a standardized protocol. Each server exposes tools that Claude can use to perform actions, with your approval. The Filesystem Server we'll install provides tools for:
- Reading file contents and directory structures
- Creating new files and directories
- Moving and renaming files
- Searching for files by name or content
All actions require your explicit approval before execution, ensuring you maintain full control over what Claude can access and modify.
The process involves configuring Claude Desktop to automatically start the Filesystem Server whenever you launch the application. This configuration is done through a JSON file that tells Claude Desktop which servers to run and how to connect to them.
Start by accessing the Claude Desktop settings. Click on the Claude menu in your system's menu bar (not the settings within the Claude window itself) and select "Settings..."On macOS, this appears in the top menu bar:
<Frame style={{ textAlign: "center" }}>
<img src="https://mintcdn.com/mcp/4ZXF1PrDkEaJvXpn/images/quickstart-menu.png?fit=max&auto=format&n=4ZXF1PrDkEaJvXpn&q=85&s=0c8b57e0e17af3624b6762a3ea944c8e" width="400" alt="Claude Desktop menu showing Settings option" data-og-width="644" data-og-height="568" data-path="images/quickstart-menu.png" data-optimize="true" data-opv="3" srcset="https://mintcdn.com/mcp/4ZXF1PrDkEaJvXpn/images/quickstart-menu.png?w=280&fit=max&auto=format&n=4ZXF1PrDkEaJvXpn&q=85&s=f997b6f31398840d3a824fa0eb9fec43 280w, https://mintcdn.com/mcp/4ZXF1PrDkEaJvXpn/images/quickstart-menu.png?w=560&fit=max&auto=format&n=4ZXF1PrDkEaJvXpn&q=85&s=062b0b3c342e4e02a8f2d690a48bcb24 560w, https://mintcdn.com/mcp/4ZXF1PrDkEaJvXpn/images/quickstart-menu.png?w=840&fit=max&auto=format&n=4ZXF1PrDkEaJvXpn&q=85&s=ae9b08052b7ea30b31d27432d8edf19e 840w, https://mintcdn.com/mcp/4ZXF1PrDkEaJvXpn/images/quickstart-menu.png?w=1100&fit=max&auto=format&n=4ZXF1PrDkEaJvXpn&q=85&s=7962cc4fb841fa0a04a3c6de03cf4d3d 1100w, https://mintcdn.com/mcp/4ZXF1PrDkEaJvXpn/images/quickstart-menu.png?w=1650&fit=max&auto=format&n=4ZXF1PrDkEaJvXpn&q=85&s=86bd79431e35b133d0ae4f74265f3d60 1650w, https://mintcdn.com/mcp/4ZXF1PrDkEaJvXpn/images/quickstart-menu.png?w=2500&fit=max&auto=format&n=4ZXF1PrDkEaJvXpn&q=85&s=1b300ae527efb4744aa08d5df94299a0 2500w" />
</Frame>
This opens the Claude Desktop configuration window, which is separate from your Claude account settings.
Click the "Edit Config" button to open the configuration file:

<Frame>
  <img src="https://mintcdn.com/mcp/4ZXF1PrDkEaJvXpn/images/quickstart-developer.png?fit=max&auto=format&n=4ZXF1PrDkEaJvXpn&q=85&s=0fb595490a2f9e15c0301e771a57446c" alt="Developer settings showing Edit Config button" data-og-width="1688" width="1688" data-og-height="534" height="534" data-path="images/quickstart-developer.png" data-optimize="true" data-opv="3" srcset="https://mintcdn.com/mcp/4ZXF1PrDkEaJvXpn/images/quickstart-developer.png?w=280&fit=max&auto=format&n=4ZXF1PrDkEaJvXpn&q=85&s=0a7e615ee50a27a4e514668f7cbd9f57 280w, https://mintcdn.com/mcp/4ZXF1PrDkEaJvXpn/images/quickstart-developer.png?w=560&fit=max&auto=format&n=4ZXF1PrDkEaJvXpn&q=85&s=16d6d4721219afd7e2bfa41f0795e7e0 560w, https://mintcdn.com/mcp/4ZXF1PrDkEaJvXpn/images/quickstart-developer.png?w=840&fit=max&auto=format&n=4ZXF1PrDkEaJvXpn&q=85&s=612b1de5516ed7321d5b6939b5b3c823 840w, https://mintcdn.com/mcp/4ZXF1PrDkEaJvXpn/images/quickstart-developer.png?w=1100&fit=max&auto=format&n=4ZXF1PrDkEaJvXpn&q=85&s=840a428450dc0ec97538eb4e05050bcd 1100w, https://mintcdn.com/mcp/4ZXF1PrDkEaJvXpn/images/quickstart-developer.png?w=1650&fit=max&auto=format&n=4ZXF1PrDkEaJvXpn&q=85&s=59ae3a95918ff7f7b15e777c2d606496 1650w, https://mintcdn.com/mcp/4ZXF1PrDkEaJvXpn/images/quickstart-developer.png?w=2500&fit=max&auto=format&n=4ZXF1PrDkEaJvXpn&q=85&s=7838d7f023a281053786870336914f03 2500w" />
</Frame>

This action creates a new configuration file if one doesn't exist, or opens your existing configuration. The file is located at:

* **macOS**: `~/Library/Application Support/Claude/claude_desktop_config.json`
* **Windows**: `%APPDATA%\Claude\claude_desktop_config.json`
<CodeGroup>
  ```json macOS theme={null}
  {
    "mcpServers": {
      "filesystem": {
        "command": "npx",
        "args": [
          "-y",
          "@modelcontextprotocol/server-filesystem",
          "/Users/username/Desktop",
          "/Users/username/Downloads"
        ]
      }
    }
  }
  ```

  ```json Windows theme={null}
  {
    "mcpServers": {
      "filesystem": {
        "command": "npx",
        "args": [
          "-y",
          "@modelcontextprotocol/server-filesystem",
          "C:\\Users\\username\\Desktop",
          "C:\\Users\\username\\Downloads"
        ]
      }
    }
  }
  ```
</CodeGroup>

Replace `username` with your actual computer username. The paths listed in the `args` array specify which directories the Filesystem Server can access. You can modify these paths or add additional directories as needed.

<Tip>
  **Understanding the Configuration**

  * `"filesystem"`: A friendly name for the server that appears in Claude Desktop
  * `"command": "npx"`: Uses Node.js's npx tool to run the server
  * `"-y"`: Automatically confirms the installation of the server package
  * `"@modelcontextprotocol/server-filesystem"`: The package name of the Filesystem Server
  * The remaining arguments: Directories the server is allowed to access
</Tip>

<Warning>
  **Security Consideration**

  Only grant access to directories you're comfortable with Claude reading and modifying. The server runs with your user account permissions, so it can perform any file operations you can perform manually.
</Warning>
Upon successful restart, you'll see an MCP server indicator <img src="https://mintcdn.com/mcp/4ZXF1PrDkEaJvXpn/images/claude-desktop-mcp-slider.svg?fit=max&auto=format&n=4ZXF1PrDkEaJvXpn&q=85&s=2742ec3fb97067e8591e68546c90221e" style={{display: 'inline', margin: 0, height: '1.3em'}} data-og-width="24" width="24" data-og-height="24" height="24" data-path="images/claude-desktop-mcp-slider.svg" data-optimize="true" data-opv="3" srcset="https://mintcdn.com/mcp/4ZXF1PrDkEaJvXpn/images/claude-desktop-mcp-slider.svg?w=280&fit=max&auto=format&n=4ZXF1PrDkEaJvXpn&q=85&s=52839f8519f476623c4fb5bb87ee24bd 280w, https://mintcdn.com/mcp/4ZXF1PrDkEaJvXpn/images/claude-desktop-mcp-slider.svg?w=560&fit=max&auto=format&n=4ZXF1PrDkEaJvXpn&q=85&s=f0491976e108286441fc6554309c5c4f 560w, https://mintcdn.com/mcp/4ZXF1PrDkEaJvXpn/images/claude-desktop-mcp-slider.svg?w=840&fit=max&auto=format&n=4ZXF1PrDkEaJvXpn&q=85&s=08e83eb102eda755a7db1eb27d16ebff 840w, https://mintcdn.com/mcp/4ZXF1PrDkEaJvXpn/images/claude-desktop-mcp-slider.svg?w=1100&fit=max&auto=format&n=4ZXF1PrDkEaJvXpn&q=85&s=2524a80752928b0206e68e8e1890d1aa 1100w, https://mintcdn.com/mcp/4ZXF1PrDkEaJvXpn/images/claude-desktop-mcp-slider.svg?w=1650&fit=max&auto=format&n=4ZXF1PrDkEaJvXpn&q=85&s=3c0dc88dadad5ed8e8af316965d00e0b 1650w, https://mintcdn.com/mcp/4ZXF1PrDkEaJvXpn/images/claude-desktop-mcp-slider.svg?w=2500&fit=max&auto=format&n=4ZXF1PrDkEaJvXpn&q=85&s=702363a955a631c40c342f9557d5cfdd 2500w" /> in the bottom-right corner of the conversation input box:

<Frame>
  <img src="https://mintcdn.com/mcp/4ZXF1PrDkEaJvXpn/images/quickstart-slider.png?fit=max&auto=format&n=4ZXF1PrDkEaJvXpn&q=85&s=f80a38b720fc0519079bae26e2aae312" alt="Claude Desktop interface showing MCP server indicator" data-og-width="1414" width="1414" data-og-height="410" height="410" data-path="images/quickstart-slider.png" data-optimize="true" data-opv="3" srcset="https://mintcdn.com/mcp/4ZXF1PrDkEaJvXpn/images/quickstart-slider.png?w=280&fit=max&auto=format&n=4ZXF1PrDkEaJvXpn&q=85&s=24a0dc6f30664e953cc185ed0c7abc64 280w, https://mintcdn.com/mcp/4ZXF1PrDkEaJvXpn/images/quickstart-slider.png?w=560&fit=max&auto=format&n=4ZXF1PrDkEaJvXpn&q=85&s=d670a5fd82405775d7bc1e5f20a9a847 560w, https://mintcdn.com/mcp/4ZXF1PrDkEaJvXpn/images/quickstart-slider.png?w=840&fit=max&auto=format&n=4ZXF1PrDkEaJvXpn&q=85&s=5f66fa4bcaaf50ca905415f15af2e276 840w, https://mintcdn.com/mcp/4ZXF1PrDkEaJvXpn/images/quickstart-slider.png?w=1100&fit=max&auto=format&n=4ZXF1PrDkEaJvXpn&q=85&s=4aecd3c4b45c3aaac75a118d2d6edda5 1100w, https://mintcdn.com/mcp/4ZXF1PrDkEaJvXpn/images/quickstart-slider.png?w=1650&fit=max&auto=format&n=4ZXF1PrDkEaJvXpn&q=85&s=c7d321e2d25aa34552057a8866782549 1650w, https://mintcdn.com/mcp/4ZXF1PrDkEaJvXpn/images/quickstart-slider.png?w=2500&fit=max&auto=format&n=4ZXF1PrDkEaJvXpn&q=85&s=25dc1761b40b11ccb727b36183efa57f 2500w" />
</Frame>

Click on this indicator to view the available tools provided by the Filesystem Server:

<Frame style={{ textAlign: "center" }}>
  <img src="https://mintcdn.com/mcp/4ZXF1PrDkEaJvXpn/images/quickstart-tools.png?fit=max&auto=format&n=4ZXF1PrDkEaJvXpn&q=85&s=18f045f27f31f40896d3710ce9a4a0a0" width="400" alt="Available filesystem tools in Claude Desktop" data-og-width="978" data-og-height="902" data-path="images/quickstart-tools.png" data-optimize="true" data-opv="3" srcset="https://mintcdn.com/mcp/4ZXF1PrDkEaJvXpn/images/quickstart-tools.png?w=280&fit=max&auto=format&n=4ZXF1PrDkEaJvXpn&q=85&s=298fc5cf79822ee781d15cf6374d8542 280w, https://mintcdn.com/mcp/4ZXF1PrDkEaJvXpn/images/quickstart-tools.png?w=560&fit=max&auto=format&n=4ZXF1PrDkEaJvXpn&q=85&s=c1e39ca66d9191dbe493cdcb52ad3fcb 560w, https://mintcdn.com/mcp/4ZXF1PrDkEaJvXpn/images/quickstart-tools.png?w=840&fit=max&auto=format&n=4ZXF1PrDkEaJvXpn&q=85&s=d797f46eb55126de14328ede4b735967 840w, https://mintcdn.com/mcp/4ZXF1PrDkEaJvXpn/images/quickstart-tools.png?w=1100&fit=max&auto=format&n=4ZXF1PrDkEaJvXpn&q=85&s=fcb9d89b6cef95bf9a3ffcd9231a4026 1100w, https://mintcdn.com/mcp/4ZXF1PrDkEaJvXpn/images/quickstart-tools.png?w=1650&fit=max&auto=format&n=4ZXF1PrDkEaJvXpn&q=85&s=23097f8f8b52a255246aeb83f85f949d 1650w, https://mintcdn.com/mcp/4ZXF1PrDkEaJvXpn/images/quickstart-tools.png?w=2500&fit=max&auto=format&n=4ZXF1PrDkEaJvXpn&q=85&s=0007b81f22a6a9b9a117981091e0221f 2500w" />
</Frame>

If the server indicator doesn't appear, refer to the [Troubleshooting](#troubleshooting) section for debugging steps.
With the Filesystem Server connected, Claude can now interact with your file system. Try these example requests to explore the capabilities:
- "Can you write a poem and save it to my desktop?" - Claude will compose a poem and create a new text file on your desktop
- "What work-related files are in my downloads folder?" - Claude will scan your downloads and identify work-related documents
- "Please organize all images on my desktop into a new folder called 'Images'" - Claude will create a folder and move image files into it
Before executing any file system operation, Claude will request your approval. This ensures you maintain control over all actions:
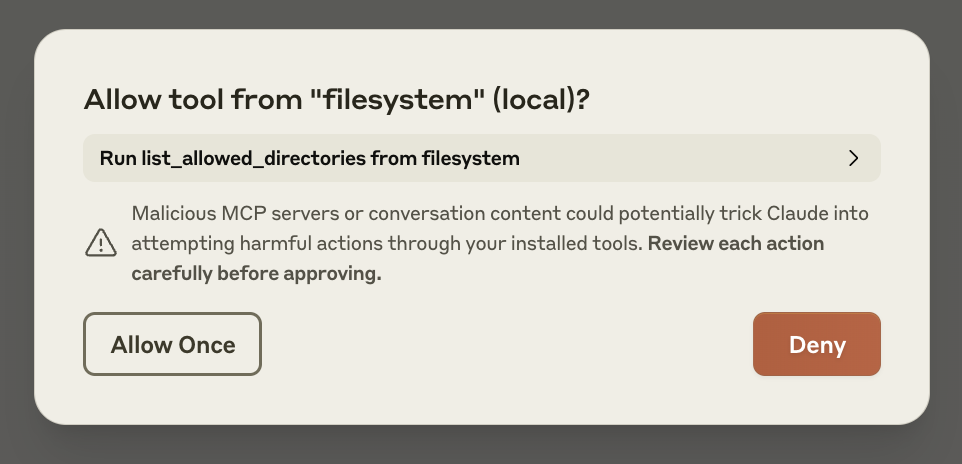
Review each request carefully before approving. You can always deny a request if you're not comfortable with the proposed action.
If you encounter issues setting up or using the Filesystem Server, these solutions address common problems:
1. Restart Claude Desktop completely 2. Check your `claude_desktop_config.json` file syntax 3. Make sure the file paths included in `claude_desktop_config.json` are valid and that they are absolute and not relative 4. Look at [logs](#getting-logs-from-claude-for-desktop) to see why the server is not connecting 5. In your command line, try manually running the server (replacing `username` as you did in `claude_desktop_config.json`) to see if you get any errors:<CodeGroup>
```bash macOS/Linux theme={null}
npx -y @modelcontextprotocol/server-filesystem /Users/username/Desktop /Users/username/Downloads
```
```powershell Windows theme={null}
npx -y @modelcontextprotocol/server-filesystem C:\Users\username\Desktop C:\Users\username\Downloads
```
</CodeGroup>
* macOS: `~/Library/Logs/Claude`

* Windows: `%APPDATA%\Claude\logs`

* `mcp.log` will contain general logging about MCP connections and connection failures.

* Files named `mcp-server-SERVERNAME.log` will contain error (stderr) logging from the named server.

You can run the following command to list recent logs and follow along with any new ones (on Windows, it will only show recent logs):

<CodeGroup>
  ```bash macOS/Linux theme={null}
  tail -n 20 -f ~/Library/Logs/Claude/mcp*.log
  ```

  ```powershell Windows theme={null}
  type "%APPDATA%\Claude\logs\mcp*.log"
  ```
</CodeGroup>
1. Check Claude's logs for errors
2. Verify your server builds and runs without errors
3. Try restarting Claude Desktop
```json  theme={null}
{
  "brave-search": {
    "command": "npx",
    "args": ["-y", "@modelcontextprotocol/server-brave-search"],
    "env": {
      "APPDATA": "C:\\Users\\user\\AppData\\Roaming\\",
      "BRAVE_API_KEY": "..."
    }
  }
}
```

With this change in place, launch Claude Desktop once again.

<Warning>
  **NPM should be installed globally**

  The `npx` command may continue to fail if you have not installed NPM globally. If NPM is already installed globally, you will find `%APPDATA%\npm` exists on your system. If not, you can install NPM globally by running the following command:

  ```bash  theme={null}
  npm install -g npm
  ```
</Warning>
Now that you've successfully connected Claude Desktop to a local MCP server, explore these options to expand your setup:
Browse our collection of official and community-created MCP servers for additional capabilities Create custom MCP servers tailored to your specific workflows and integrations Learn how to connect Claude to remote MCP servers for cloud-based tools and services Dive deeper into how MCP works and its architecture # Connect to remote MCP ServersLearn how to connect Claude to remote MCP servers and extend its capabilities with internet-hosted tools and data sources
Remote MCP servers extend AI applications' capabilities beyond your local environment, providing access to internet-hosted tools, services, and data sources. By connecting to remote MCP servers, you transform AI assistants from helpful tools into informed teammates capable of handling complex, multi-step projects with real-time access to external resources.
Many clients now support remote MCP servers, enabling a wide range of integration possibilities. This guide demonstrates how to connect to remote MCP servers using Claude as an example, one of the many clients that support MCP. While we focus on Claude's implementation through Custom Connectors, the concepts apply broadly to other MCP-compatible clients.
Remote MCP servers function similarly to local MCP servers but are hosted on the internet rather than your local machine. They expose tools, prompts, and resources that Claude can use to perform tasks on your behalf. These servers can integrate with various services such as project management tools, documentation systems, code repositories, and any other API-enabled service.
The key advantage of remote MCP servers is their accessibility. Unlike local servers that require installation and configuration on each device, remote servers are available from any MCP client with an internet connection. This makes them ideal for web-based AI applications, integrations that emphasize ease-of-use and services that require server-side processing or authentication.
Custom Connectors serve as the bridge between Claude and remote MCP servers. They allow you to connect Claude directly to the tools and data sources that matter most to your workflows, enabling Claude to operate within your favorite software and draw insights from the complete context of your external tools.
With Custom Connectors, you can:
- Connect Claude to existing remote MCP servers provided by third-party developers
- Build your own remote MCP servers to connect with any tool
The process of connecting Claude to a remote MCP server involves adding a Custom Connector through the Claude interface. This establishes a secure connection between Claude and your chosen remote server.
Open Claude in your browser and navigate to the settings page. You can access this by clicking on your profile icon and selecting "Settings" from the dropdown menu. Once in settings, locate and click on the "Connectors" section in the sidebar.This will display your currently configured connectors and provide options to add new ones.
<Frame>
  <img src="https://mintcdn.com/mcp/4ZXF1PrDkEaJvXpn/images/quickstart-remote/1-add-connector.png?fit=max&auto=format&n=4ZXF1PrDkEaJvXpn&q=85&s=b5ae9b23164875bbaa3aff4c178cdc64" alt="Add custom connector button in Claude settings" data-og-width="1038" width="1038" data-og-height="809" height="809" data-path="images/quickstart-remote/1-add-connector.png" data-optimize="true" data-opv="3" srcset="https://mintcdn.com/mcp/4ZXF1PrDkEaJvXpn/images/quickstart-remote/1-add-connector.png?w=280&fit=max&auto=format&n=4ZXF1PrDkEaJvXpn&q=85&s=df494c13492290da8cbf33320405bc60 280w, https://mintcdn.com/mcp/4ZXF1PrDkEaJvXpn/images/quickstart-remote/1-add-connector.png?w=560&fit=max&auto=format&n=4ZXF1PrDkEaJvXpn&q=85&s=a2dce224fb5e1636218ea2806962c89f 560w, https://mintcdn.com/mcp/4ZXF1PrDkEaJvXpn/images/quickstart-remote/1-add-connector.png?w=840&fit=max&auto=format&n=4ZXF1PrDkEaJvXpn&q=85&s=de18294dd3cad23989c04cedbacff74f 840w, https://mintcdn.com/mcp/4ZXF1PrDkEaJvXpn/images/quickstart-remote/1-add-connector.png?w=1100&fit=max&auto=format&n=4ZXF1PrDkEaJvXpn&q=85&s=c55cb3531701df2b5dfd721dcd3f48dc 1100w, https://mintcdn.com/mcp/4ZXF1PrDkEaJvXpn/images/quickstart-remote/1-add-connector.png?w=1650&fit=max&auto=format&n=4ZXF1PrDkEaJvXpn&q=85&s=b0d3e56c4c445ba6896d49997dcdf2c0 1650w, https://mintcdn.com/mcp/4ZXF1PrDkEaJvXpn/images/quickstart-remote/1-add-connector.png?w=2500&fit=max&auto=format&n=4ZXF1PrDkEaJvXpn&q=85&s=9d83f4f2db7441a39ff8733d97243ab9 2500w" />
</Frame>

A dialog will appear prompting you to enter the remote MCP server URL. This URL should be provided by the server developer or administrator. Enter the complete URL, ensuring it includes the proper protocol (https\://) and any necessary path components.

<Frame>
  <img src="https://mintcdn.com/mcp/4ZXF1PrDkEaJvXpn/images/quickstart-remote/2-connect.png?fit=max&auto=format&n=4ZXF1PrDkEaJvXpn&q=85&s=0934f16d8e016cade8e560c8f89d011b" alt="Dialog for entering remote MCP server URL" data-og-width="1616" width="1616" data-og-height="282" height="282" data-path="images/quickstart-remote/2-connect.png" data-optimize="true" data-opv="3" srcset="https://mintcdn.com/mcp/4ZXF1PrDkEaJvXpn/images/quickstart-remote/2-connect.png?w=280&fit=max&auto=format&n=4ZXF1PrDkEaJvXpn&q=85&s=e3d7318b0b8e691d25e1887e80200b60 280w, https://mintcdn.com/mcp/4ZXF1PrDkEaJvXpn/images/quickstart-remote/2-connect.png?w=560&fit=max&auto=format&n=4ZXF1PrDkEaJvXpn&q=85&s=be3edc7b361eecaabf688c2058b5e466 560w, https://mintcdn.com/mcp/4ZXF1PrDkEaJvXpn/images/quickstart-remote/2-connect.png?w=840&fit=max&auto=format&n=4ZXF1PrDkEaJvXpn&q=85&s=31be86114b31e1c5e813d92a4c0cb1c3 840w, https://mintcdn.com/mcp/4ZXF1PrDkEaJvXpn/images/quickstart-remote/2-connect.png?w=1100&fit=max&auto=format&n=4ZXF1PrDkEaJvXpn&q=85&s=15b6cd3819fabd3655a52b930d384b51 1100w, https://mintcdn.com/mcp/4ZXF1PrDkEaJvXpn/images/quickstart-remote/2-connect.png?w=1650&fit=max&auto=format&n=4ZXF1PrDkEaJvXpn&q=85&s=5ef180101a7fb0901f7ecf1b5efd254f 1650w, https://mintcdn.com/mcp/4ZXF1PrDkEaJvXpn/images/quickstart-remote/2-connect.png?w=2500&fit=max&auto=format&n=4ZXF1PrDkEaJvXpn&q=85&s=c024f625ec6ee3f7959513ba15adf524 2500w" />
</Frame>

After entering the URL, click "Add" to proceed with the connection.
<Frame>
  <img src="https://mintcdn.com/mcp/4ZXF1PrDkEaJvXpn/images/quickstart-remote/3-auth.png?fit=max&auto=format&n=4ZXF1PrDkEaJvXpn&q=85&s=89af6e1b85718637231388697cc7b015" alt="Authentication screen for remote MCP server" data-og-width="490" width="490" data-og-height="806" height="806" data-path="images/quickstart-remote/3-auth.png" data-optimize="true" data-opv="3" srcset="https://mintcdn.com/mcp/4ZXF1PrDkEaJvXpn/images/quickstart-remote/3-auth.png?w=280&fit=max&auto=format&n=4ZXF1PrDkEaJvXpn&q=85&s=cde1e30b4c3b99b5edc5575c5958e9e7 280w, https://mintcdn.com/mcp/4ZXF1PrDkEaJvXpn/images/quickstart-remote/3-auth.png?w=560&fit=max&auto=format&n=4ZXF1PrDkEaJvXpn&q=85&s=e2cef2daadce577ce335949d3f425257 560w, https://mintcdn.com/mcp/4ZXF1PrDkEaJvXpn/images/quickstart-remote/3-auth.png?w=840&fit=max&auto=format&n=4ZXF1PrDkEaJvXpn&q=85&s=4e06599391ebf6bcb521cb4000469844 840w, https://mintcdn.com/mcp/4ZXF1PrDkEaJvXpn/images/quickstart-remote/3-auth.png?w=1100&fit=max&auto=format&n=4ZXF1PrDkEaJvXpn&q=85&s=e78e71303fd5bb7d1e5c1602dca7641b 1100w, https://mintcdn.com/mcp/4ZXF1PrDkEaJvXpn/images/quickstart-remote/3-auth.png?w=1650&fit=max&auto=format&n=4ZXF1PrDkEaJvXpn&q=85&s=2e49d390bddf2a37fef4cba409e9950f 1650w, https://mintcdn.com/mcp/4ZXF1PrDkEaJvXpn/images/quickstart-remote/3-auth.png?w=2500&fit=max&auto=format&n=4ZXF1PrDkEaJvXpn&q=85&s=47ec70901a76a3209267b2078f9f8011 2500w" />
</Frame>

Follow the authentication prompts provided by the server. This may redirect you to a third-party authentication provider or display a form within Claude. Once authentication is complete, Claude will establish a secure connection to the remote server.
<Frame>
  <img src="https://mintcdn.com/mcp/4ZXF1PrDkEaJvXpn/images/quickstart-remote/4-select-resources-menu.png?fit=max&auto=format&n=4ZXF1PrDkEaJvXpn&q=85&s=ecc6234b0fe5625e24cc2b02b7893c67" alt="Attachment menu showing available resources" data-og-width="735" width="735" data-og-height="666" height="666" data-path="images/quickstart-remote/4-select-resources-menu.png" data-optimize="true" data-opv="3" srcset="https://mintcdn.com/mcp/4ZXF1PrDkEaJvXpn/images/quickstart-remote/4-select-resources-menu.png?w=280&fit=max&auto=format&n=4ZXF1PrDkEaJvXpn&q=85&s=6e853446286f2c2caf1c7137e4293db4 280w, https://mintcdn.com/mcp/4ZXF1PrDkEaJvXpn/images/quickstart-remote/4-select-resources-menu.png?w=560&fit=max&auto=format&n=4ZXF1PrDkEaJvXpn&q=85&s=7c3c5b7d2f8d078bc263b0603a4136d1 560w, https://mintcdn.com/mcp/4ZXF1PrDkEaJvXpn/images/quickstart-remote/4-select-resources-menu.png?w=840&fit=max&auto=format&n=4ZXF1PrDkEaJvXpn&q=85&s=280e1d1547925f73f33fcf404eac5ba2 840w, https://mintcdn.com/mcp/4ZXF1PrDkEaJvXpn/images/quickstart-remote/4-select-resources-menu.png?w=1100&fit=max&auto=format&n=4ZXF1PrDkEaJvXpn&q=85&s=00fc5842c2d6592f41f96c2051b016e2 1100w, https://mintcdn.com/mcp/4ZXF1PrDkEaJvXpn/images/quickstart-remote/4-select-resources-menu.png?w=1650&fit=max&auto=format&n=4ZXF1PrDkEaJvXpn&q=85&s=505d4ec95d83f4e52cf9c60780b225fe 1650w, https://mintcdn.com/mcp/4ZXF1PrDkEaJvXpn/images/quickstart-remote/4-select-resources-menu.png?w=2500&fit=max&auto=format&n=4ZXF1PrDkEaJvXpn&q=85&s=07178c22a89472b962639854dc029953 2500w" />
</Frame>

The menu displays all available resources and prompts from your connected servers. Select the items you want to include in your conversation. These resources provide Claude with context and information from your external tools.

<Frame>
  <img src="https://mintcdn.com/mcp/4ZXF1PrDkEaJvXpn/images/quickstart-remote/5-select-prompts-resources.png?fit=max&auto=format&n=4ZXF1PrDkEaJvXpn&q=85&s=30c522540c7ff5abd8617d20b329eca2" alt="Selecting specific resources and prompts from the menu" data-og-width="648" width="648" data-og-height="920" height="920" data-path="images/quickstart-remote/5-select-prompts-resources.png" data-optimize="true" data-opv="3" srcset="https://mintcdn.com/mcp/4ZXF1PrDkEaJvXpn/images/quickstart-remote/5-select-prompts-resources.png?w=280&fit=max&auto=format&n=4ZXF1PrDkEaJvXpn&q=85&s=7361585026d3dd1f0c218232ce475d59 280w, https://mintcdn.com/mcp/4ZXF1PrDkEaJvXpn/images/quickstart-remote/5-select-prompts-resources.png?w=560&fit=max&auto=format&n=4ZXF1PrDkEaJvXpn&q=85&s=eb5162947ac8110569225e4ff36ac54c 560w, https://mintcdn.com/mcp/4ZXF1PrDkEaJvXpn/images/quickstart-remote/5-select-prompts-resources.png?w=840&fit=max&auto=format&n=4ZXF1PrDkEaJvXpn&q=85&s=93b0b1de76b11785deb6cd2b8bbbb33e 840w, https://mintcdn.com/mcp/4ZXF1PrDkEaJvXpn/images/quickstart-remote/5-select-prompts-resources.png?w=1100&fit=max&auto=format&n=4ZXF1PrDkEaJvXpn&q=85&s=19d1f1de9b7b38dff6fabaea260fc700 1100w, https://mintcdn.com/mcp/4ZXF1PrDkEaJvXpn/images/quickstart-remote/5-select-prompts-resources.png?w=1650&fit=max&auto=format&n=4ZXF1PrDkEaJvXpn&q=85&s=587ee6b0f0831f7b9c827db58e4c53a6 1650w, https://mintcdn.com/mcp/4ZXF1PrDkEaJvXpn/images/quickstart-remote/5-select-prompts-resources.png?w=2500&fit=max&auto=format&n=4ZXF1PrDkEaJvXpn&q=85&s=a875a3599b478977e1322c07b82a5879 2500w" />
</Frame>
<Frame>
  <img src="https://mintcdn.com/mcp/4ZXF1PrDkEaJvXpn/images/quickstart-remote/6-configure-tools.png?fit=max&auto=format&n=4ZXF1PrDkEaJvXpn&q=85&s=1e55fd2f7da85150bfcf9dfbd7a31f44" alt="Tool permission configuration interface" data-og-width="604" width="604" data-og-height="745" height="745" data-path="images/quickstart-remote/6-configure-tools.png" data-optimize="true" data-opv="3" srcset="https://mintcdn.com/mcp/4ZXF1PrDkEaJvXpn/images/quickstart-remote/6-configure-tools.png?w=280&fit=max&auto=format&n=4ZXF1PrDkEaJvXpn&q=85&s=6ece557353a2b8227cfc033ee7533fbc 280w, https://mintcdn.com/mcp/4ZXF1PrDkEaJvXpn/images/quickstart-remote/6-configure-tools.png?w=560&fit=max&auto=format&n=4ZXF1PrDkEaJvXpn&q=85&s=aa954f4a018077d6a4a3c9406cdd4a63 560w, https://mintcdn.com/mcp/4ZXF1PrDkEaJvXpn/images/quickstart-remote/6-configure-tools.png?w=840&fit=max&auto=format&n=4ZXF1PrDkEaJvXpn&q=85&s=309fd1583dd23081ed93eca4fb85c5e0 840w, https://mintcdn.com/mcp/4ZXF1PrDkEaJvXpn/images/quickstart-remote/6-configure-tools.png?w=1100&fit=max&auto=format&n=4ZXF1PrDkEaJvXpn&q=85&s=8b7ea5b326ea5cf8947e9b9aba28f2f7 1100w, https://mintcdn.com/mcp/4ZXF1PrDkEaJvXpn/images/quickstart-remote/6-configure-tools.png?w=1650&fit=max&auto=format&n=4ZXF1PrDkEaJvXpn&q=85&s=7e02024cdcae2b7c41aab3d5c4f4e75e 1650w, https://mintcdn.com/mcp/4ZXF1PrDkEaJvXpn/images/quickstart-remote/6-configure-tools.png?w=2500&fit=max&auto=format&n=4ZXF1PrDkEaJvXpn&q=85&s=f953404ab1cb149e160eaa139c53d701 2500w" />
</Frame>

Navigate back to the Connectors settings and click on your connected server. Here you can enable or disable specific tools, set usage limits, and configure other security parameters according to your needs.
When working with remote MCP servers, consider these recommendations to ensure a secure and efficient experience:
Security considerations: Always verify the authenticity of remote MCP servers before connecting. Only connect to servers from trusted sources, and review the permissions requested during authentication. Be cautious about granting access to sensitive data or systems.
Managing multiple connectors: You can connect to multiple remote MCP servers simultaneously. Organize your connectors by purpose or project to maintain clarity. Regularly review and remove connectors you no longer use to keep your workspace organized and secure.
Now that you've connected Claude to a remote MCP server, you can explore its capabilities in your conversations. Try using the connected tools to automate tasks, access external data, or integrate with your existing workflows.
Create custom remote MCP servers to integrate with proprietary tools and services Browse our collection of official and community-created MCP servers Learn how to connect Claude Desktop to local MCP servers for direct system access Dive deeper into how MCP works and its architectureRemote MCP servers unlock powerful possibilities for extending Claude's capabilities. As you become familiar with these integrations, you'll discover new ways to streamline your workflows and accomplish complex tasks more efficiently.
Get started building your own server to use in Claude for Desktop and other clients.
In this tutorial, we'll build a simple MCP weather server and connect it to a host, Claude for Desktop.
We'll build a server that exposes two tools: get_alerts and get_forecast. Then we'll connect the server to an MCP host (in this case, Claude for Desktop):
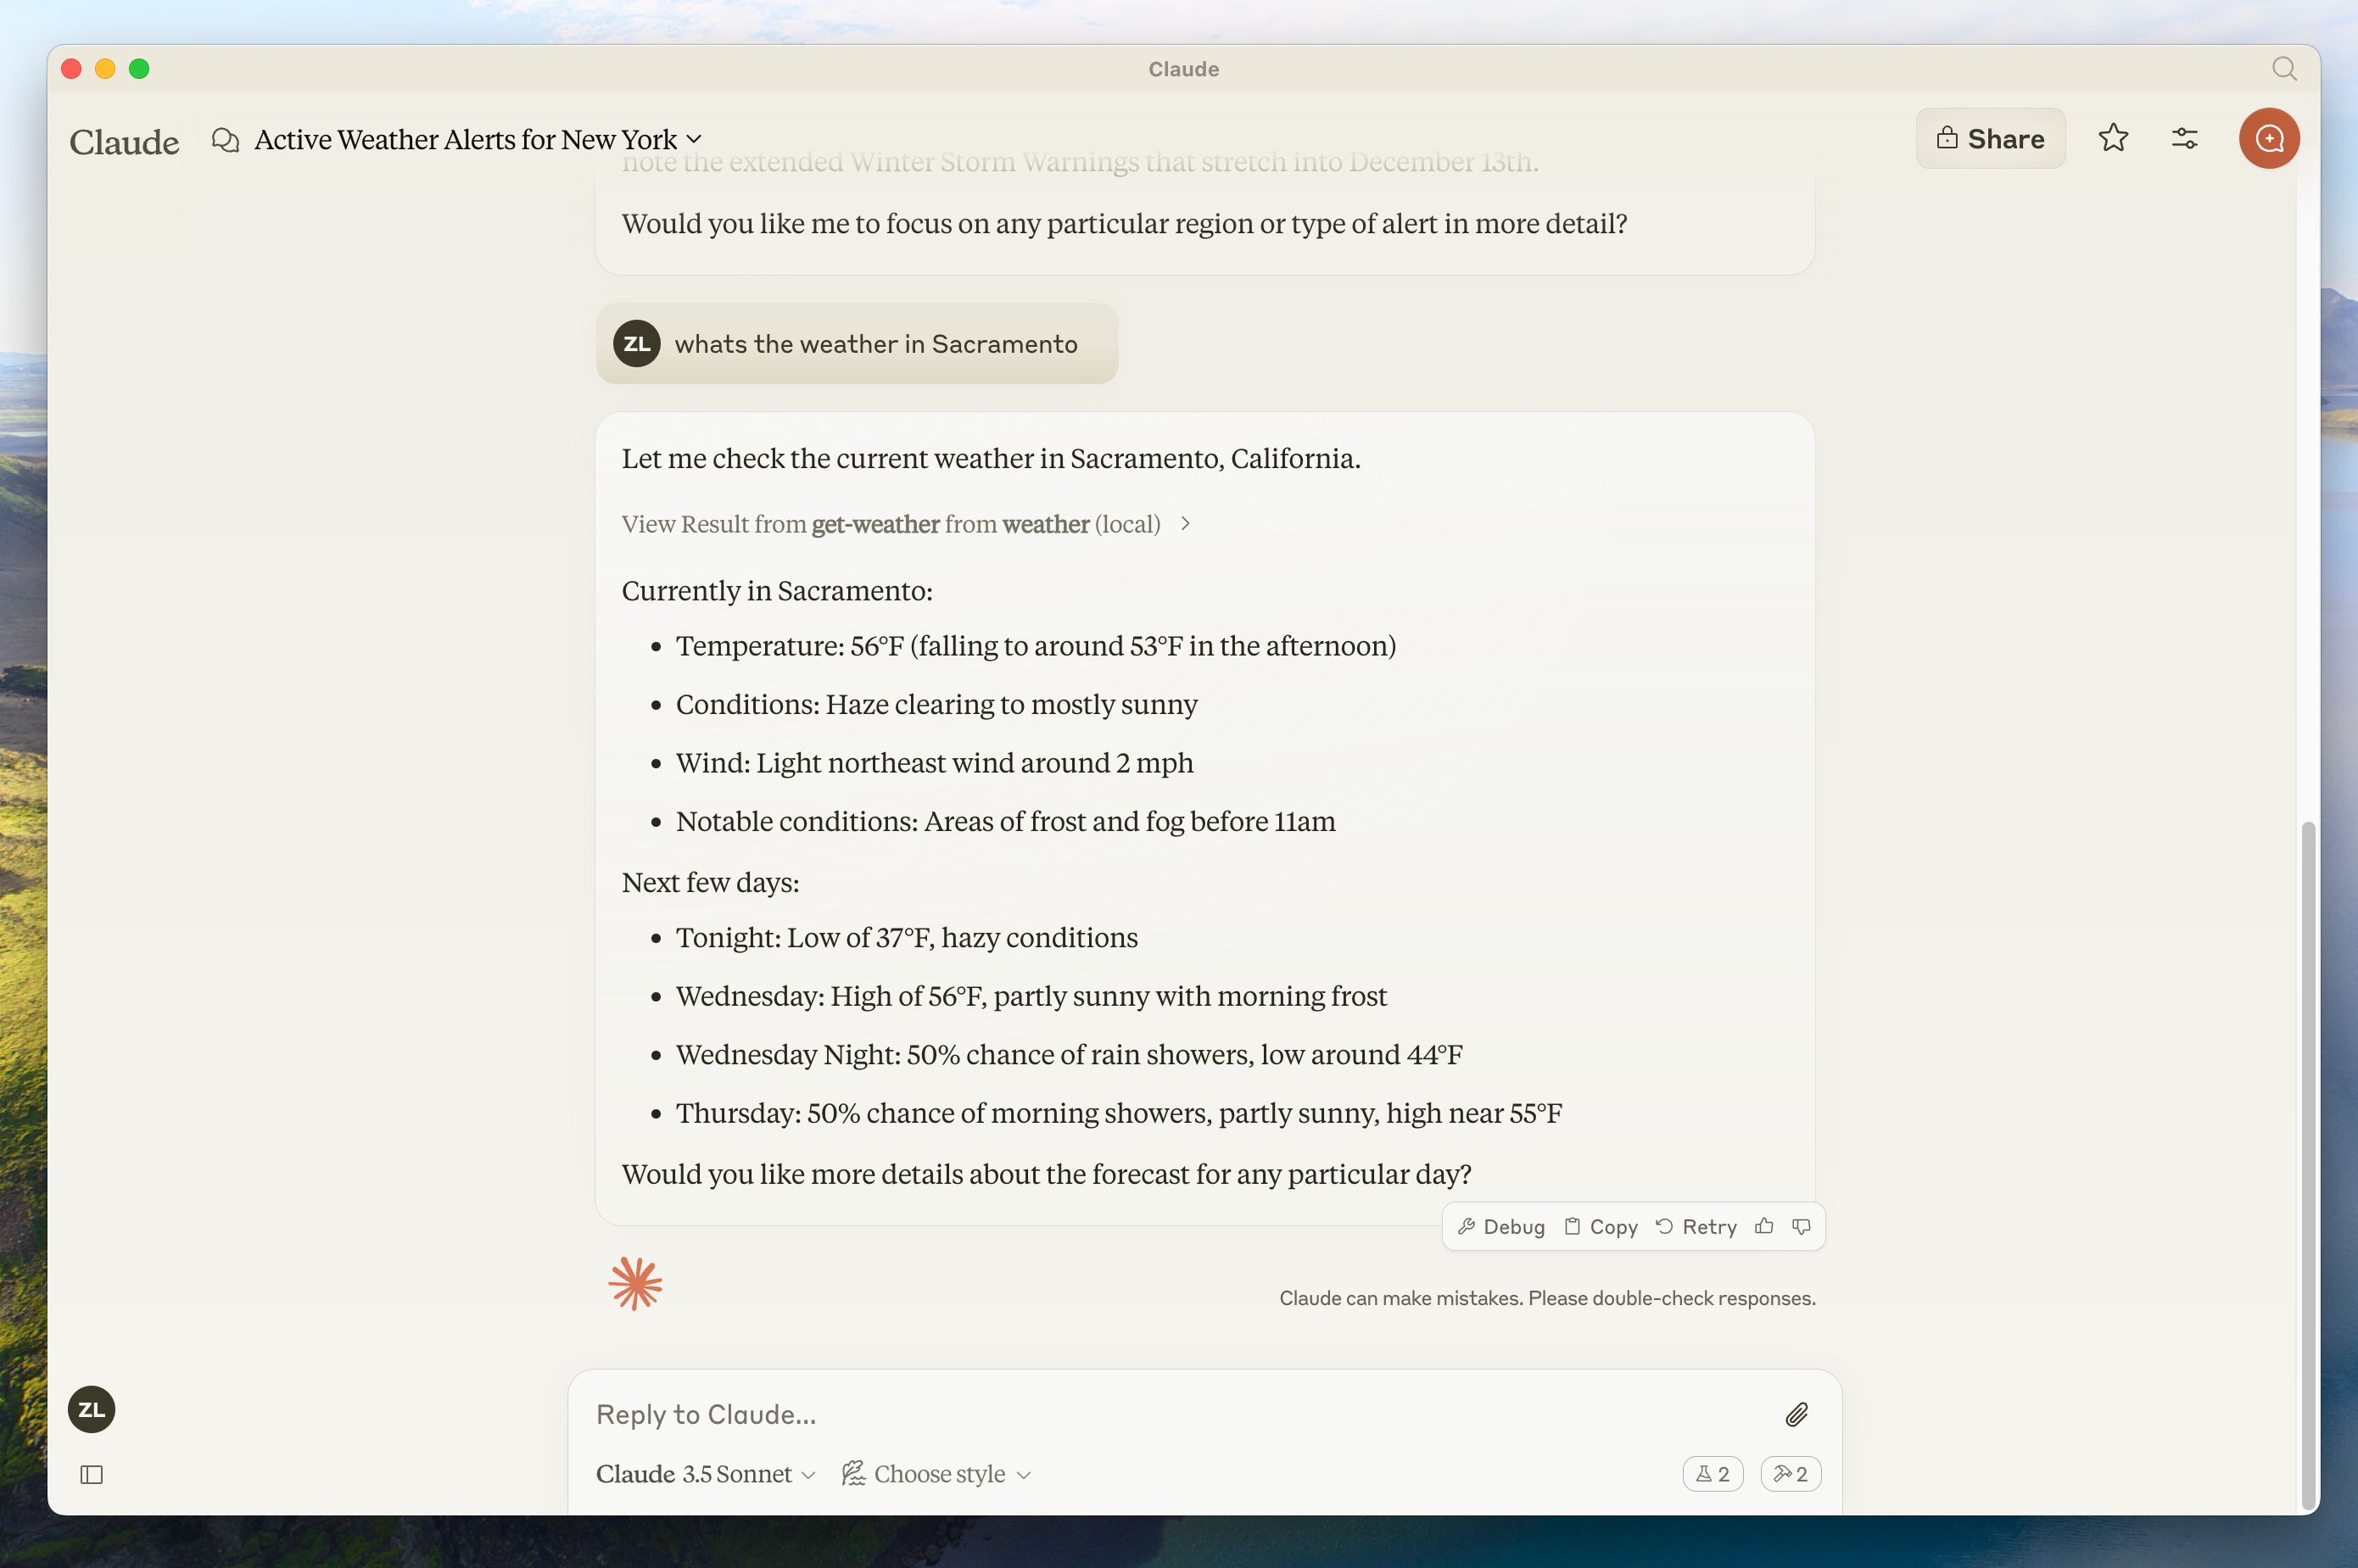
MCP servers can provide three main types of capabilities:
- Resources: File-like data that can be read by clients (like API responses or file contents)
- Tools: Functions that can be called by the LLM (with user approval)
- Prompts: Pre-written templates that help users accomplish specific tasks
This tutorial will primarily focus on tools.
Let's get started with building our weather server! [You can find the complete code for what we'll be building here.](https://github.com/modelcontextprotocol/quickstart-resources/tree/main/weather-server-python)### Prerequisite knowledge
This quickstart assumes you have familiarity with:
* Python
* LLMs like Claude
### Logging in MCP Servers
When implementing MCP servers, be careful about how you handle logging:
**For STDIO-based servers:** Never write to standard output (stdout). This includes:
* `print()` statements in Python
* `console.log()` in JavaScript
* `fmt.Println()` in Go
* Similar stdout functions in other languages
Writing to stdout will corrupt the JSON-RPC messages and break your server.
**For HTTP-based servers:** Standard output logging is fine since it doesn't interfere with HTTP responses.
### Best Practices
1. Use a logging library that writes to stderr or files.
### Quick Examples
```python theme={null}
# ❌ Bad (STDIO)
print("Processing request")
# ✅ Good (STDIO)
import logging
logging.info("Processing request")
```
### System requirements
* Python 3.10 or higher installed.
* You must use the Python MCP SDK 1.2.0 or higher.
### Set up your environment
First, let's install `uv` and set up our Python project and environment:
<CodeGroup>
```bash macOS/Linux theme={null}
curl -LsSf https://astral.sh/uv/install.sh | sh
```
```powershell Windows theme={null}
powershell -ExecutionPolicy ByPass -c "irm https://astral.sh/uv/install.ps1 | iex"
```
</CodeGroup>
Make sure to restart your terminal afterwards to ensure that the `uv` command gets picked up.
Now, let's create and set up our project:
<CodeGroup>
```bash macOS/Linux theme={null}
# Create a new directory for our project
uv init weather
cd weather
# Create virtual environment and activate it
uv venv
source .venv/bin/activate
# Install dependencies
uv add "mcp[cli]" httpx
# Create our server file
touch weather.py
```
```powershell Windows theme={null}
# Create a new directory for our project
uv init weather
cd weather
# Create virtual environment and activate it
uv venv
.venv\Scripts\activate
# Install dependencies
uv add mcp[cli] httpx
# Create our server file
new-item weather.py
```
</CodeGroup>
Now let's dive into building your server.
## Building your server
### Importing packages and setting up the instance
Add these to the top of your `weather.py`:
```python theme={null}
from typing import Any
import httpx
from mcp.server.fastmcp import FastMCP
# Initialize FastMCP server
mcp = FastMCP("weather")
# Constants
NWS_API_BASE = "https://api.weather.gov"
USER_AGENT = "weather-app/1.0"
```
The FastMCP class uses Python type hints and docstrings to automatically generate tool definitions, making it easy to create and maintain MCP tools.
### Helper functions
Next, let's add our helper functions for querying and formatting the data from the National Weather Service API:
```python theme={null}
async def make_nws_request(url: str) -> dict[str, Any] | None:
"""Make a request to the NWS API with proper error handling."""
headers = {
"User-Agent": USER_AGENT,
"Accept": "application/geo+json"
}
async with httpx.AsyncClient() as client:
try:
response = await client.get(url, headers=headers, timeout=30.0)
response.raise_for_status()
return response.json()
except Exception:
return None
def format_alert(feature: dict) -> str:
"""Format an alert feature into a readable string."""
props = feature["properties"]
return f"""
Event: {props.get('event', 'Unknown')}
Area: {props.get('areaDesc', 'Unknown')}
Severity: {props.get('severity', 'Unknown')}
Description: {props.get('description', 'No description available')}
Instructions: {props.get('instruction', 'No specific instructions provided')}
"""
```
### Implementing tool execution
The tool execution handler is responsible for actually executing the logic of each tool. Let's add it:
```python theme={null}
@mcp.tool()
async def get_alerts(state: str) -> str:
"""Get weather alerts for a US state.
Args:
state: Two-letter US state code (e.g. CA, NY)
"""
url = f"{NWS_API_BASE}/alerts/active/area/{state}"
data = await make_nws_request(url)
if not data or "features" not in data:
return "Unable to fetch alerts or no alerts found."
if not data["features"]:
return "No active alerts for this state."
alerts = [format_alert(feature) for feature in data["features"]]
return "\n---\n".join(alerts)
@mcp.tool()
async def get_forecast(latitude: float, longitude: float) -> str:
"""Get weather forecast for a location.
Args:
latitude: Latitude of the location
longitude: Longitude of the location
"""
# First get the forecast grid endpoint
points_url = f"{NWS_API_BASE}/points/{latitude},{longitude}"
points_data = await make_nws_request(points_url)
if not points_data:
return "Unable to fetch forecast data for this location."
# Get the forecast URL from the points response
forecast_url = points_data["properties"]["forecast"]
forecast_data = await make_nws_request(forecast_url)
if not forecast_data:
return "Unable to fetch detailed forecast."
# Format the periods into a readable forecast
periods = forecast_data["properties"]["periods"]
forecasts = []
for period in periods[:5]: # Only show next 5 periods
forecast = f"""
{period['name']}:
Temperature: {period['temperature']}°{period['temperatureUnit']}
Wind: {period['windSpeed']} {period['windDirection']}
Forecast: {period['detailedForecast']}
"""
forecasts.append(forecast)
return "\n---\n".join(forecasts)
```
### Running the server
Finally, let's initialize and run the server:
```python theme={null}
def main():
# Initialize and run the server
mcp.run(transport='stdio')
if __name__ == "__main__":
main()
```
Your server is complete! Run `uv run weather.py` to start the MCP server, which will listen for messages from MCP hosts.
Let's now test your server from an existing MCP host, Claude for Desktop.
## Testing your server with Claude for Desktop
<Note>
Claude for Desktop is not yet available on Linux. Linux users can proceed to the [Building a client](/docs/develop/build-client) tutorial to build an MCP client that connects to the server we just built.
</Note>
First, make sure you have Claude for Desktop installed. [You can install the latest version
here.](https://claude.ai/download) If you already have Claude for Desktop, **make sure it's updated to the latest version.**
We'll need to configure Claude for Desktop for whichever MCP servers you want to use. To do this, open your Claude for Desktop App configuration at `~/Library/Application Support/Claude/claude_desktop_config.json` in a text editor. Make sure to create the file if it doesn't exist.
For example, if you have [VS Code](https://code.visualstudio.com/) installed:
<CodeGroup>
```bash macOS/Linux theme={null}
code ~/Library/Application\ Support/Claude/claude_desktop_config.json
```
```powershell Windows theme={null}
code $env:AppData\Claude\claude_desktop_config.json
```
</CodeGroup>
You'll then add your servers in the `mcpServers` key. The MCP UI elements will only show up in Claude for Desktop if at least one server is properly configured.
In this case, we'll add our single weather server like so:
<CodeGroup>
```json macOS/Linux theme={null}
{
"mcpServers": {
"weather": {
"command": "uv",
"args": [
"--directory",
"/ABSOLUTE/PATH/TO/PARENT/FOLDER/weather",
"run",
"weather.py"
]
}
}
}
```
```json Windows theme={null}
{
"mcpServers": {
"weather": {
"command": "uv",
"args": [
"--directory",
"C:\\ABSOLUTE\\PATH\\TO\\PARENT\\FOLDER\\weather",
"run",
"weather.py"
]
}
}
}
```
</CodeGroup>
<Warning>
You may need to put the full path to the `uv` executable in the `command` field. You can get this by running `which uv` on macOS/Linux or `where uv` on Windows.
</Warning>
<Note>
Make sure you pass in the absolute path to your server. You can get this by running `pwd` on macOS/Linux or `cd` on Windows Command Prompt. On Windows, remember to use double backslashes (`\\`) or forward slashes (`/`) in the JSON path.
</Note>
This tells Claude for Desktop:
1. There's an MCP server named "weather"
2. To launch it by running `uv --directory /ABSOLUTE/PATH/TO/PARENT/FOLDER/weather run weather.py`
Save the file, and restart **Claude for Desktop**.
### Prerequisite knowledge

This quickstart assumes you have familiarity with:

* TypeScript
* LLMs like Claude

### Logging in MCP Servers

When implementing MCP servers, be careful about how you handle logging:

**For STDIO-based servers:** Never write to standard output (stdout). This includes:

* `print()` statements in Python
* `console.log()` in JavaScript
* `fmt.Println()` in Go
* Similar stdout functions in other languages

Writing to stdout will corrupt the JSON-RPC messages and break your server.

**For HTTP-based servers:** Standard output logging is fine since it doesn't interfere with HTTP responses.

### Best Practices

1. Use a logging library that writes to stderr or files, such as `logging` in Python.
2. For JavaScript, be especially careful - `console.log()` writes to stdout by default

### Quick Examples

```javascript  theme={null}
// ❌ Bad (STDIO)
console.log("Server started");

// ✅ Good (STDIO)
console.error("Server started"); // stderr is safe
```

### System requirements

For TypeScript, make sure you have the latest version of Node installed.

### Set up your environment

First, let's install Node.js and npm if you haven't already. You can download them from [nodejs.org](https://nodejs.org/).
Verify your Node.js installation:

```bash  theme={null}
node --version
npm --version
```

For this tutorial, you'll need Node.js version 16 or higher.

Now, let's create and set up our project:

<CodeGroup>
  ```bash macOS/Linux theme={null}
  # Create a new directory for our project
  mkdir weather
  cd weather

  # Initialize a new npm project
  npm init -y

  # Install dependencies
  npm install @modelcontextprotocol/sdk zod@3
  npm install -D @types/node typescript

  # Create our files
  mkdir src
  touch src/index.ts
  ```

  ```powershell Windows theme={null}
  # Create a new directory for our project
  md weather
  cd weather

  # Initialize a new npm project
  npm init -y

  # Install dependencies
  npm install @modelcontextprotocol/sdk zod@3
  npm install -D @types/node typescript

  # Create our files
  md src
  new-item src\index.ts
  ```
</CodeGroup>

Update your package.json to add type: "module" and a build script:

```json package.json theme={null}
{
  "type": "module",
  "bin": {
    "weather": "./build/index.js"
  },
  "scripts": {
    "build": "tsc && chmod 755 build/index.js"
  },
  "files": ["build"]
}
```

Create a `tsconfig.json` in the root of your project:

```json tsconfig.json theme={null}
{
  "compilerOptions": {
    "target": "ES2022",
    "module": "Node16",
    "moduleResolution": "Node16",
    "outDir": "./build",
    "rootDir": "./src",
    "strict": true,
    "esModuleInterop": true,
    "skipLibCheck": true,
    "forceConsistentCasingInFileNames": true
  },
  "include": ["src/**/*"],
  "exclude": ["node_modules"]
}
```

Now let's dive into building your server.

## Building your server

### Importing packages and setting up the instance

Add these to the top of your `src/index.ts`:

```typescript  theme={null}
import { McpServer } from "@modelcontextprotocol/sdk/server/mcp.js";
import { StdioServerTransport } from "@modelcontextprotocol/sdk/server/stdio.js";
import { z } from "zod";

const NWS_API_BASE = "https://api.weather.gov";
const USER_AGENT = "weather-app/1.0";

// Create server instance
const server = new McpServer({
  name: "weather",
  version: "1.0.0",
  capabilities: {
    resources: {},
    tools: {},
  },
});
```

### Helper functions

Next, let's add our helper functions for querying and formatting the data from the National Weather Service API:

```typescript  theme={null}
// Helper function for making NWS API requests
async function makeNWSRequest<T>(url: string): Promise<T | null> {
  const headers = {
    "User-Agent": USER_AGENT,
    Accept: "application/geo+json",
  };

  try {
    const response = await fetch(url, { headers });
    if (!response.ok) {
      throw new Error(`HTTP error! status: ${response.status}`);
    }
    return (await response.json()) as T;
  } catch (error) {
    console.error("Error making NWS request:", error);
    return null;
  }
}

interface AlertFeature {
  properties: {
    event?: string;
    areaDesc?: string;
    severity?: string;
    status?: string;
    headline?: string;
  };
}

// Format alert data
function formatAlert(feature: AlertFeature): string {
  const props = feature.properties;
  return [
    `Event: ${props.event || "Unknown"}`,
    `Area: ${props.areaDesc || "Unknown"}`,
    `Severity: ${props.severity || "Unknown"}`,
    `Status: ${props.status || "Unknown"}`,
    `Headline: ${props.headline || "No headline"}`,
    "---",
  ].join("\n");
}

interface ForecastPeriod {
  name?: string;
  temperature?: number;
  temperatureUnit?: string;
  windSpeed?: string;
  windDirection?: string;
  shortForecast?: string;
}

interface AlertsResponse {
  features: AlertFeature[];
}

interface PointsResponse {
  properties: {
    forecast?: string;
  };
}

interface ForecastResponse {
  properties: {
    periods: ForecastPeriod[];
  };
}
```

### Implementing tool execution

The tool execution handler is responsible for actually executing the logic of each tool. Let's add it:

```typescript  theme={null}
// Register weather tools
server.tool(
  "get_alerts",
  "Get weather alerts for a state",
  {
    state: z.string().length(2).describe("Two-letter state code (e.g. CA, NY)"),
  },
  async ({ state }) => {
    const stateCode = state.toUpperCase();
    const alertsUrl = `${NWS_API_BASE}/alerts?area=${stateCode}`;
    const alertsData = await makeNWSRequest<AlertsResponse>(alertsUrl);

    if (!alertsData) {
      return {
        content: [
          {
            type: "text",
            text: "Failed to retrieve alerts data",
          },
        ],
      };
    }

    const features = alertsData.features || [];
    if (features.length === 0) {
      return {
        content: [
          {
            type: "text",
            text: `No active alerts for ${stateCode}`,
          },
        ],
      };
    }

    const formattedAlerts = features.map(formatAlert);
    const alertsText = `Active alerts for ${stateCode}:\n\n${formattedAlerts.join("\n")}`;

    return {
      content: [
        {
          type: "text",
          text: alertsText,
        },
      ],
    };
  },
);

server.tool(
  "get_forecast",
  "Get weather forecast for a location",
  {
    latitude: z.number().min(-90).max(90).describe("Latitude of the location"),
    longitude: z
      .number()
      .min(-180)
      .max(180)
      .describe("Longitude of the location"),
  },
  async ({ latitude, longitude }) => {
    // Get grid point data
    const pointsUrl = `${NWS_API_BASE}/points/${latitude.toFixed(4)},${longitude.toFixed(4)}`;
    const pointsData = await makeNWSRequest<PointsResponse>(pointsUrl);

    if (!pointsData) {
      return {
        content: [
          {
            type: "text",
            text: `Failed to retrieve grid point data for coordinates: ${latitude}, ${longitude}. This location may not be supported by the NWS API (only US locations are supported).`,
          },
        ],
      };
    }

    const forecastUrl = pointsData.properties?.forecast;
    if (!forecastUrl) {
      return {
        content: [
          {
            type: "text",
            text: "Failed to get forecast URL from grid point data",
          },
        ],
      };
    }

    // Get forecast data
    const forecastData = await makeNWSRequest<ForecastResponse>(forecastUrl);
    if (!forecastData) {
      return {
        content: [
          {
            type: "text",
            text: "Failed to retrieve forecast data",
          },
        ],
      };
    }

    const periods = forecastData.properties?.periods || [];
    if (periods.length === 0) {
      return {
        content: [
          {
            type: "text",
            text: "No forecast periods available",
          },
        ],
      };
    }

    // Format forecast periods
    const formattedForecast = periods.map((period: ForecastPeriod) =>
      [
        `${period.name || "Unknown"}:`,
        `Temperature: ${period.temperature || "Unknown"}°${period.temperatureUnit || "F"}`,
        `Wind: ${period.windSpeed || "Unknown"} ${period.windDirection || ""}`,
        `${period.shortForecast || "No forecast available"}`,
        "---",
      ].join("\n"),
    );

    const forecastText = `Forecast for ${latitude}, ${longitude}:\n\n${formattedForecast.join("\n")}`;

    return {
      content: [
        {
          type: "text",
          text: forecastText,
        },
      ],
    };
  },
);
```

### Running the server

Finally, implement the main function to run the server:

```typescript  theme={null}
async function main() {
  const transport = new StdioServerTransport();
  await server.connect(transport);
  console.error("Weather MCP Server running on stdio");
}

main().catch((error) => {
  console.error("Fatal error in main():", error);
  process.exit(1);
});
```

Make sure to run `npm run build` to build your server! This is a very important step in getting your server to connect.

Let's now test your server from an existing MCP host, Claude for Desktop.

## Testing your server with Claude for Desktop

<Note>
  Claude for Desktop is not yet available on Linux. Linux users can proceed to the [Building a client](/docs/develop/build-client) tutorial to build an MCP client that connects to the server we just built.
</Note>

First, make sure you have Claude for Desktop installed. [You can install the latest version
here.](https://claude.ai/download) If you already have Claude for Desktop, **make sure it's updated to the latest version.**

We'll need to configure Claude for Desktop for whichever MCP servers you want to use. To do this, open your Claude for Desktop App configuration at `~/Library/Application Support/Claude/claude_desktop_config.json` in a text editor. Make sure to create the file if it doesn't exist.

For example, if you have [VS Code](https://code.visualstudio.com/) installed:

<CodeGroup>
  ```bash macOS/Linux theme={null}
  code ~/Library/Application\ Support/Claude/claude_desktop_config.json
  ```

  ```powershell Windows theme={null}
  code $env:AppData\Claude\claude_desktop_config.json
  ```
</CodeGroup>

You'll then add your servers in the `mcpServers` key. The MCP UI elements will only show up in Claude for Desktop if at least one server is properly configured.

In this case, we'll add our single weather server like so:

<CodeGroup>
  ```json macOS/Linux theme={null}
  {
    "mcpServers": {
      "weather": {
        "command": "node",
        "args": ["/ABSOLUTE/PATH/TO/PARENT/FOLDER/weather/build/index.js"]
      }
    }
  }
  ```

  ```json Windows theme={null}
  {
    "mcpServers": {
      "weather": {
        "command": "node",
        "args": ["C:\\PATH\\TO\\PARENT\\FOLDER\\weather\\build\\index.js"]
      }
    }
  }
  ```
</CodeGroup>

This tells Claude for Desktop:

1. There's an MCP server named "weather"
2. Launch it by running `node /ABSOLUTE/PATH/TO/PARENT/FOLDER/weather/build/index.js`

Save the file, and restart **Claude for Desktop**.
Let's get started with building our weather server!
[You can find the complete code for what we'll be building here.](https://github.com/spring-projects/spring-ai-examples/tree/main/model-context-protocol/weather/starter-stdio-server)

For more information, see the [MCP Server Boot Starter](https://docs.spring.io/spring-ai/reference/api/mcp/mcp-server-boot-starter-docs.html) reference documentation.
For manual MCP Server implementation, refer to the [MCP Server Java SDK documentation](/sdk/java/mcp-server).

### Logging in MCP Servers

When implementing MCP servers, be careful about how you handle logging:

**For STDIO-based servers:** Never write to standard output (stdout). This includes:

* `print()` statements in Python
* `console.log()` in JavaScript
* `fmt.Println()` in Go
* Similar stdout functions in other languages

Writing to stdout will corrupt the JSON-RPC messages and break your server.

**For HTTP-based servers:** Standard output logging is fine since it doesn't interfere with HTTP responses.

### Best Practices

1. Use a logging library that writes to stderr or files.
2. Ensure any configured logging library will not write to STDOUT

### System requirements

* Java 17 or higher installed.
* [Spring Boot 3.3.x](https://docs.spring.io/spring-boot/installing.html) or higher

### Set up your environment

Use the [Spring Initializer](https://start.spring.io/) to bootstrap the project.

You will need to add the following dependencies:

<CodeGroup>
  ```xml Maven theme={null}
  <dependencies>
        <dependency>
            <groupId>org.springframework.ai</groupId>
            <artifactId>spring-ai-starter-mcp-server</artifactId>
        </dependency>

        <dependency>
            <groupId>org.springframework</groupId>
            <artifactId>spring-web</artifactId>
        </dependency>
  </dependencies>
  ```

  ```groovy Gradle theme={null}
  dependencies {
    implementation platform("org.springframework.ai:spring-ai-starter-mcp-server")
    implementation platform("org.springframework:spring-web")
  }
  ```
</CodeGroup>

Then configure your application by setting the application properties:

<CodeGroup>
  ```bash application.properties theme={null}
  spring.main.bannerMode=off
  logging.pattern.console=
  ```

  ```yaml application.yml theme={null}
  logging:
    pattern:
      console:
  spring:
    main:
      banner-mode: off
  ```
</CodeGroup>

The [Server Configuration Properties](https://docs.spring.io/spring-ai/reference/api/mcp/mcp-server-boot-starter-docs.html#_configuration_properties) documents all available properties.

Now let's dive into building your server.

## Building your server

### Weather Service

Let's implement a [WeatherService.java](https://github.com/spring-projects/spring-ai-examples/blob/main/model-context-protocol/weather/starter-stdio-server/src/main/java/org/springframework/ai/mcp/sample/server/WeatherService.java) that uses a REST client to query the data from the National Weather Service API:

```java  theme={null}
@Service
public class WeatherService {

	private final RestClient restClient;

	public WeatherService() {
		this.restClient = RestClient.builder()
			.baseUrl("https://api.weather.gov")
			.defaultHeader("Accept", "application/geo+json")
			.defaultHeader("User-Agent", "WeatherApiClient/1.0 (your@email.com)")
			.build();
	}

  @Tool(description = "Get weather forecast for a specific latitude/longitude")
  public String getWeatherForecastByLocation(
      double latitude,   // Latitude coordinate
      double longitude   // Longitude coordinate
  ) {
      // Returns detailed forecast including:
      // - Temperature and unit
      // - Wind speed and direction
      // - Detailed forecast description
  }

  @Tool(description = "Get weather alerts for a US state")
  public String getAlerts(
      @ToolParam(description = "Two-letter US state code (e.g. CA, NY)") String state
  ) {
      // Returns active alerts including:
      // - Event type
      // - Affected area
      // - Severity
      // - Description
      // - Safety instructions
  }

  // ......
}
```

The `@Service` annotation with auto-register the service in your application context.
The Spring AI `@Tool` annotation, making it easy to create and maintain MCP tools.

The auto-configuration will automatically register these tools with the MCP server.

### Create your Boot Application

```java  theme={null}
@SpringBootApplication
public class McpServerApplication {

	public static void main(String[] args) {
		SpringApplication.run(McpServerApplication.class, args);
	}

	@Bean
	public ToolCallbackProvider weatherTools(WeatherService weatherService) {
		return  MethodToolCallbackProvider.builder().toolObjects(weatherService).build();
	}
}
```

Uses the `MethodToolCallbackProvider` utils to convert the `@Tools` into actionable callbacks used by the MCP server.

### Running the server

Finally, let's build the server:

```bash  theme={null}
./mvnw clean install
```

This will generate a `mcp-weather-stdio-server-0.0.1-SNAPSHOT.jar` file within the `target` folder.

Let's now test your server from an existing MCP host, Claude for Desktop.

## Testing your server with Claude for Desktop

<Note>
  Claude for Desktop is not yet available on Linux.
</Note>

First, make sure you have Claude for Desktop installed.
[You can install the latest version here.](https://claude.ai/download) If you already have Claude for Desktop, **make sure it's updated to the latest version.**

We'll need to configure Claude for Desktop for whichever MCP servers you want to use.
To do this, open your Claude for Desktop App configuration at `~/Library/Application Support/Claude/claude_desktop_config.json` in a text editor.
Make sure to create the file if it doesn't exist.

For example, if you have [VS Code](https://code.visualstudio.com/) installed:

<CodeGroup>
  ```bash macOS/Linux theme={null}
  code ~/Library/Application\ Support/Claude/claude_desktop_config.json
  ```

  ```powershell Windows theme={null}
  code $env:AppData\Claude\claude_desktop_config.json
  ```
</CodeGroup>

You'll then add your servers in the `mcpServers` key.
The MCP UI elements will only show up in Claude for Desktop if at least one server is properly configured.

In this case, we'll add our single weather server like so:

<CodeGroup>
  ```json macOS/Linux theme={null}
  {
    "mcpServers": {
      "spring-ai-mcp-weather": {
        "command": "java",
        "args": [
          "-Dspring.ai.mcp.server.stdio=true",
          "-jar",
          "/ABSOLUTE/PATH/TO/PARENT/FOLDER/mcp-weather-stdio-server-0.0.1-SNAPSHOT.jar"
        ]
      }
    }
  }
  ```

  ```json Windows theme={null}
  {
    "mcpServers": {
      "spring-ai-mcp-weather": {
        "command": "java",
        "args": [
          "-Dspring.ai.mcp.server.transport=STDIO",
          "-jar",
          "C:\\ABSOLUTE\\PATH\\TO\\PARENT\\FOLDER\\weather\\mcp-weather-stdio-server-0.0.1-SNAPSHOT.jar"
        ]
      }
    }
  }
  ```
</CodeGroup>

<Note>
  Make sure you pass in the absolute path to your server.
</Note>

This tells Claude for Desktop:

1. There's an MCP server named "my-weather-server"
2. To launch it by running `java -jar /ABSOLUTE/PATH/TO/PARENT/FOLDER/mcp-weather-stdio-server-0.0.1-SNAPSHOT.jar`

Save the file, and restart **Claude for Desktop**.

## Testing your server with Java client

### Create an MCP Client manually

Use the `McpClient` to connect to the server:

```java  theme={null}
var stdioParams = ServerParameters.builder("java")
  .args("-jar", "/ABSOLUTE/PATH/TO/PARENT/FOLDER/mcp-weather-stdio-server-0.0.1-SNAPSHOT.jar")
  .build();

var stdioTransport = new StdioClientTransport(stdioParams);

var mcpClient = McpClient.sync(stdioTransport).build();

mcpClient.initialize();

ListToolsResult toolsList = mcpClient.listTools();

CallToolResult weather = mcpClient.callTool(
  new CallToolRequest("getWeatherForecastByLocation",
      Map.of("latitude", "47.6062", "longitude", "-122.3321")));

CallToolResult alert = mcpClient.callTool(
  new CallToolRequest("getAlerts", Map.of("state", "NY")));

mcpClient.closeGracefully();
```

### Use MCP Client Boot Starter

Create a new boot starter application using the `spring-ai-starter-mcp-client` dependency:

```xml  theme={null}
<dependency>
    <groupId>org.springframework.ai</groupId>
    <artifactId>spring-ai-starter-mcp-client</artifactId>
</dependency>
```

and set the `spring.ai.mcp.client.stdio.servers-configuration` property to point to your `claude_desktop_config.json`.
You can reuse the existing Anthropic Desktop configuration:

```properties  theme={null}
spring.ai.mcp.client.stdio.servers-configuration=file:PATH/TO/claude_desktop_config.json
```

When you start your client application, the auto-configuration will create, automatically MCP clients from the claude\_desktop\_config.json.

For more information, see the [MCP Client Boot Starters](https://docs.spring.io/spring-ai/reference/api/mcp/mcp-server-boot-client-docs.html) reference documentation.

## More Java MCP Server examples

The [starter-webflux-server](https://github.com/spring-projects/spring-ai-examples/tree/main/model-context-protocol/weather/starter-webflux-server) demonstrates how to create an MCP server using SSE transport.
It showcases how to define and register MCP Tools, Resources, and Prompts, using the Spring Boot's auto-configuration capabilities.
### Prerequisite knowledge

This quickstart assumes you have familiarity with:

* Kotlin
* LLMs like Claude

### System requirements

* Java 17 or higher installed.

### Set up your environment

First, let's install `java` and `gradle` if you haven't already.
You can download `java` from [official Oracle JDK website](https://www.oracle.com/java/technologies/downloads/).
Verify your `java` installation:

```bash  theme={null}
java --version
```

Now, let's create and set up your project:

<CodeGroup>
  ```bash macOS/Linux theme={null}
  # Create a new directory for our project
  mkdir weather
  cd weather

  # Initialize a new kotlin project
  gradle init
  ```

  ```powershell Windows theme={null}
  # Create a new directory for our project
  md weather
  cd weather

  # Initialize a new kotlin project
  gradle init
  ```
</CodeGroup>

After running `gradle init`, you will be presented with options for creating your project.
Select **Application** as the project type, **Kotlin** as the programming language, and **Java 17** as the Java version.

Alternatively, you can create a Kotlin application using the [IntelliJ IDEA project wizard](https://kotlinlang.org/docs/jvm-get-started.html).

After creating the project, add the following dependencies:

<CodeGroup>
  ```kotlin build.gradle.kts theme={null}
  val mcpVersion = "0.4.0"
  val slf4jVersion = "2.0.9"
  val ktorVersion = "3.1.1"

  dependencies {
      implementation("io.modelcontextprotocol:kotlin-sdk:$mcpVersion")
      implementation("org.slf4j:slf4j-nop:$slf4jVersion")
      implementation("io.ktor:ktor-client-content-negotiation:$ktorVersion")
      implementation("io.ktor:ktor-serialization-kotlinx-json:$ktorVersion")
  }
  ```

  ```groovy build.gradle theme={null}
  def mcpVersion = '0.3.0'
  def slf4jVersion = '2.0.9'
  def ktorVersion = '3.1.1'

  dependencies {
      implementation "io.modelcontextprotocol:kotlin-sdk:$mcpVersion"
      implementation "org.slf4j:slf4j-nop:$slf4jVersion"
      implementation "io.ktor:ktor-client-content-negotiation:$ktorVersion"
      implementation "io.ktor:ktor-serialization-kotlinx-json:$ktorVersion"
  }
  ```
</CodeGroup>

Also, add the following plugins to your build script:

<CodeGroup>
  ```kotlin build.gradle.kts theme={null}
  plugins {
      kotlin("plugin.serialization") version "your_version_of_kotlin"
      id("com.github.johnrengelman.shadow") version "8.1.1"
  }
  ```

  ```groovy build.gradle theme={null}
  plugins {
      id 'org.jetbrains.kotlin.plugin.serialization' version 'your_version_of_kotlin'
      id 'com.github.johnrengelman.shadow' version '8.1.1'
  }
  ```
</CodeGroup>

Now let’s dive into building your server.

## Building your server

### Setting up the instance

Add a server initialization function:

```kotlin  theme={null}
// Main function to run the MCP server
fun `run mcp server`() {
    // Create the MCP Server instance with a basic implementation
    val server = Server(
        Implementation(
            name = "weather", // Tool name is "weather"
            version = "1.0.0" // Version of the implementation
        ),
        ServerOptions(
            capabilities = ServerCapabilities(tools = ServerCapabilities.Tools(listChanged = true))
        )
    )

    // Create a transport using standard IO for server communication
    val transport = StdioServerTransport(
        System.`in`.asInput(),
        System.out.asSink().buffered()
    )

    runBlocking {
        server.connect(transport)
        val done = Job()
        server.onClose {
            done.complete()
        }
        done.join()
    }
}
```

### Weather API helper functions

Next, let's add functions and data classes for querying and converting responses from the National Weather Service API:

```kotlin  theme={null}
// Extension function to fetch forecast information for given latitude and longitude
suspend fun HttpClient.getForecast(latitude: Double, longitude: Double): List<String> {
    val points = this.get("/points/$latitude,$longitude").body<Points>()
    val forecast = this.get(points.properties.forecast).body<Forecast>()
    return forecast.properties.periods.map { period ->
        """
            ${period.name}:
            Temperature: ${period.temperature} ${period.temperatureUnit}
            Wind: ${period.windSpeed} ${period.windDirection}
            Forecast: ${period.detailedForecast}
        """.trimIndent()
    }
}

// Extension function to fetch weather alerts for a given state
suspend fun HttpClient.getAlerts(state: String): List<String> {
    val alerts = this.get("/alerts/active/area/$state").body<Alert>()
    return alerts.features.map { feature ->
        """
            Event: ${feature.properties.event}
            Area: ${feature.properties.areaDesc}
            Severity: ${feature.properties.severity}
            Description: ${feature.properties.description}
            Instruction: ${feature.properties.instruction}
        """.trimIndent()
    }
}

@Serializable
data class Points(
    val properties: Properties
) {
    @Serializable
    data class Properties(val forecast: String)
}

@Serializable
data class Forecast(
    val properties: Properties
) {
    @Serializable
    data class Properties(val periods: List<Period>)

    @Serializable
    data class Period(
        val number: Int, val name: String, val startTime: String, val endTime: String,
        val isDaytime: Boolean, val temperature: Int, val temperatureUnit: String,
        val temperatureTrend: String, val probabilityOfPrecipitation: JsonObject,
        val windSpeed: String, val windDirection: String,
        val shortForecast: String, val detailedForecast: String,
    )
}

@Serializable
data class Alert(
    val features: List<Feature>
) {
    @Serializable
    data class Feature(
        val properties: Properties
    )

    @Serializable
    data class Properties(
        val event: String, val areaDesc: String, val severity: String,
        val description: String, val instruction: String?,
    )
}
```

### Implementing tool execution

The tool execution handler is responsible for actually executing the logic of each tool. Let's add it:

```kotlin  theme={null}
// Create an HTTP client with a default request configuration and JSON content negotiation
val httpClient = HttpClient {
    defaultRequest {
        url("https://api.weather.gov")
        headers {
            append("Accept", "application/geo+json")
            append("User-Agent", "WeatherApiClient/1.0")
        }
        contentType(ContentType.Application.Json)
    }
    // Install content negotiation plugin for JSON serialization/deserialization
    install(ContentNegotiation) { json(Json { ignoreUnknownKeys = true }) }
}

// Register a tool to fetch weather alerts by state
server.addTool(
    name = "get_alerts",
    description = """
        Get weather alerts for a US state. Input is Two-letter US state code (e.g. CA, NY)
    """.trimIndent(),
    inputSchema = Tool.Input(
        properties = buildJsonObject {
            putJsonObject("state") {
                put("type", "string")
                put("description", "Two-letter US state code (e.g. CA, NY)")
            }
        },
        required = listOf("state")
    )
) { request ->
    val state = request.arguments["state"]?.jsonPrimitive?.content
    if (state == null) {
        return@addTool CallToolResult(
            content = listOf(TextContent("The 'state' parameter is required."))
        )
    }

    val alerts = httpClient.getAlerts(state)

    CallToolResult(content = alerts.map { TextContent(it) })
}

// Register a tool to fetch weather forecast by latitude and longitude
server.addTool(
    name = "get_forecast",
    description = """
        Get weather forecast for a specific latitude/longitude
    """.trimIndent(),
    inputSchema = Tool.Input(
        properties = buildJsonObject {
            putJsonObject("latitude") { put("type", "number") }
            putJsonObject("longitude") { put("type", "number") }
        },
        required = listOf("latitude", "longitude")
    )
) { request ->
    val latitude = request.arguments["latitude"]?.jsonPrimitive?.doubleOrNull
    val longitude = request.arguments["longitude"]?.jsonPrimitive?.doubleOrNull
    if (latitude == null || longitude == null) {
        return@addTool CallToolResult(
            content = listOf(TextContent("The 'latitude' and 'longitude' parameters are required."))
        )
    }

    val forecast = httpClient.getForecast(latitude, longitude)

    CallToolResult(content = forecast.map { TextContent(it) })
}
```

### Running the server

Finally, implement the main function to run the server:

```kotlin  theme={null}
fun main() = `run mcp server`()
```

Make sure to run `./gradlew build` to build your server. This is a very important step in getting your server to connect.

Let's now test your server from an existing MCP host, Claude for Desktop.

## Testing your server with Claude for Desktop

<Note>
  Claude for Desktop is not yet available on Linux. Linux users can proceed to the [Building a client](/docs/develop/build-client) tutorial to build an MCP client that connects to the server we just built.
</Note>

First, make sure you have Claude for Desktop installed. [You can install the latest version
here.](https://claude.ai/download) If you already have Claude for Desktop, **make sure it's updated to the latest version.**

We'll need to configure Claude for Desktop for whichever MCP servers you want to use.
To do this, open your Claude for Desktop App configuration at `~/Library/Application Support/Claude/claude_desktop_config.json` in a text editor.
Make sure to create the file if it doesn't exist.

For example, if you have [VS Code](https://code.visualstudio.com/) installed:

<CodeGroup>
  ```bash macOS/Linux theme={null}
  code ~/Library/Application\ Support/Claude/claude_desktop_config.json
  ```

  ```powershell Windows theme={null}
  code $env:AppData\Claude\claude_desktop_config.json
  ```
</CodeGroup>

You'll then add your servers in the `mcpServers` key.
The MCP UI elements will only show up in Claude for Desktop if at least one server is properly configured.

In this case, we'll add our single weather server like so:

<CodeGroup>
  ```json macOS/Linux theme={null}
  {
    "mcpServers": {
      "weather": {
        "command": "java",
        "args": [
          "-jar",
          "/ABSOLUTE/PATH/TO/PARENT/FOLDER/weather/build/libs/weather-0.1.0-all.jar"
        ]
      }
    }
  }
  ```

  ```json Windows theme={null}
  {
    "mcpServers": {
      "weather": {
        "command": "java",
        "args": [
          "-jar",
          "C:\\PATH\\TO\\PARENT\\FOLDER\\weather\\build\\libs\\weather-0.1.0-all.jar"
        ]
      }
    }
  }
  ```
</CodeGroup>

This tells Claude for Desktop:

1. There's an MCP server named "weather"
2. Launch it by running `java -jar /ABSOLUTE/PATH/TO/PARENT/FOLDER/weather/build/libs/weather-0.1.0-all.jar`

Save the file, and restart **Claude for Desktop**.
### Prerequisite knowledge

This quickstart assumes you have familiarity with:

* C#
* LLMs like Claude
* .NET 8 or higher

### Logging in MCP Servers

When implementing MCP servers, be careful about how you handle logging:

**For STDIO-based servers:** Never write to standard output (stdout). This includes:

* `print()` statements in Python
* `console.log()` in JavaScript
* `fmt.Println()` in Go
* Similar stdout functions in other languages

Writing to stdout will corrupt the JSON-RPC messages and break your server.

**For HTTP-based servers:** Standard output logging is fine since it doesn't interfere with HTTP responses.

### Best Practices

1. Use a logging library that writes to stderr or files

### System requirements

* [.NET 8 SDK](https://dotnet.microsoft.com/download/dotnet/8.0) or higher installed.

### Set up your environment

First, let's install `dotnet` if you haven't already. You can download `dotnet` from [official Microsoft .NET website](https://dotnet.microsoft.com/download/). Verify your `dotnet` installation:

```bash  theme={null}
dotnet --version
```

Now, let's create and set up your project:

<CodeGroup>
  ```bash macOS/Linux theme={null}
  # Create a new directory for our project
  mkdir weather
  cd weather
  # Initialize a new C# project
  dotnet new console
  ```

  ```powershell Windows theme={null}
  # Create a new directory for our project
  mkdir weather
  cd weather
  # Initialize a new C# project
  dotnet new console
  ```
</CodeGroup>

After running `dotnet new console`, you will be presented with a new C# project.
You can open the project in your favorite IDE, such as [Visual Studio](https://visualstudio.microsoft.com/) or [Rider](https://www.jetbrains.com/rider/).
Alternatively, you can create a C# application using the [Visual Studio project wizard](https://learn.microsoft.com/en-us/visualstudio/get-started/csharp/tutorial-console?view=vs-2022).
After creating the project, add NuGet package for the Model Context Protocol SDK and hosting:

```bash  theme={null}
# Add the Model Context Protocol SDK NuGet package
dotnet add package ModelContextProtocol --prerelease
# Add the .NET Hosting NuGet package
dotnet add package Microsoft.Extensions.Hosting
```

Now let’s dive into building your server.

## Building your server

Open the `Program.cs` file in your project and replace its contents with the following code:

```csharp  theme={null}
using Microsoft.Extensions.DependencyInjection;
using Microsoft.Extensions.Hosting;
using ModelContextProtocol;
using System.Net.Http.Headers;

var builder = Host.CreateEmptyApplicationBuilder(settings: null);

builder.Services.AddMcpServer()
    .WithStdioServerTransport()
    .WithToolsFromAssembly();

builder.Services.AddSingleton(_ =>
{
    var client = new HttpClient() { BaseAddress = new Uri("https://api.weather.gov") };
    client.DefaultRequestHeaders.UserAgent.Add(new ProductInfoHeaderValue("weather-tool", "1.0"));
    return client;
});

var app = builder.Build();

await app.RunAsync();
```

<Note>
  When creating the `ApplicationHostBuilder`, ensure you use `CreateEmptyApplicationBuilder` instead of `CreateDefaultBuilder`. This ensures that the server does not write any additional messages to the console. This is only necessary for servers using STDIO transport.
</Note>

This code sets up a basic console application that uses the Model Context Protocol SDK to create an MCP server with standard I/O transport.

### Weather API helper functions

Create an extension class for `HttpClient` which helps simplify JSON request handling:

```csharp  theme={null}
using System.Text.Json;

internal static class HttpClientExt
{
    public static async Task<JsonDocument> ReadJsonDocumentAsync(this HttpClient client, string requestUri)
    {
        using var response = await client.GetAsync(requestUri);
        response.EnsureSuccessStatusCode();
        return await JsonDocument.ParseAsync(await response.Content.ReadAsStreamAsync());
    }
}
```

Next, define a class with the tool execution handlers for querying and converting responses from the National Weather Service API:

```csharp  theme={null}
using ModelContextProtocol.Server;
using System.ComponentModel;
using System.Globalization;
using System.Text.Json;

namespace QuickstartWeatherServer.Tools;

[McpServerToolType]
public static class WeatherTools
{
    [McpServerTool, Description("Get weather alerts for a US state.")]
    public static async Task<string> GetAlerts(
        HttpClient client,
        [Description("The US state to get alerts for.")] string state)
    {
        using var jsonDocument = await client.ReadJsonDocumentAsync($"/alerts/active/area/{state}");
        var jsonElement = jsonDocument.RootElement;
        var alerts = jsonElement.GetProperty("features").EnumerateArray();

        if (!alerts.Any())
        {
            return "No active alerts for this state.";
        }

        return string.Join("\n--\n", alerts.Select(alert =>
        {
            JsonElement properties = alert.GetProperty("properties");
            return $"""
                    Event: {properties.GetProperty("event").GetString()}
                    Area: {properties.GetProperty("areaDesc").GetString()}
                    Severity: {properties.GetProperty("severity").GetString()}
                    Description: {properties.GetProperty("description").GetString()}
                    Instruction: {properties.GetProperty("instruction").GetString()}
                    """;
        }));
    }

    [McpServerTool, Description("Get weather forecast for a location.")]
    public static async Task<string> GetForecast(
        HttpClient client,
        [Description("Latitude of the location.")] double latitude,
        [Description("Longitude of the location.")] double longitude)
    {
        var pointUrl = string.Create(CultureInfo.InvariantCulture, $"/points/{latitude},{longitude}");
        using var jsonDocument = await client.ReadJsonDocumentAsync(pointUrl);
        var forecastUrl = jsonDocument.RootElement.GetProperty("properties").GetProperty("forecast").GetString()
            ?? throw new Exception($"No forecast URL provided by {client.BaseAddress}points/{latitude},{longitude}");

        using var forecastDocument = await client.ReadJsonDocumentAsync(forecastUrl);
        var periods = forecastDocument.RootElement.GetProperty("properties").GetProperty("periods").EnumerateArray();

        return string.Join("\n---\n", periods.Select(period => $"""
                {period.GetProperty("name").GetString()}
                Temperature: {period.GetProperty("temperature").GetInt32()}°F
                Wind: {period.GetProperty("windSpeed").GetString()} {period.GetProperty("windDirection").GetString()}
                Forecast: {period.GetProperty("detailedForecast").GetString()}
                """));
    }
}
```

### Running the server

Finally, run the server using the following command:

```bash  theme={null}
dotnet run
```

This will start the server and listen for incoming requests on standard input/output.

## Testing your server with Claude for Desktop

<Note>
  Claude for Desktop is not yet available on Linux. Linux users can proceed to the [Building a client](/docs/develop/build-client) tutorial to build an MCP client that connects to the server we just built.
</Note>

First, make sure you have Claude for Desktop installed. [You can install the latest version
here.](https://claude.ai/download) If you already have Claude for Desktop, **make sure it's updated to the latest version.**
We'll need to configure Claude for Desktop for whichever MCP servers you want to use. To do this, open your Claude for Desktop App configuration at `~/Library/Application Support/Claude/claude_desktop_config.json` in a text editor. Make sure to create the file if it doesn't exist.
For example, if you have [VS Code](https://code.visualstudio.com/) installed:

<CodeGroup>
  ```bash macOS/Linux theme={null}
  code ~/Library/Application\ Support/Claude/claude_desktop_config.json
  ```

  ```powershell Windows theme={null}
  code $env:AppData\Claude\claude_desktop_config.json
  ```
</CodeGroup>

You'll then add your servers in the `mcpServers` key. The MCP UI elements will only show up in Claude for Desktop if at least one server is properly configured.
In this case, we'll add our single weather server like so:

<CodeGroup>
  ```json macOS/Linux theme={null}
  {
    "mcpServers": {
      "weather": {
        "command": "dotnet",
        "args": ["run", "--project", "/ABSOLUTE/PATH/TO/PROJECT", "--no-build"]
      }
    }
  }
  ```

  ```json Windows theme={null}
  {
    "mcpServers": {
      "weather": {
        "command": "dotnet",
        "args": [
          "run",
          "--project",
          "C:\\ABSOLUTE\\PATH\\TO\\PROJECT",
          "--no-build"
        ]
      }
    }
  }
  ```
</CodeGroup>

This tells Claude for Desktop:

1. There's an MCP server named "weather"
2. Launch it by running `dotnet run /ABSOLUTE/PATH/TO/PROJECT`
   Save the file, and restart **Claude for Desktop**.
Let's make sure Claude for Desktop is picking up the two tools we've exposed in our weather server. You can do this by looking for the "Search and tools" <img src="https://mintcdn.com/mcp/4ZXF1PrDkEaJvXpn/images/claude-desktop-mcp-slider.svg?fit=max&auto=format&n=4ZXF1PrDkEaJvXpn&q=85&s=2742ec3fb97067e8591e68546c90221e" style={{display: 'inline', margin: 0, height: '1.3em'}} data-og-width="24" width="24" data-og-height="24" height="24" data-path="images/claude-desktop-mcp-slider.svg" data-optimize="true" data-opv="3" srcset="https://mintcdn.com/mcp/4ZXF1PrDkEaJvXpn/images/claude-desktop-mcp-slider.svg?w=280&fit=max&auto=format&n=4ZXF1PrDkEaJvXpn&q=85&s=52839f8519f476623c4fb5bb87ee24bd 280w, https://mintcdn.com/mcp/4ZXF1PrDkEaJvXpn/images/claude-desktop-mcp-slider.svg?w=560&fit=max&auto=format&n=4ZXF1PrDkEaJvXpn&q=85&s=f0491976e108286441fc6554309c5c4f 560w, https://mintcdn.com/mcp/4ZXF1PrDkEaJvXpn/images/claude-desktop-mcp-slider.svg?w=840&fit=max&auto=format&n=4ZXF1PrDkEaJvXpn&q=85&s=08e83eb102eda755a7db1eb27d16ebff 840w, https://mintcdn.com/mcp/4ZXF1PrDkEaJvXpn/images/claude-desktop-mcp-slider.svg?w=1100&fit=max&auto=format&n=4ZXF1PrDkEaJvXpn&q=85&s=2524a80752928b0206e68e8e1890d1aa 1100w, https://mintcdn.com/mcp/4ZXF1PrDkEaJvXpn/images/claude-desktop-mcp-slider.svg?w=1650&fit=max&auto=format&n=4ZXF1PrDkEaJvXpn&q=85&s=3c0dc88dadad5ed8e8af316965d00e0b 1650w, https://mintcdn.com/mcp/4ZXF1PrDkEaJvXpn/images/claude-desktop-mcp-slider.svg?w=2500&fit=max&auto=format&n=4ZXF1PrDkEaJvXpn&q=85&s=702363a955a631c40c342f9557d5cfdd 2500w" /> icon:
After clicking on the slider icon, you should see two tools listed:
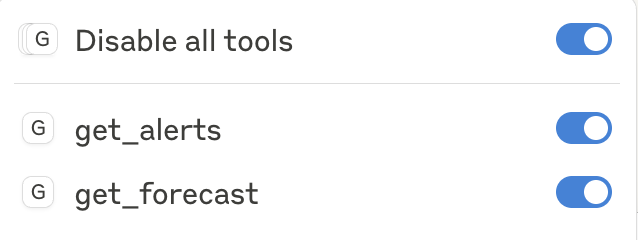
If your server isn't being picked up by Claude for Desktop, proceed to the Troubleshooting section for debugging tips.
If the tool settings icon has shown up, you can now test your server by running the following commands in Claude for Desktop:
- What's the weather in Sacramento?
- What are the active weather alerts in Texas?
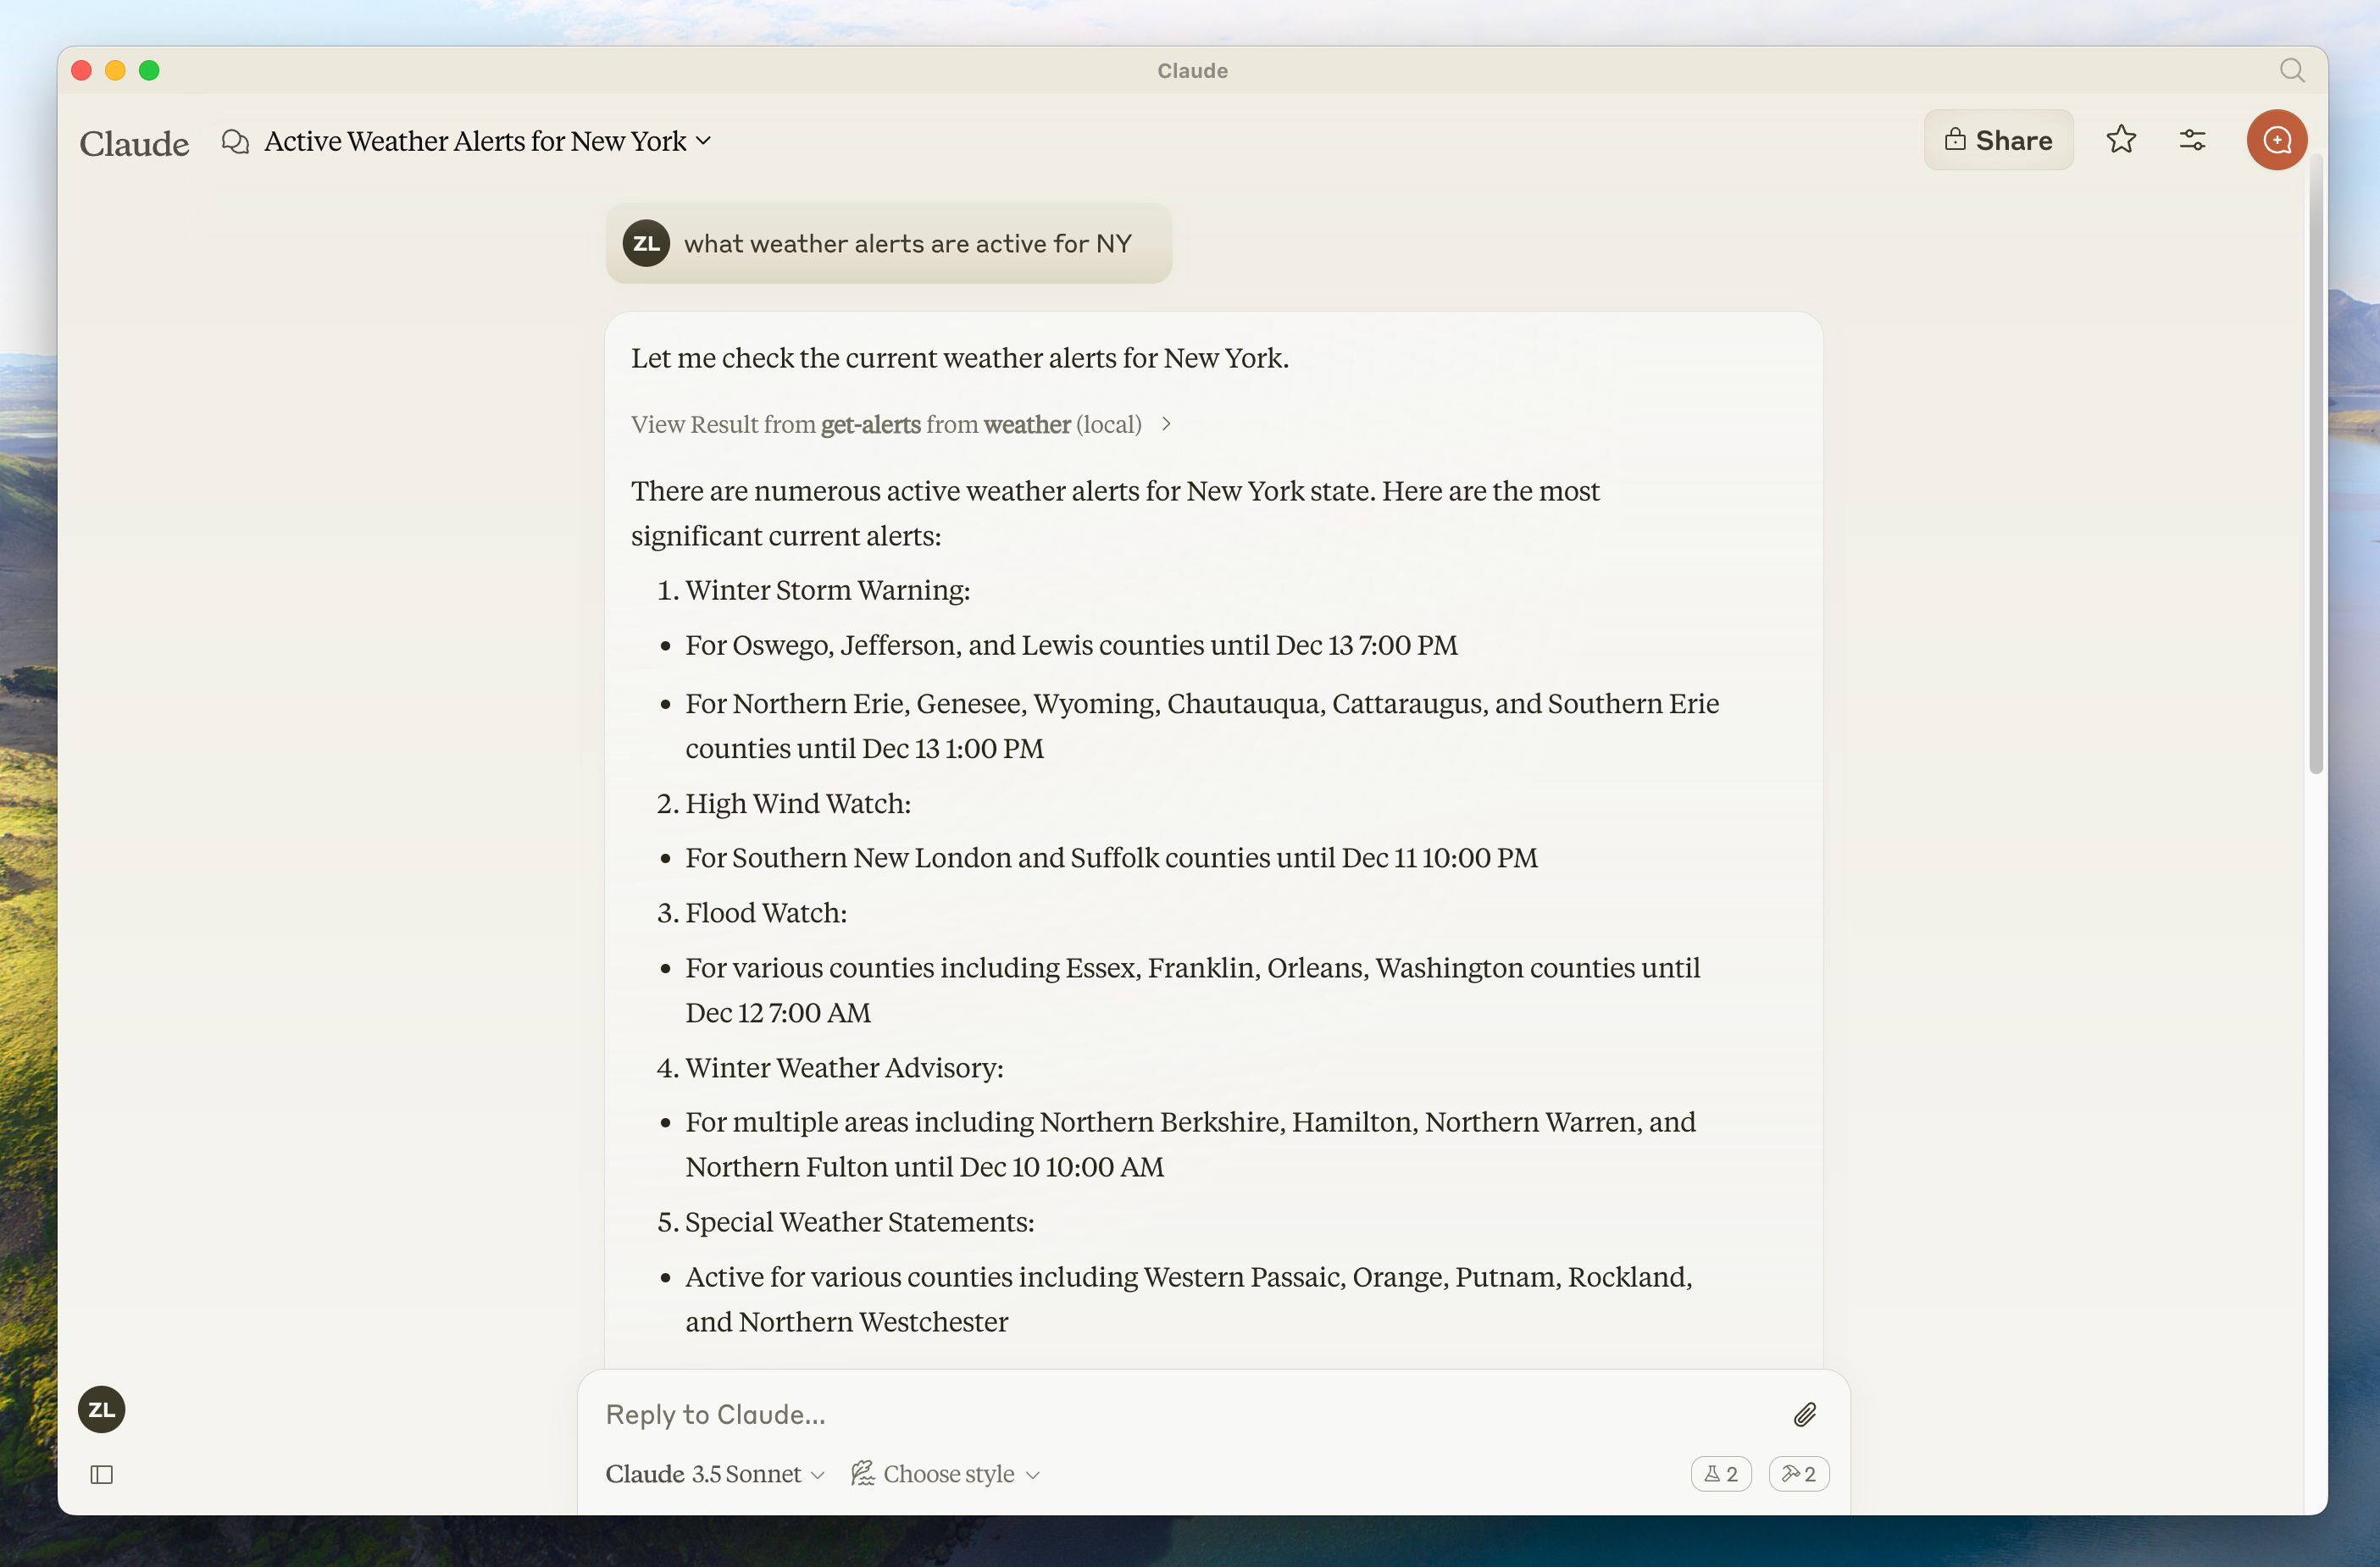
When you ask a question:
- The client sends your question to Claude
- Claude analyzes the available tools and decides which one(s) to use
- The client executes the chosen tool(s) through the MCP server
- The results are sent back to Claude
- Claude formulates a natural language response
- The response is displayed to you!
Claude.app logging related to MCP is written to log files in `~/Library/Logs/Claude`:

* `mcp.log` will contain general logging about MCP connections and connection failures.
* Files named `mcp-server-SERVERNAME.log` will contain error (stderr) logging from the named server.

You can run the following command to list recent logs and follow along with any new ones:

```bash  theme={null}
# Check Claude's logs for errors
tail -n 20 -f ~/Library/Logs/Claude/mcp*.log
```

**Server not showing up in Claude**

1. Check your `claude_desktop_config.json` file syntax
2. Make sure the path to your project is absolute and not relative
3. Restart Claude for Desktop completely

**Tool calls failing silently**

If Claude attempts to use the tools but they fail:

1. Check Claude's logs for errors
2. Verify your server builds and runs without errors
3. Try restarting Claude for Desktop

**None of this is working. What do I do?**

Please refer to our [debugging guide](/legacy/tools/debugging) for better debugging tools and more detailed guidance.
This usually means either:

1. The coordinates are outside the US
2. The NWS API is having issues
3. You're being rate limited

Fix:

* Verify you're using US coordinates
* Add a small delay between requests
* Check the NWS API status page

**Error: No active alerts for \[STATE]**

This isn't an error - it just means there are no current weather alerts for that state. Try a different state or check during severe weather.
Get started building your own client that can integrate with all MCP servers.
In this tutorial, you'll learn how to build an LLM-powered chatbot client that connects to MCP servers.
Before you begin, it helps to have gone through our Build an MCP Server tutorial so you can understand how clients and servers communicate.
[You can find the complete code for this tutorial here.](https://github.com/modelcontextprotocol/quickstart-resources/tree/main/mcp-client-python)## System Requirements
Before starting, ensure your system meets these requirements:
* Mac or Windows computer
* Latest Python version installed
* Latest version of `uv` installed
## Setting Up Your Environment
First, create a new Python project with `uv`:
<CodeGroup>
```bash macOS/Linux theme={null}
# Create project directory
uv init mcp-client
cd mcp-client
# Create virtual environment
uv venv
# Activate virtual environment
source .venv/bin/activate
# Install required packages
uv add mcp anthropic python-dotenv
# Remove boilerplate files
rm main.py
# Create our main file
touch client.py
```
```powershell Windows theme={null}
# Create project directory
uv init mcp-client
cd mcp-client
# Create virtual environment
uv venv
# Activate virtual environment
.venv\Scripts\activate
# Install required packages
uv add mcp anthropic python-dotenv
# Remove boilerplate files
del main.py
# Create our main file
new-item client.py
```
</CodeGroup>
## Setting Up Your API Key
You'll need an Anthropic API key from the [Anthropic Console](https://console.anthropic.com/settings/keys).
Create a `.env` file to store it:
```bash theme={null}
echo "ANTHROPIC_API_KEY=<your key here>" > .env
```
Add `.env` to your `.gitignore`:
```bash theme={null}
echo ".env" >> .gitignore
```
<Warning>
Make sure you keep your `ANTHROPIC_API_KEY` secure!
</Warning>
## Creating the Client
### Basic Client Structure
First, let's set up our imports and create the basic client class:
```python theme={null}
import asyncio
from typing import Optional
from contextlib import AsyncExitStack
from mcp import ClientSession, StdioServerParameters
from mcp.client.stdio import stdio_client
from anthropic import Anthropic
from dotenv import load_dotenv
load_dotenv() # load environment variables from .env
class MCPClient:
def __init__(self):
# Initialize session and client objects
self.session: Optional[ClientSession] = None
self.exit_stack = AsyncExitStack()
self.anthropic = Anthropic()
# methods will go here
```
### Server Connection Management
Next, we'll implement the method to connect to an MCP server:
```python theme={null}
async def connect_to_server(self, server_script_path: str):
"""Connect to an MCP server
Args:
server_script_path: Path to the server script (.py or .js)
"""
is_python = server_script_path.endswith('.py')
is_js = server_script_path.endswith('.js')
if not (is_python or is_js):
raise ValueError("Server script must be a .py or .js file")
command = "python" if is_python else "node"
server_params = StdioServerParameters(
command=command,
args=[server_script_path],
env=None
)
stdio_transport = await self.exit_stack.enter_async_context(stdio_client(server_params))
self.stdio, self.write = stdio_transport
self.session = await self.exit_stack.enter_async_context(ClientSession(self.stdio, self.write))
await self.session.initialize()
# List available tools
response = await self.session.list_tools()
tools = response.tools
print("\nConnected to server with tools:", [tool.name for tool in tools])
```
### Query Processing Logic
Now let's add the core functionality for processing queries and handling tool calls:
```python theme={null}
async def process_query(self, query: str) -> str:
"""Process a query using Claude and available tools"""
messages = [
{
"role": "user",
"content": query
}
]
response = await self.session.list_tools()
available_tools = [{
"name": tool.name,
"description": tool.description,
"input_schema": tool.inputSchema
} for tool in response.tools]
# Initial Claude API call
response = self.anthropic.messages.create(
model="claude-3-5-sonnet-20241022",
max_tokens=1000,
messages=messages,
tools=available_tools
)
# Process response and handle tool calls
final_text = []
assistant_message_content = []
for content in response.content:
if content.type == 'text':
final_text.append(content.text)
assistant_message_content.append(content)
elif content.type == 'tool_use':
tool_name = content.name
tool_args = content.input
# Execute tool call
result = await self.session.call_tool(tool_name, tool_args)
final_text.append(f"[Calling tool {tool_name} with args {tool_args}]")
assistant_message_content.append(content)
messages.append({
"role": "assistant",
"content": assistant_message_content
})
messages.append({
"role": "user",
"content": [
{
"type": "tool_result",
"tool_use_id": content.id,
"content": result.content
}
]
})
# Get next response from Claude
response = self.anthropic.messages.create(
model="claude-3-5-sonnet-20241022",
max_tokens=1000,
messages=messages,
tools=available_tools
)
final_text.append(response.content[0].text)
return "\n".join(final_text)
```
### Interactive Chat Interface
Now we'll add the chat loop and cleanup functionality:
```python theme={null}
async def chat_loop(self):
"""Run an interactive chat loop"""
print("\nMCP Client Started!")
print("Type your queries or 'quit' to exit.")
while True:
try:
query = input("\nQuery: ").strip()
if query.lower() == 'quit':
break
response = await self.process_query(query)
print("\n" + response)
except Exception as e:
print(f"\nError: {str(e)}")
async def cleanup(self):
"""Clean up resources"""
await self.exit_stack.aclose()
```
### Main Entry Point
Finally, we'll add the main execution logic:
```python theme={null}
async def main():
if len(sys.argv) < 2:
print("Usage: python client.py <path_to_server_script>")
sys.exit(1)
client = MCPClient()
try:
await client.connect_to_server(sys.argv[1])
await client.chat_loop()
finally:
await client.cleanup()
if __name__ == "__main__":
import sys
asyncio.run(main())
```
You can find the complete `client.py` file [here](https://github.com/modelcontextprotocol/quickstart-resources/blob/main/mcp-client-python/client.py).
## Key Components Explained
### 1. Client Initialization
* The `MCPClient` class initializes with session management and API clients
* Uses `AsyncExitStack` for proper resource management
* Configures the Anthropic client for Claude interactions
### 2. Server Connection
* Supports both Python and Node.js servers
* Validates server script type
* Sets up proper communication channels
* Initializes the session and lists available tools
### 3. Query Processing
* Maintains conversation context
* Handles Claude's responses and tool calls
* Manages the message flow between Claude and tools
* Combines results into a coherent response
### 4. Interactive Interface
* Provides a simple command-line interface
* Handles user input and displays responses
* Includes basic error handling
* Allows graceful exit
### 5. Resource Management
* Proper cleanup of resources
* Error handling for connection issues
* Graceful shutdown procedures
## Common Customization Points
1. **Tool Handling**
* Modify `process_query()` to handle specific tool types
* Add custom error handling for tool calls
* Implement tool-specific response formatting
2. **Response Processing**
* Customize how tool results are formatted
* Add response filtering or transformation
* Implement custom logging
3. **User Interface**
* Add a GUI or web interface
* Implement rich console output
* Add command history or auto-completion
## Running the Client
To run your client with any MCP server:
```bash theme={null}
uv run client.py path/to/server.py # python server
uv run client.py path/to/build/index.js # node server
```
<Note>
If you're continuing [the weather tutorial from the server quickstart](https://github.com/modelcontextprotocol/quickstart-resources/tree/main/weather-server-python), your command might look something like this: `python client.py .../quickstart-resources/weather-server-python/weather.py`
</Note>
The client will:
1. Connect to the specified server
2. List available tools
3. Start an interactive chat session where you can:
* Enter queries
* See tool executions
* Get responses from Claude
Here's an example of what it should look like if connected to the weather server from the server quickstart:
<Frame>
<img src="https://mintcdn.com/mcp/4ZXF1PrDkEaJvXpn/images/client-claude-cli-python.png?fit=max&auto=format&n=4ZXF1PrDkEaJvXpn&q=85&s=686d6e0ae7c54f807827db111eaed7d4" data-og-width="1932" width="1932" data-og-height="1739" height="1739" data-path="images/client-claude-cli-python.png" data-optimize="true" data-opv="3" srcset="https://mintcdn.com/mcp/4ZXF1PrDkEaJvXpn/images/client-claude-cli-python.png?w=280&fit=max&auto=format&n=4ZXF1PrDkEaJvXpn&q=85&s=48ff45c4ca51501589d9f20f060daa56 280w, https://mintcdn.com/mcp/4ZXF1PrDkEaJvXpn/images/client-claude-cli-python.png?w=560&fit=max&auto=format&n=4ZXF1PrDkEaJvXpn&q=85&s=b35ca5d8a67c2f08efec9c6519efcfe2 560w, https://mintcdn.com/mcp/4ZXF1PrDkEaJvXpn/images/client-claude-cli-python.png?w=840&fit=max&auto=format&n=4ZXF1PrDkEaJvXpn&q=85&s=51b8f5c7fa48db6ccd30aa9988a8c917 840w, https://mintcdn.com/mcp/4ZXF1PrDkEaJvXpn/images/client-claude-cli-python.png?w=1100&fit=max&auto=format&n=4ZXF1PrDkEaJvXpn&q=85&s=9e1b01bc4c324a7e5100674f63f36b13 1100w, https://mintcdn.com/mcp/4ZXF1PrDkEaJvXpn/images/client-claude-cli-python.png?w=1650&fit=max&auto=format&n=4ZXF1PrDkEaJvXpn&q=85&s=e3e961bd5b5506fed6c860f70df9bf9d 1650w, https://mintcdn.com/mcp/4ZXF1PrDkEaJvXpn/images/client-claude-cli-python.png?w=2500&fit=max&auto=format&n=4ZXF1PrDkEaJvXpn&q=85&s=da01c2527db68cb0c99d29d20751a868 2500w" />
</Frame>
## How It Works
When you submit a query:
1. The client gets the list of available tools from the server
2. Your query is sent to Claude along with tool descriptions
3. Claude decides which tools (if any) to use
4. The client executes any requested tool calls through the server
5. Results are sent back to Claude
6. Claude provides a natural language response
7. The response is displayed to you
## Best practices
1. **Error Handling**
* Always wrap tool calls in try-catch blocks
* Provide meaningful error messages
* Gracefully handle connection issues
2. **Resource Management**
* Use `AsyncExitStack` for proper cleanup
* Close connections when done
* Handle server disconnections
3. **Security**
* Store API keys securely in `.env`
* Validate server responses
* Be cautious with tool permissions
## Troubleshooting
### Server Path Issues
* Double-check the path to your server script is correct
* Use the absolute path if the relative path isn't working
* For Windows users, make sure to use forward slashes (/) or escaped backslashes (\\) in the path
* Verify the server file has the correct extension (.py for Python or .js for Node.js)
Example of correct path usage:
```bash theme={null}
# Relative path
uv run client.py ./server/weather.py
# Absolute path
uv run client.py /Users/username/projects/mcp-server/weather.py
# Windows path (either format works)
uv run client.py C:/projects/mcp-server/weather.py
uv run client.py C:\\projects\\mcp-server\\weather.py
```
### Response Timing
* The first response might take up to 30 seconds to return
* This is normal and happens while:
* The server initializes
* Claude processes the query
* Tools are being executed
* Subsequent responses are typically faster
* Don't interrupt the process during this initial waiting period
### Common Error Messages
If you see:
* `FileNotFoundError`: Check your server path
* `Connection refused`: Ensure the server is running and the path is correct
* `Tool execution failed`: Verify the tool's required environment variables are set
* `Timeout error`: Consider increasing the timeout in your client configuration
## System Requirements

Before starting, ensure your system meets these requirements:

* Mac or Windows computer
* Node.js 17 or higher installed
* Latest version of `npm` installed
* Anthropic API key (Claude)

## Setting Up Your Environment

First, let's create and set up our project:

<CodeGroup>
  ```bash macOS/Linux theme={null}
  # Create project directory
  mkdir mcp-client-typescript
  cd mcp-client-typescript

  # Initialize npm project
  npm init -y

  # Install dependencies
  npm install @anthropic-ai/sdk @modelcontextprotocol/sdk dotenv

  # Install dev dependencies
  npm install -D @types/node typescript

  # Create source file
  touch index.ts
  ```

  ```powershell Windows theme={null}
  # Create project directory
  md mcp-client-typescript
  cd mcp-client-typescript

  # Initialize npm project
  npm init -y

  # Install dependencies
  npm install @anthropic-ai/sdk @modelcontextprotocol/sdk dotenv

  # Install dev dependencies
  npm install -D @types/node typescript

  # Create source file
  new-item index.ts
  ```
</CodeGroup>

Update your `package.json` to set `type: "module"` and a build script:

```json package.json theme={null}
{
  "type": "module",
  "scripts": {
    "build": "tsc && chmod 755 build/index.js"
  }
}
```

Create a `tsconfig.json` in the root of your project:

```json tsconfig.json theme={null}
{
  "compilerOptions": {
    "target": "ES2022",
    "module": "Node16",
    "moduleResolution": "Node16",
    "outDir": "./build",
    "rootDir": "./",
    "strict": true,
    "esModuleInterop": true,
    "skipLibCheck": true,
    "forceConsistentCasingInFileNames": true
  },
  "include": ["index.ts"],
  "exclude": ["node_modules"]
}
```

## Setting Up Your API Key

You'll need an Anthropic API key from the [Anthropic Console](https://console.anthropic.com/settings/keys).

Create a `.env` file to store it:

```bash  theme={null}
echo "ANTHROPIC_API_KEY=<your key here>" > .env
```

Add `.env` to your `.gitignore`:

```bash  theme={null}
echo ".env" >> .gitignore
```

<Warning>
  Make sure you keep your `ANTHROPIC_API_KEY` secure!
</Warning>

## Creating the Client

### Basic Client Structure

First, let's set up our imports and create the basic client class in `index.ts`:

```typescript  theme={null}
import { Anthropic } from "@anthropic-ai/sdk";
import {
  MessageParam,
  Tool,
} from "@anthropic-ai/sdk/resources/messages/messages.mjs";
import { Client } from "@modelcontextprotocol/sdk/client/index.js";
import { StdioClientTransport } from "@modelcontextprotocol/sdk/client/stdio.js";
import readline from "readline/promises";
import dotenv from "dotenv";

dotenv.config();

const ANTHROPIC_API_KEY = process.env.ANTHROPIC_API_KEY;
if (!ANTHROPIC_API_KEY) {
  throw new Error("ANTHROPIC_API_KEY is not set");
}

class MCPClient {
  private mcp: Client;
  private anthropic: Anthropic;
  private transport: StdioClientTransport | null = null;
  private tools: Tool[] = [];

  constructor() {
    this.anthropic = new Anthropic({
      apiKey: ANTHROPIC_API_KEY,
    });
    this.mcp = new Client({ name: "mcp-client-cli", version: "1.0.0" });
  }
  // methods will go here
}
```

### Server Connection Management

Next, we'll implement the method to connect to an MCP server:

```typescript  theme={null}
async connectToServer(serverScriptPath: string) {
  try {
    const isJs = serverScriptPath.endsWith(".js");
    const isPy = serverScriptPath.endsWith(".py");
    if (!isJs && !isPy) {
      throw new Error("Server script must be a .js or .py file");
    }
    const command = isPy
      ? process.platform === "win32"
        ? "python"
        : "python3"
      : process.execPath;

    this.transport = new StdioClientTransport({
      command,
      args: [serverScriptPath],
    });
    await this.mcp.connect(this.transport);

    const toolsResult = await this.mcp.listTools();
    this.tools = toolsResult.tools.map((tool) => {
      return {
        name: tool.name,
        description: tool.description,
        input_schema: tool.inputSchema,
      };
    });
    console.log(
      "Connected to server with tools:",
      this.tools.map(({ name }) => name)
    );
  } catch (e) {
    console.log("Failed to connect to MCP server: ", e);
    throw e;
  }
}
```

### Query Processing Logic

Now let's add the core functionality for processing queries and handling tool calls:

```typescript  theme={null}
async processQuery(query: string) {
  const messages: MessageParam[] = [
    {
      role: "user",
      content: query,
    },
  ];

  const response = await this.anthropic.messages.create({
    model: "claude-3-5-sonnet-20241022",
    max_tokens: 1000,
    messages,
    tools: this.tools,
  });

  const finalText = [];

  for (const content of response.content) {
    if (content.type === "text") {
      finalText.push(content.text);
    } else if (content.type === "tool_use") {
      const toolName = content.name;
      const toolArgs = content.input as { [x: string]: unknown } | undefined;

      const result = await this.mcp.callTool({
        name: toolName,
        arguments: toolArgs,
      });
      finalText.push(
        `[Calling tool ${toolName} with args ${JSON.stringify(toolArgs)}]`
      );

      messages.push({
        role: "user",
        content: result.content as string,
      });

      const response = await this.anthropic.messages.create({
        model: "claude-3-5-sonnet-20241022",
        max_tokens: 1000,
        messages,
      });

      finalText.push(
        response.content[0].type === "text" ? response.content[0].text : ""
      );
    }
  }

  return finalText.join("\n");
}
```

### Interactive Chat Interface

Now we'll add the chat loop and cleanup functionality:

```typescript  theme={null}
async chatLoop() {
  const rl = readline.createInterface({
    input: process.stdin,
    output: process.stdout,
  });

  try {
    console.log("\nMCP Client Started!");
    console.log("Type your queries or 'quit' to exit.");

    while (true) {
      const message = await rl.question("\nQuery: ");
      if (message.toLowerCase() === "quit") {
        break;
      }
      const response = await this.processQuery(message);
      console.log("\n" + response);
    }
  } finally {
    rl.close();
  }
}

async cleanup() {
  await this.mcp.close();
}
```

### Main Entry Point

Finally, we'll add the main execution logic:

```typescript  theme={null}
async function main() {
  if (process.argv.length < 3) {
    console.log("Usage: node index.ts <path_to_server_script>");
    return;
  }
  const mcpClient = new MCPClient();
  try {
    await mcpClient.connectToServer(process.argv[2]);
    await mcpClient.chatLoop();
  } finally {
    await mcpClient.cleanup();
    process.exit(0);
  }
}

main();
```

## Running the Client

To run your client with any MCP server:

```bash  theme={null}
# Build TypeScript
npm run build

# Run the client
node build/index.js path/to/server.py # python server
node build/index.js path/to/build/index.js # node server
```

<Note>
  If you're continuing [the weather tutorial from the server quickstart](https://github.com/modelcontextprotocol/quickstart-resources/tree/main/weather-server-typescript), your command might look something like this: `node build/index.js .../quickstart-resources/weather-server-typescript/build/index.js`
</Note>

**The client will:**

1. Connect to the specified server
2. List available tools
3. Start an interactive chat session where you can:
   * Enter queries
   * See tool executions
   * Get responses from Claude

## How It Works

When you submit a query:

1. The client gets the list of available tools from the server
2. Your query is sent to Claude along with tool descriptions
3. Claude decides which tools (if any) to use
4. The client executes any requested tool calls through the server
5. Results are sent back to Claude
6. Claude provides a natural language response
7. The response is displayed to you

## Best practices

1. **Error Handling**
   * Use TypeScript's type system for better error detection
   * Wrap tool calls in try-catch blocks
   * Provide meaningful error messages
   * Gracefully handle connection issues

2. **Security**
   * Store API keys securely in `.env`
   * Validate server responses
   * Be cautious with tool permissions

## Troubleshooting

### Server Path Issues

* Double-check the path to your server script is correct
* Use the absolute path if the relative path isn't working
* For Windows users, make sure to use forward slashes (/) or escaped backslashes (\\) in the path
* Verify the server file has the correct extension (.js for Node.js or .py for Python)

Example of correct path usage:

```bash  theme={null}
# Relative path
node build/index.js ./server/build/index.js

# Absolute path
node build/index.js /Users/username/projects/mcp-server/build/index.js

# Windows path (either format works)
node build/index.js C:/projects/mcp-server/build/index.js
node build/index.js C:\\projects\\mcp-server\\build\\index.js
```

### Response Timing

* The first response might take up to 30 seconds to return
* This is normal and happens while:
  * The server initializes
  * Claude processes the query
  * Tools are being executed
* Subsequent responses are typically faster
* Don't interrupt the process during this initial waiting period

### Common Error Messages

If you see:

* `Error: Cannot find module`: Check your build folder and ensure TypeScript compilation succeeded
* `Connection refused`: Ensure the server is running and the path is correct
* `Tool execution failed`: Verify the tool's required environment variables are set
* `ANTHROPIC_API_KEY is not set`: Check your .env file and environment variables
* `TypeError`: Ensure you're using the correct types for tool arguments
This example demonstrates how to build an interactive chatbot that combines Spring AI's Model Context Protocol (MCP) with the [Brave Search MCP Server](https://github.com/modelcontextprotocol/servers-archived/tree/main/src/brave-search). The application creates a conversational interface powered by Anthropic's Claude AI model that can perform internet searches through Brave Search, enabling natural language interactions with real-time web data.
[You can find the complete code for this tutorial here.](https://github.com/spring-projects/spring-ai-examples/tree/main/model-context-protocol/web-search/brave-chatbot)

## System Requirements

Before starting, ensure your system meets these requirements:

* Java 17 or higher
* Maven 3.6+
* npx package manager
* Anthropic API key (Claude)
* Brave Search API key

## Setting Up Your Environment

1. Install npx (Node Package eXecute):
   First, make sure to install [npm](https://docs.npmjs.com/downloading-and-installing-node-js-and-npm)
   and then run:

   ```bash  theme={null}
   npm install -g npx
   ```

2. Clone the repository:

   ```bash  theme={null}
   git clone https://github.com/spring-projects/spring-ai-examples.git
   cd model-context-protocol/brave-chatbot
   ```

3. Set up your API keys:

   ```bash  theme={null}
   export ANTHROPIC_API_KEY='your-anthropic-api-key-here'
   export BRAVE_API_KEY='your-brave-api-key-here'
   ```

4. Build the application:

   ```bash  theme={null}
   ./mvnw clean install
   ```

5. Run the application using Maven:
   ```bash  theme={null}
   ./mvnw spring-boot:run
   ```

<Warning>
  Make sure you keep your `ANTHROPIC_API_KEY` and `BRAVE_API_KEY` keys secure!
</Warning>

## How it Works

The application integrates Spring AI with the Brave Search MCP server through several components:

### MCP Client Configuration

1. Required dependencies in pom.xml:

```xml  theme={null}
<dependency>
    <groupId>org.springframework.ai</groupId>
    <artifactId>spring-ai-starter-mcp-client</artifactId>
</dependency>
<dependency>
    <groupId>org.springframework.ai</groupId>
    <artifactId>spring-ai-starter-model-anthropic</artifactId>
</dependency>
```

2. Application properties (application.yml):

```yml  theme={null}
spring:
  ai:
    mcp:
      client:
        enabled: true
        name: brave-search-client
        version: 1.0.0
        type: SYNC
        request-timeout: 20s
        stdio:
          root-change-notification: true
          servers-configuration: classpath:/mcp-servers-config.json
        toolcallback:
          enabled: true
    anthropic:
      api-key: ${ANTHROPIC_API_KEY}
```

This activates the `spring-ai-starter-mcp-client` to create one or more `McpClient`s based on the provided server configuration.
The `spring.ai.mcp.client.toolcallback.enabled=true` property enables the tool callback mechanism, that automatically registers all MCP tool as spring ai tools.
It is disabled by default.

3. MCP Server Configuration (`mcp-servers-config.json`):

```json  theme={null}
{
  "mcpServers": {
    "brave-search": {
      "command": "npx",
      "args": ["-y", "@modelcontextprotocol/server-brave-search"],
      "env": {
        "BRAVE_API_KEY": "<PUT YOUR BRAVE API KEY>"
      }
    }
  }
}
```

### Chat Implementation

The chatbot is implemented using Spring AI's ChatClient with MCP tool integration:

```java  theme={null}
var chatClient = chatClientBuilder
    .defaultSystem("You are useful assistant, expert in AI and Java.")
    .defaultToolCallbacks((Object[]) mcpToolAdapter.toolCallbacks())
    .defaultAdvisors(new MessageChatMemoryAdvisor(new InMemoryChatMemory()))
    .build();
```

Key features:

* Uses Claude AI model for natural language understanding
* Integrates Brave Search through MCP for real-time web search capabilities
* Maintains conversation memory using InMemoryChatMemory
* Runs as an interactive command-line application

### Build and run

```bash  theme={null}
./mvnw clean install
java -jar ./target/ai-mcp-brave-chatbot-0.0.1-SNAPSHOT.jar
```

or

```bash  theme={null}
./mvnw spring-boot:run
```

The application will start an interactive chat session where you can ask questions. The chatbot will use Brave Search when it needs to find information from the internet to answer your queries.

The chatbot can:

* Answer questions using its built-in knowledge
* Perform web searches when needed using Brave Search
* Remember context from previous messages in the conversation
* Combine information from multiple sources to provide comprehensive answers

### Advanced Configuration

The MCP client supports additional configuration options:

* Client customization through `McpSyncClientCustomizer` or `McpAsyncClientCustomizer`
* Multiple clients with multiple transport types: `STDIO` and `SSE` (Server-Sent Events)
* Integration with Spring AI's tool execution framework
* Automatic client initialization and lifecycle management

For WebFlux-based applications, you can use the WebFlux starter instead:

```xml  theme={null}
<dependency>
    <groupId>org.springframework.ai</groupId>
    <artifactId>spring-ai-mcp-client-webflux-spring-boot-starter</artifactId>
</dependency>
```

This provides similar functionality but uses a WebFlux-based SSE transport implementation, recommended for production deployments.
## System Requirements

Before starting, ensure your system meets these requirements:

* Java 17 or higher
* Anthropic API key (Claude)

## Setting up your environment

First, let's install `java` and `gradle` if you haven't already.
You can download `java` from [official Oracle JDK website](https://www.oracle.com/java/technologies/downloads/).
Verify your `java` installation:

```bash  theme={null}
java --version
```

Now, let's create and set up your project:

<CodeGroup>
  ```bash macOS/Linux theme={null}
  # Create a new directory for our project
  mkdir kotlin-mcp-client
  cd kotlin-mcp-client

  # Initialize a new kotlin project
  gradle init
  ```

  ```powershell Windows theme={null}
  # Create a new directory for our project
  md kotlin-mcp-client
  cd kotlin-mcp-client
  # Initialize a new kotlin project
  gradle init
  ```
</CodeGroup>

After running `gradle init`, you will be presented with options for creating your project.
Select **Application** as the project type, **Kotlin** as the programming language, and **Java 17** as the Java version.

Alternatively, you can create a Kotlin application using the [IntelliJ IDEA project wizard](https://kotlinlang.org/docs/jvm-get-started.html).

After creating the project, add the following dependencies:

<CodeGroup>
  ```kotlin build.gradle.kts theme={null}
  val mcpVersion = "0.4.0"
  val slf4jVersion = "2.0.9"
  val anthropicVersion = "0.8.0"

  dependencies {
      implementation("io.modelcontextprotocol:kotlin-sdk:$mcpVersion")
      implementation("org.slf4j:slf4j-nop:$slf4jVersion")
      implementation("com.anthropic:anthropic-java:$anthropicVersion")
  }
  ```

  ```groovy build.gradle theme={null}
  def mcpVersion = '0.3.0'
  def slf4jVersion = '2.0.9'
  def anthropicVersion = '0.8.0'
  dependencies {
      implementation "io.modelcontextprotocol:kotlin-sdk:$mcpVersion"
      implementation "org.slf4j:slf4j-nop:$slf4jVersion"
      implementation "com.anthropic:anthropic-java:$anthropicVersion"
  }
  ```
</CodeGroup>

Also, add the following plugins to your build script:

<CodeGroup>
  ```kotlin build.gradle.kts theme={null}
  plugins {
      id("com.github.johnrengelman.shadow") version "8.1.1"
  }
  ```

  ```groovy build.gradle theme={null}
  plugins {
      id 'com.github.johnrengelman.shadow' version '8.1.1'
  }
  ```
</CodeGroup>

## Setting up your API key

You'll need an Anthropic API key from the [Anthropic Console](https://console.anthropic.com/settings/keys).

Set up your API key:

```bash  theme={null}
export ANTHROPIC_API_KEY='your-anthropic-api-key-here'
```

<Warning>
  Make sure your keep your `ANTHROPIC_API_KEY` secure!
</Warning>

## Creating the Client

### Basic Client Structure

First, let's create the basic client class:

```kotlin  theme={null}
class MCPClient : AutoCloseable {
    private val anthropic = AnthropicOkHttpClient.fromEnv()
    private val mcp: Client = Client(clientInfo = Implementation(name = "mcp-client-cli", version = "1.0.0"))
    private lateinit var tools: List<ToolUnion>

    // methods will go here

    override fun close() {
        runBlocking {
            mcp.close()
            anthropic.close()
        }
    }
```

### Server connection management

Next, we'll implement the method to connect to an MCP server:

```kotlin  theme={null}
suspend fun connectToServer(serverScriptPath: String) {
    try {
        val command = buildList {
            when (serverScriptPath.substringAfterLast(".")) {
                "js" -> add("node")
                "py" -> add(if (System.getProperty("os.name").lowercase().contains("win")) "python" else "python3")
                "jar" -> addAll(listOf("java", "-jar"))
                else -> throw IllegalArgumentException("Server script must be a .js, .py or .jar file")
            }
            add(serverScriptPath)
        }

        val process = ProcessBuilder(command).start()
        val transport = StdioClientTransport(
            input = process.inputStream.asSource().buffered(),
            output = process.outputStream.asSink().buffered()
        )

        mcp.connect(transport)

        val toolsResult = mcp.listTools()
        tools = toolsResult?.tools?.map { tool ->
            ToolUnion.ofTool(
                Tool.builder()
                    .name(tool.name)
                    .description(tool.description ?: "")
                    .inputSchema(
                        Tool.InputSchema.builder()
                            .type(JsonValue.from(tool.inputSchema.type))
                            .properties(tool.inputSchema.properties.toJsonValue())
                            .putAdditionalProperty("required", JsonValue.from(tool.inputSchema.required))
                            .build()
                    )
                    .build()
            )
        } ?: emptyList()
        println("Connected to server with tools: ${tools.joinToString(", ") { it.tool().get().name() }}")
    } catch (e: Exception) {
        println("Failed to connect to MCP server: $e")
        throw e
    }
}
```

Also create a helper function to convert from `JsonObject` to `JsonValue` for Anthropic:

```kotlin  theme={null}
private fun JsonObject.toJsonValue(): JsonValue {
    val mapper = ObjectMapper()
    val node = mapper.readTree(this.toString())
    return JsonValue.fromJsonNode(node)
}
```

### Query processing logic

Now let's add the core functionality for processing queries and handling tool calls:

```kotlin  theme={null}
private val messageParamsBuilder: MessageCreateParams.Builder = MessageCreateParams.builder()
    .model(Model.CLAUDE_3_5_SONNET_20241022)
    .maxTokens(1024)

suspend fun processQuery(query: String): String {
    val messages = mutableListOf(
        MessageParam.builder()
            .role(MessageParam.Role.USER)
            .content(query)
            .build()
    )

    val response = anthropic.messages().create(
        messageParamsBuilder
            .messages(messages)
            .tools(tools)
            .build()
    )

    val finalText = mutableListOf<String>()
    response.content().forEach { content ->
        when {
            content.isText() -> finalText.add(content.text().getOrNull()?.text() ?: "")

            content.isToolUse() -> {
                val toolName = content.toolUse().get().name()
                val toolArgs =
                    content.toolUse().get()._input().convert(object : TypeReference<Map<String, JsonValue>>() {})

                val result = mcp.callTool(
                    name = toolName,
                    arguments = toolArgs ?: emptyMap()
                )
                finalText.add("[Calling tool $toolName with args $toolArgs]")

                messages.add(
                    MessageParam.builder()
                        .role(MessageParam.Role.USER)
                        .content(
                            """
                                "type": "tool_result",
                                "tool_name": $toolName,
                                "result": ${result?.content?.joinToString("\n") { (it as TextContent).text ?: "" }}
                            """.trimIndent()
                        )
                        .build()
                )

                val aiResponse = anthropic.messages().create(
                    messageParamsBuilder
                        .messages(messages)
                        .build()
                )

                finalText.add(aiResponse.content().first().text().getOrNull()?.text() ?: "")
            }
        }
    }

    return finalText.joinToString("\n", prefix = "", postfix = "")
}
```

### Interactive chat

We'll add the chat loop:

```kotlin  theme={null}
suspend fun chatLoop() {
    println("\nMCP Client Started!")
    println("Type your queries or 'quit' to exit.")

    while (true) {
        print("\nQuery: ")
        val message = readLine() ?: break
        if (message.lowercase() == "quit") break
        val response = processQuery(message)
        println("\n$response")
    }
}
```

### Main entry point

Finally, we'll add the main execution function:

```kotlin  theme={null}
fun main(args: Array<String>) = runBlocking {
    if (args.isEmpty()) throw IllegalArgumentException("Usage: java -jar <your_path>/build/libs/kotlin-mcp-client-0.1.0-all.jar <path_to_server_script>")
    val serverPath = args.first()
    val client = MCPClient()
    client.use {
        client.connectToServer(serverPath)
        client.chatLoop()
    }
}
```

## Running the client

To run your client with any MCP server:

```bash  theme={null}
./gradlew build

# Run the client
java -jar build/libs/<your-jar-name>.jar path/to/server.jar # jvm server
java -jar build/libs/<your-jar-name>.jar path/to/server.py # python server
java -jar build/libs/<your-jar-name>.jar path/to/build/index.js # node server
```

<Note>
  If you're continuing the weather tutorial from the server quickstart, your command might look something like this: `java -jar build/libs/kotlin-mcp-client-0.1.0-all.jar .../samples/weather-stdio-server/build/libs/weather-stdio-server-0.1.0-all.jar`
</Note>

**The client will:**

1. Connect to the specified server
2. List available tools
3. Start an interactive chat session where you can:
   * Enter queries
   * See tool executions
   * Get responses from Claude

## How it works

Here's a high-level workflow schema:

```mermaid  theme={null}
---
config:
    theme: neutral
---
sequenceDiagram
    actor User
    participant Client
    participant Claude
    participant MCP_Server as MCP Server
    participant Tools

    User->>Client: Send query
    Client<<->>MCP_Server: Get available tools
    Client->>Claude: Send query with tool descriptions
    Claude-->>Client: Decide tool execution
    Client->>MCP_Server: Request tool execution
    MCP_Server->>Tools: Execute chosen tools
    Tools-->>MCP_Server: Return results
    MCP_Server-->>Client: Send results
    Client->>Claude: Send tool results
    Claude-->>Client: Provide final response
    Client-->>User: Display response
```

When you submit a query:

1. The client gets the list of available tools from the server
2. Your query is sent to Claude along with tool descriptions
3. Claude decides which tools (if any) to use
4. The client executes any requested tool calls through the server
5. Results are sent back to Claude
6. Claude provides a natural language response
7. The response is displayed to you

## Best practices

1. **Error Handling**
   * Leverage Kotlin's type system to model errors explicitly
   * Wrap external tool and API calls in `try-catch` blocks when exceptions are possible
   * Provide clear and meaningful error messages
   * Handle network timeouts and connection issues gracefully

2. **Security**
   * Store API keys and secrets securely in `local.properties`, environment variables, or secret managers
   * Validate all external responses to avoid unexpected or unsafe data usage
   * Be cautious with permissions and trust boundaries when using tools

## Troubleshooting

### Server Path Issues

* Double-check the path to your server script is correct
* Use the absolute path if the relative path isn't working
* For Windows users, make sure to use forward slashes (/) or escaped backslashes (\\) in the path
* Make sure that the required runtime is installed (java for Java, npm for Node.js, or uv for Python)
* Verify the server file has the correct extension (.jar for Java, .js for Node.js or .py for Python)

Example of correct path usage:

```bash  theme={null}
# Relative path
java -jar build/libs/client.jar ./server/build/libs/server.jar

# Absolute path
java -jar build/libs/client.jar /Users/username/projects/mcp-server/build/libs/server.jar

# Windows path (either format works)
java -jar build/libs/client.jar C:/projects/mcp-server/build/libs/server.jar
java -jar build/libs/client.jar C:\\projects\\mcp-server\\build\\libs\\server.jar
```

### Response Timing

* The first response might take up to 30 seconds to return
* This is normal and happens while:
  * The server initializes
  * Claude processes the query
  * Tools are being executed
* Subsequent responses are typically faster
* Don't interrupt the process during this initial waiting period

### Common Error Messages

If you see:

* `Connection refused`: Ensure the server is running and the path is correct
* `Tool execution failed`: Verify the tool's required environment variables are set
* `ANTHROPIC_API_KEY is not set`: Check your environment variables
## System Requirements

Before starting, ensure your system meets these requirements:

* .NET 8.0 or higher
* Anthropic API key (Claude)
* Windows, Linux, or macOS

## Setting up your environment

First, create a new .NET project:

```bash  theme={null}
dotnet new console -n QuickstartClient
cd QuickstartClient
```

Then, add the required dependencies to your project:

```bash  theme={null}
dotnet add package ModelContextProtocol --prerelease
dotnet add package Anthropic.SDK
dotnet add package Microsoft.Extensions.Hosting
dotnet add package Microsoft.Extensions.AI
```

## Setting up your API key

You'll need an Anthropic API key from the [Anthropic Console](https://console.anthropic.com/settings/keys).

```bash  theme={null}
dotnet user-secrets init
dotnet user-secrets set "ANTHROPIC_API_KEY" "<your key here>"
```

## Creating the Client

### Basic Client Structure

First, let's setup the basic client class in the file `Program.cs`:

```csharp  theme={null}
using Anthropic.SDK;
using Microsoft.Extensions.AI;
using Microsoft.Extensions.Configuration;
using Microsoft.Extensions.Hosting;
using ModelContextProtocol.Client;
using ModelContextProtocol.Protocol.Transport;

var builder = Host.CreateApplicationBuilder(args);

builder.Configuration
    .AddEnvironmentVariables()
    .AddUserSecrets<Program>();
```

This creates the beginnings of a .NET console application that can read the API key from user secrets.

Next, we'll setup the MCP Client:

```csharp  theme={null}
var (command, arguments) = GetCommandAndArguments(args);

var clientTransport = new StdioClientTransport(new()
{
    Name = "Demo Server",
    Command = command,
    Arguments = arguments,
});

await using var mcpClient = await McpClientFactory.CreateAsync(clientTransport);

var tools = await mcpClient.ListToolsAsync();
foreach (var tool in tools)
{
    Console.WriteLine($"Connected to server with tools: {tool.Name}");
}
```

Add this function at the end of the `Program.cs` file:

```csharp  theme={null}
static (string command, string[] arguments) GetCommandAndArguments(string[] args)
{
    return args switch
    {
        [var script] when script.EndsWith(".py") => ("python", args),
        [var script] when script.EndsWith(".js") => ("node", args),
        [var script] when Directory.Exists(script) || (File.Exists(script) && script.EndsWith(".csproj")) => ("dotnet", ["run", "--project", script, "--no-build"]),
        _ => throw new NotSupportedException("An unsupported server script was provided. Supported scripts are .py, .js, or .csproj")
    };
}
```

This creates an MCP client that will connect to a server that is provided as a command line argument. It then lists the available tools from the connected server.

### Query processing logic

Now let's add the core functionality for processing queries and handling tool calls:

```csharp  theme={null}
using var anthropicClient = new AnthropicClient(new APIAuthentication(builder.Configuration["ANTHROPIC_API_KEY"]))
    .Messages
    .AsBuilder()
    .UseFunctionInvocation()
    .Build();

var options = new ChatOptions
{
    MaxOutputTokens = 1000,
    ModelId = "claude-3-5-sonnet-20241022",
    Tools = [.. tools]
};

Console.ForegroundColor = ConsoleColor.Green;
Console.WriteLine("MCP Client Started!");
Console.ResetColor();

PromptForInput();
while(Console.ReadLine() is string query && !"exit".Equals(query, StringComparison.OrdinalIgnoreCase))
{
    if (string.IsNullOrWhiteSpace(query))
    {
        PromptForInput();
        continue;
    }

    await foreach (var message in anthropicClient.GetStreamingResponseAsync(query, options))
    {
        Console.Write(message);
    }
    Console.WriteLine();

    PromptForInput();
}

static void PromptForInput()
{
    Console.WriteLine("Enter a command (or 'exit' to quit):");
    Console.ForegroundColor = ConsoleColor.Cyan;
    Console.Write("> ");
    Console.ResetColor();
}
```

## Key Components Explained

### 1. Client Initialization

* The client is initialized using `McpClientFactory.CreateAsync()`, which sets up the transport type and command to run the server.

### 2. Server Connection

* Supports Python, Node.js, and .NET servers.
* The server is started using the command specified in the arguments.
* Configures to use stdio for communication with the server.
* Initializes the session and available tools.

### 3. Query Processing

* Leverages [Microsoft.Extensions.AI](https://learn.microsoft.com/dotnet/ai/ai-extensions) for the chat client.
* Configures the `IChatClient` to use automatic tool (function) invocation.
* The client reads user input and sends it to the server.
* The server processes the query and returns a response.
* The response is displayed to the user.

## Running the Client

To run your client with any MCP server:

```bash  theme={null}
dotnet run -- path/to/server.csproj # dotnet server
dotnet run -- path/to/server.py # python server
dotnet run -- path/to/server.js # node server
```

<Note>
  If you're continuing the weather tutorial from the server quickstart, your command might look something like this: `dotnet run -- path/to/QuickstartWeatherServer`.
</Note>

The client will:

1. Connect to the specified server
2. List available tools
3. Start an interactive chat session where you can:
   * Enter queries
   * See tool executions
   * Get responses from Claude
4. Exit the session when done

Here's an example of what it should look like it connected to a weather server quickstart:

<Frame>
  <img src="https://mintcdn.com/mcp/4ZXF1PrDkEaJvXpn/images/quickstart-dotnet-client.png?fit=max&auto=format&n=4ZXF1PrDkEaJvXpn&q=85&s=fcf28dde150d6db879402ad8150c6b23" data-og-width="1115" width="1115" data-og-height="666" height="666" data-path="images/quickstart-dotnet-client.png" data-optimize="true" data-opv="3" srcset="https://mintcdn.com/mcp/4ZXF1PrDkEaJvXpn/images/quickstart-dotnet-client.png?w=280&fit=max&auto=format&n=4ZXF1PrDkEaJvXpn&q=85&s=0c82cdfe1350b4a924a44d7beaa39f70 280w, https://mintcdn.com/mcp/4ZXF1PrDkEaJvXpn/images/quickstart-dotnet-client.png?w=560&fit=max&auto=format&n=4ZXF1PrDkEaJvXpn&q=85&s=4fd6f3ed867741b44ae12940788be646 560w, https://mintcdn.com/mcp/4ZXF1PrDkEaJvXpn/images/quickstart-dotnet-client.png?w=840&fit=max&auto=format&n=4ZXF1PrDkEaJvXpn&q=85&s=1b5fcfaf8b63b9ea71bf36aa20388a28 840w, https://mintcdn.com/mcp/4ZXF1PrDkEaJvXpn/images/quickstart-dotnet-client.png?w=1100&fit=max&auto=format&n=4ZXF1PrDkEaJvXpn&q=85&s=cb969889d05ec8771c12b887f2940c7d 1100w, https://mintcdn.com/mcp/4ZXF1PrDkEaJvXpn/images/quickstart-dotnet-client.png?w=1650&fit=max&auto=format&n=4ZXF1PrDkEaJvXpn&q=85&s=81b2cb62f60a9f3afb2d66cf3ee3df79 1650w, https://mintcdn.com/mcp/4ZXF1PrDkEaJvXpn/images/quickstart-dotnet-client.png?w=2500&fit=max&auto=format&n=4ZXF1PrDkEaJvXpn&q=85&s=ac9271a3dd0d7b424bb390ad0c31e14e 2500w" />
</Frame>