Clean Swift (VIP) is Uncle Bob’s Clean Architecture applied to iOS and Mac projects (https://8thlight.com/blog/uncle-bob/2012/08/13/the-clean-architecture.html). The Clean Swift Architecture is not a framework. It is a set of Xcode templates to generate the Clean Architecture components for you. That means you have the freedom to modify the templates to suit your needs
In an MVC project, your code is organized around and grouped by models, views, and controllers. In Clean Swift, your project structure is built around scenes. Here is an example how does one scene looks like. In other words, we will have a set of components for each scene that will "work" for our controller. These are the components:
- Model
- Router
- Worker
- Interactor
- Presenter
- ViewController
- Configurator
The communication between the components is done with protocols. Each component will contain protocols which will be used for receiving and passing data between them. Worker communicates with Interactor, then Interactor with Presenter and Presenter with ViewController.
I have also designed a Flow Diagram so you can get a visual representation of the relations between these components.
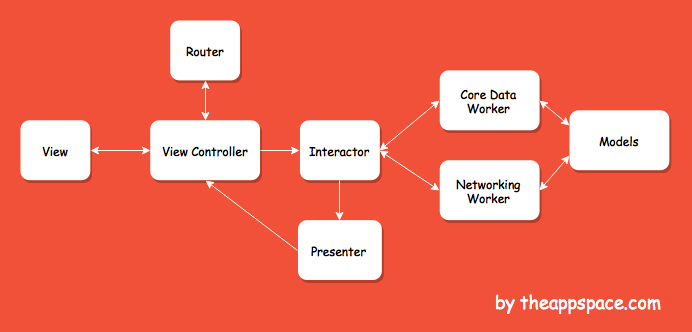
We will store all the models related to the controller. The Models class will be related to each component, as you can see in the Flow Diagram. It will be of type struct and mostly it will contain Request, Response, and ViewModel structs.
- Request model: parameters that need to be sent to the API request.
- Response model: intercepts the response from the API and stores the appropriate data.
- View Model: everything that you need to show to the UI is stored here. Assuming that signin is complete, there will be a welcome user, which will need a user's name to display, and an error message will appear.
struct LoginModel{
    struct Request {
	    var username: String?
	    var password: String?
    }
    struct Response {
        var userID: String?
        var firstName: String?
        var lastname: String?
    }
    struct ViewModel {
        var isSuccess: Bool
        var errorMessage: String?
    }
}The router takes care for the transition and passing data between view controllers. Also, you can use segues, unlike the VIPER architecture where you can’t do that.
import UIKit
import SwiftEntryKit

class LoginRouter {
	weak var viewController: LoginViewController!
	//Data passing
    var dataSource: LoginViewControllerDataSource?
}

extension  LoginRouter: LoginRouterProtocol {

	func showSignupView() {
		let signupViewController = SignupConfigurator.viewcontroller()
		viewController.navigationController?.pushViewController(signupViewController, animated: true)
	}

	func showHone() {
		let homeViewController = HomeConfigurator.viewcontroller()
		viewController.navigationController?.pushViewController(homeViewController, animated: true)
	}

	// MARK: Navigation
	/* Example
	func navigateToSomewhere() {
		// NOTE: Teach the router how to navigate to another scene. Some examples follow:
		// 1. Trigger a storyboard segue
		// viewController.performSegueWithIdentifier("ShowSomewhereScene", sender: nil)
		// 2. Present another view controller programmatically
		// viewController.presentViewController(someWhereViewController, animated: true, completion: nil)
		// 3. Ask the navigation controller to push another view controller onto the stack
		// viewController.navigationController?.pushViewController(someWhereViewController, animated: true)
		// 4. Present a view controller from a different storyboard
		// let storyboard = UIStoryboard(name: "OtherThanMain", bundle: nil)
		// let someWhereViewController = storyboard.instantiateInitialViewController() as! SomeWhereViewController
		// viewController.navigationController?.pushViewController(someWhereViewController, animated: true)
	} */
}The Worker component will handle all the API/CoreData requests and responses. The Response struct (from Models) will get the data ready for the Interactor. It will handle the success/error response, so the Interactor would know how to proceed.
class LoginWorker {
    // MARK: Business Logic
    typealias responseHandler = (_ response:LoginModel.Fetch.Response) ->()
    func login(_ loginInfo: LoginModel.Request, success:@escaping(responseHandler), fail:@escaping(responseHandler)) {
      AppCenter.shared.userSession.login(loginRequest: loginInfo)
			.continueOnSuccessWith { userProfile in
				   success(LoginModel.Fetch.Response(userObj: userProfile, error: nil))
			}
			.continueOnErrorWith { error in
				  success(LoginModel.Fetch.Response(userObj: nil, error: error))
			}
    }
}This is the “mediator” between the Worker and the Presenter. Here is how the Interactor works. First, it communicates with the ViewController which passes all the Request params needed for the Worker. Before proceeding to the Worker, a validation is done to check if everything is sent properly. The Worker returns a response and the Interactor passes that response towards the Presenter.
class LoginInteractor {
	var output: LoginInteractorOutputProtocol!
  var worker: LoginWorker = LoginWorker()
}

extension  LoginInteractor: LoginViewControllerOutputProtocol {
	func login(_ loginInfo: LoginModel.Request) {
		worker.fetch(loginInfo, success: { (response) in
            self.output.loginSuccess(response.userProfile)
        }) { (error) in
            self.output.loginFailure(response.error)
        }
	}
}Now that we have the Response from the Interactor, it’s time to format it into a ViewModel and pass the result back to the ViewController. Presenter will be in charge of the presentation logic. This component decides how the data will be presented to the user.
class LoginPresenter {
	weak  var output: LoginPresenterOutputProtocol!
}

extension  LoginPresenter: LoginInteractorOutputProtocol {
	func loginFailure(_ error: Error) {
		self.output.loginDone(LoginModel.ViewModel(isSuccess: false, errorMessage: error.localizedDescription))
	}
	func loginSuccess(_ loginResponse: UserProfile) {
		self.output.loginDone(LoginModel.ViewModel(isSuccess: true, errorMessage: ""))
	}
}We are done with the components. I hope that you have understood so far what is going on. But, we are not done yet. This is the last step, and it’s about bringing the components to action. As you can see in the Flow Diagram above, the ViewController will communicate with the Interactor, and get a response back from the Presenter. Also, when there is a need for transition, it will communicate with the Router.
import UIKit

// MARK: View
class LoginViewController: UIViewController {
	var output: LoginViewControllerOutputProtocol!
	var router: LoginRouter!
	var viewModel: LoginModel.ViewModel?

	// MARK: View lifecycle
	override func viewDidLoad() {
		super.viewDidLoad()
		setupUI()
		fetchDataOnLoad()
	}

	private func setupUI() {
		//setup UI here
	}

	// MARK: Fetch Login
	private func fetchDataOnLoad() {
		// NOTE: Ask the Interactor to do some work
	}

	@IBAction func signupButtonPressed() {
		if let request = getRequestModel() {
			self.output.login(request)
		}
	}

	func getRequestModel() -> LoginModel.Request? {
		var isValidated = false
		//validate here or ask Iteractor validate
		if isValidated {
			return LoginModel.Request(email: "emailText", password: "passwordText")
		} else {
			return nil
		}
	}
}

// MARK: Connect View, Interactor, and Presenter
extension  LoginViewController: LoginPresenterOuputProtocol {
	func loginDone(_ loginResponse: LoginModel.ViewModel) {
		if loginResponse.isSuccess {
			self.router.showHome()
		} else {
			UIAlertController(title: "Error", message: loginResponse.errorMessage, defaultActionButtonTitle: "OK").show()
		}
	}
}The configurator will be the place where all components of a controller are initialized, and the relations between the components are initialized. This is where the interfaces of the components will be. Looking at this, we can overview what this controller will handle, what will be able to navigate.
import UIKit

class LoginConfigurator {
// MARK: Configuration
	class func view() -> LoginViewController {
		let viewController = LoginViewController(nibName: "LoginViewController", bundle: nil)
		let presenter = LoginPresenter()
		presenter.output = viewController

		let interactor = LoginInteractor()
		interactor.output = presenter

		let router = LoginRouter()
		router.viewController = viewController

		viewController.output = interactor
		viewController.router = router

		return view
	}
}

// MARK: View Interface
protocol LoginViewControllerOuputProtocol {
	func login(_ loginInfo: LoginModel.Request)
}

// MARK: Interactor Interface
protocol LoginInteractorOuputProtocol {
	func loginSuccess(_ userProfile: LoginModel.Response)
	func loginFailure(_ error: Error)
}

// MARK: Presenter Interface
protocol LoginPresenterOuputProtocol: class {
	func loginDone(_ loginResponse: LoginModel.ViewModel)
}

// MARK: Router
protocol LoginRouterProtocol {
	func showSignupView()
	func showHome()
}https://hackernoon.com/introducing-clean-swift-architecture-vip-770a639ad7bf