
Using a small IP camera for home surveilance, coded with python and optimized for raspberry pi.
Tarsiers are small animals with enormous eyes; each eyeball is approximately 16 millimetres (0.63 in) in diameter and is as large as, or in some cases larger than, its entire brain.
The final goal of the project was for me to do the following:
- Have a home surveillance camera system that didn't depend on any vendor, didn't send anything on the cloud, didn't suffer from subscription plans or any other free_now_pay_later service.
- Simple and with as little dependencies as possible. In this regard I decided to take inspiration from Frigate but don't use it because, see next point:
- Learn something in the process.
In order to fullfill my goals I came up with the following setup:
- An IP camera, I used Dahua IPC-HDW2441T-S because it had good reviews online and offers a simple RTSP stream.
- A RaspberryPi 5
- A Google Coral TPU (This wasn't strictly necessary but it's a cool piece of hardware to try)
The connections are the following:
 IP_CAM <--- Ethernet PoE --> PoE Network Switch <--- Ethernet---> Raspberry Pi 5 <--- wlan ---> Home router
                                                                          ^
 < ------ isolated IP range, no connetion to internet ---------- >        |       < ------- 192... with internet access ---->
                                                                          |
                                                                          |
                                                                          └──── PCIe ---> TPU
If you have a setup that already works with the TPU and you can run inference from python, you can skip this section completely! Go to the dockerfile explanation for all the userspace config
Unfortunately the TPU is not very well supported these days especially with the new linux kernels and python version. On my brand new raspberry I am running out of the box:
>>> uname -a
Linux camera 6.12.34+rpt-rpi-v8 #1 SMP PREEMPT Debian 1:6.12.34-1+rpt1~bookworm (2025-06-26) aarch64 GNU/Linux

>>> python -V
Python 3.11.2
To make things a bit more complex finding a coral USB accelerator these days is quite hard as every place is sold out with lead time of months, and I had only a small window this summer to get busy with this project. I therefore resorted to a PCIe card with TPU, this one in particular:

And the rpi compute module 5 IO board because it has already a PCIe slot with the right key (thought for NVMe SSDs)
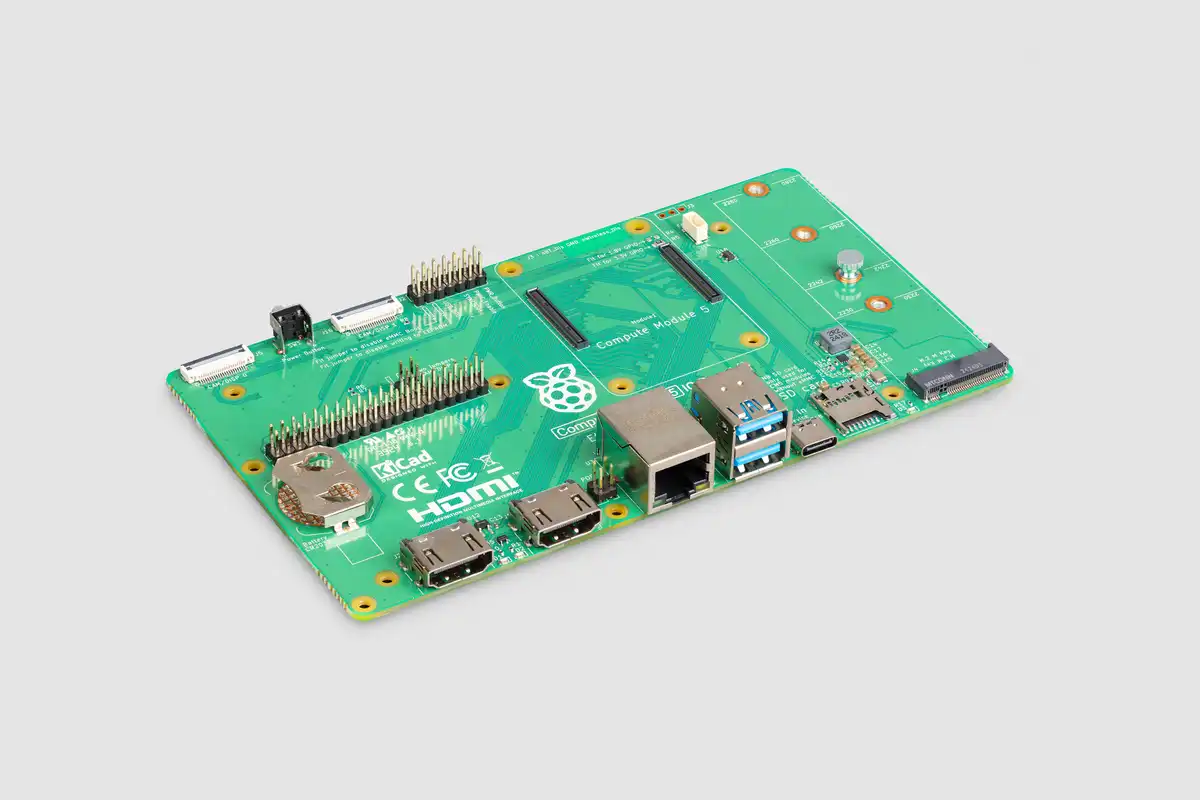
Making the TPU running on the raspberry required some tweaks, some easy others that took a bit longer. Even though I want this project to run from a docker container, these steps require changing the device tree and compiling kernel drivers so unfortunately they have to be done manually if you want to replicate this project. Everything I found was a combination of what this blog post described very well, reading coral docs and weaving through good tips and hallucinations from out favourite LLMs.
First of all we need to tell the device tree that we have added a PCIe card. Luckily we have overlays and DT parameters to setup some configuration without changing much on the device tree.
Add to /boot/firmware/config.txt the following lines:
dtparam=pciex1
dtparam=pciex1_gen=2
kernel=kernel8.img
The first parameters are related to enabling the PCIe interface on the Raspberry Pi and setting gen2 speeds (5GT/s)
The kernel parameter is just telling to switch to a generic aarch64 image that works with 4KB page size, this is needed because that's the assumption in the apex driver (google tpu driver) that we will install later).
Then add this parameter pcie_aspm=off to the /boot/firmware/cmdline.txt, I didn't understand exactly why but every guide suggests it.
Unfortunately by default the device tree has a PCIe node entry that doesn't enable the MSI-X interrupt. The Coral driver expects to be able to allocate memory for these interrupt, and if they are not available it will fail at initialization:
>>> dmesg | grep apex
 ... Couldn't initialize interrupts -28

>>> lspci
0001:00:00.0 PCI bridge: Broadcom Inc. and subsidiaries BCM2712 PCIe Bridge (rev 30)
0001:01:00.0 System peripheral: Global Unichip Corp. Coral Edge TPU
As you can see the Coral is detected and enumerated correctly, however I would like to know the properties of that node in the device tree. Here my knowledge in device tree shakes a little bit, but that's what I understood: if I decompile the device tree with the following:
# Use this page to find the correct device tree that will be selected at boot
# https://www.raspberrypi.com/documentation/computers/raspberry-pi.html#new-style-revision-codes-in-use
sudo dtc -I dtb -O dts /boot/firmware/bcm2712-rpi-cm5-cm5io.dtb -o bcm2712-rpi-cm5-cm5io.dts

vim bcm2712-rpi-cm5-cm5io.dts

	pcie@1000110000 {
		compatible = "brcm, bcm2712-pcie" ;
		...
		linux, pci-domain = <0x01>;
		max-link-speed = <0x02>;
		num-lanes = <0x01>;
		...
		msi-controller;
		msi-parent = <0x25>; <-----------------------
		...
		status = "disabled"; <-----------------------
		phandle = <0x66>


	msi-controller@1000131000 {
		compatible = "brcm, bcm2712-mip" ;
		reg = <0x10 0x131000 0x00 Oxc0 Oxff Oxfffff000 0x00 0x1000>;
		msi-controller;
		msi-ranges = <0x01 0x00 0xf7 0x01 Ox08>;
		brem,msi-offset = <0x08>;
		phandle = <0x25>
Few interesting things: the PCIe node is disabled, however it shows in the lspci command, this is probably due to runtime enumeration, it finds something attached to the bridge and enables it. The interrupt controller for the msi is instead a different IP that acts as msi-controller, namely the bcm2712-mip.
Claude gave me this explanation to why this doesn't work and how to fix it: the mip controller is a different silicon IP in the rpi soc and it's not capable of handling the PCIe interrupts, or it has a different register space than what the driver expects (I might dig into this later) so a possible fix is to self-reference the bcm2712-pcie bridge to handle msi interrupts. After all, the dt node has the property msi-controller meaning it should be capable of handling these interrupts.
It turns out that this is indeed the correct fix to do, so we just do the following change on the decompiled device tree:
--------- msi-parent = <0x25>;
+++++++++ msi-parent = <0x66>;
And we recompile it
sudo cp /boot/firmware/bcm2712-rpi-cm5-cm5io.dtb bcm2712-rpi-cm5-cm5io.dtb.bak

dtc -I dts -O dtb bcm2712-rpi-cm5-cm5io.dts -o bcm2712-rpi-cm5-cm5io.dtb
sudo cp bcm2712-rpi-cm5-cm5io.dtb /boot/firmware/bcm2712-rpi-cm5-cm5io.dtb

sudo reboot
One of the first steps to use the Coral TPU is to install the drivers. The commands from the docs are pretty simple:
sudo apt-get install gasket-dkms libedgetpu1-std
But it already fails because dkms tries to compile against the kernel headers and it fails because the repo version that is downloaded is written for an older version of the kernel, so the headers don't match. I didn't want to go through the pain of downgrading my kernel so I checked if there was a fix and there is a PR (not yet approved as of 10 Sept 2025) that adds the changes needed for the newest kernel. So I managed to build the driver on my own.
Notice that when building the driver it will install 2: gasket (general google driver to talk with their asics) and apex (which instead is dedicated to the TPU).
This is cross-compiling natively on the raspberry so you probably need to install the build-essential tools
git clone https://github.com/google/gasket-driver.git coral-driver/git-source
cd coral-driver/git-source

# Modify the following, since noble doesn't work with raspberry OS
diff --git a/debian/changelog b/debian/changelog
index 3032563..c6afc2d 100644
--- a/debian/changelog
+++ b/debian/changelog
@@ -1,4 +1,4 @@
-gasket-dkms (1.0-18.4) noble; urgency=medium
+gasket-dkms (1.0-18.4) unstable; urgency=medium

# Build kernel modules
debuild -us -uc -tc -b

cd ..
sudo dpkg -i gasket-dkms_*.deb
sudo depmod -a
sudo modprobe apex

# Add udev rules as per documentation
sudo sh -c "echo 'SUBSYSTEM==\"apex\", MODE=\"0660\", GROUP=\"apex\"' >> /etc/udev/rules.d/65-apex.rules"

sudo groupadd apex

sudo adduser $USER apex

# Now I can see the gasket and apex drivers
lsmod | grep apex
apex                   49152  0
gasket                114688  1 apex
I have created a dockerfile to easily run the app from. It can be built ... TODO
On the userspace side the inference works by using pycoral that under the hood works with tensorflow lite runtime to load a model and send the weights and inference tensor to the TPU. Talking to the TPU is done through a tensorflow mechanism called "delegate" that will link to the libedgetpu static library.
Unfortunately the changes in the linux kernel aren't all that is needed to make inference work. First of all the python library pycoral doesn't have support for python 3.11 and the dependencies as well (tensorflow lite runtime).
There is also another dependency constraints, which is that the tf_lite runtime and the libedgetpu have to agree on a certain ABI, hence when building the tf_lite we need to stick to the same commit that was used when coding the source of libedgetpu.
Installing everything with apt-get will give us a libedgetpu v16.0, however there are no tf_lite wheels built for aarch64 that are compatible with python3.11 .
We can downgrade python to 3.9 (or use a container) to then use the pre-built wheels or we can actually try to rebuild everything from scratch using the latest of everything. I decided to rebuild everything, hence the steps are:
- decide on a tensorflow commit
- build libedgetpu
- build tensorflow lite runtime
- build coral [ optional, I didn't do it and I use tensorflow directly, coral is just a wrapper ]
As of today, the master branch on the libedgetpu repo was written with the v2.16.1 tf tag
From debian/changelog

libedgetpu (16.0tf2.16.1-1) stable; urgency=medium
  * Build against TF v2.16.1
-- Nicola Ferralis < feranick@hotmail.com> Thu, 07 Mar 2024 14:01:34 -0500
So we can build tf_lite wheels through its build system on another host ( I tried on the raspberry but the cmake script was crashing because of too much RAM usage, it was consuming more than 16GB of swap!! ) and there is no easy way to install bazel on the rpi.
git clone https://github.com/tensorflow/tensorflow
cd tensorflow
git checkout v2.16.1
Important: the tpu models use all the tensorflow operators, but the regular build doesn't add all of them to the build, so building normally will result in a segmentation flow when loading the model:
ImportError: /home/casa/Documents/test_coral/coral/lib/python3.11/site-packages/tflite_runtime/_pywrap_tensorflow_interpreter_wrapper.so: undefined symbol: ZN6tflite3ops7builtin16RegisterGREATEREv
The undefined symbol ZN6tflite3ops7builtin16Register_GREATEREv (when demangled) relates to the registration of the GREATER operation in TensorFlow Lite's built-in operators. The resolution for this issue comes directly from the docs about operators and ops select it's explained that we need to enable a build with monolithic or flex delegate to have all operators.
How this is done practically is explaiend in the README.md in the subfolder tensorflow/lite/tools/pip_package/
## Enable TF OP support (Flex delegate)

If you want to use TF ops with Python API, you need to enable flex support.
You can build TFLite interpreter with flex ops support by providing
--define=tflite_pip_with_flex=true to Bazel.

Here are some examples.


CI_DOCKER_EXTRA_PARAMS="-e CUSTOM_BAZEL_FLAGS=--define=tflite_pip_with_flex=true" \
  tensorflow/tools/ci_build/ci_build.sh PI-PYTHON37 \
  tensorflow/lite/tools/pip_package/build_pip_package_with_bazel.sh aarch64
However there is an easier way than this command. We just have to notice that ci_build is just entering the container used for cross compilation, but that container can be built directly and then entered manually to run the bazel build. We just need 2 changes to the dockerfile before:
--- a/tensorflow/lite/tools/pip_package/Dockerfile.py3
+++ b/tensorflow/lite/tools/pip_package/Dockerfile.py3

-RUN yes | add-apt-repository ppa:deadsnakes/ppa
-RUN apt-get update && \
+RUN export DEBIAN_FRONTEND=noninteractive && \
+    yes | add-apt-repository ppa:deadsnakes/ppa
+RUN export DEBIAN_FRONTEND=noninteractive && \
+    apt-get update && \
To allow some commands to not wait user input, and
--- a/tensorflow/lite/tools/pip_package/Makefile
+++ b/tensorflow/lite/tools/pip_package/Makefile

 DOCKER_PARAMS := --pid=host \
+    --env "CUSTOM_BAZEL_FLAGS=--define=tflite_pip_with_flex=true" \
To pass to bazel the flex option needed for the build.
I used an ubuntu image to cross compile, so finally, the command to run is
# Enter the container (first time it will build the docker image)
make  BASE_IMAGE=ubuntu:22.04 PYTHON_VERSION=3.11 TENSORFLOW_TARGET=aarch64 docker-shell

#Inside the container, check that the flex option is exported correctly
echo $CUSTOM_BAZEL_FLAGS

# Start the build
./build_pip_package_with_bazel.sh aarch64

# The built wheel will be in ./gen/tflite_pip/python3.11/dist/tflite_runtime-2.16.1-cp311-cp311-linux_aarch64.whl
The last step is to copy the wheel to the raspberry pi and then install it with
pip install --upgrade tflite_runtime-2.16.1-cp311-cp311-linux_aarch64.whl

# Sanity check
python -c "import tflite_runtime; print(tflite_runtime.__file__)"
Since for this build the master branch is already pointing at the v2.16.1 tensorflow tag, we don't have to modify anything. However we can check the correct tag is specified:
grep 5bc9d26 -r .
./workspace.bzl:TENSORFLOW_COMMIT = "5bc9d26649cca274750ad3625bd93422617eed4b"
Modify the tag if you are using another tensorflow commit (although I would stick to whatever the libedge was coded for), and then run the cross compilation
DOCKER_CPUS="aarch64" DOCKER_IMAGE="debian:bookworm" DOCKER_TARGETS=libedgetpu make docker-build
This will create, on the upper directory:
-rw-r--r--  1 fra fra   6320 Sep  8 09:45 libedgetpu-dev_16.0tf2.16.1-1_arm64.deb
-rw-r--r--  1 fra fra 332944 Sep  8 09:45 libedgetpu1-max_16.0tf2.16.1-1_arm64.deb
-rw-r--r--  1 fra fra 333048 Sep  8 09:45 libedgetpu1-std_16.0tf2.16.1-1_arm64.deb
-rw-r--r--  1 fra fra   7381 Sep  8 09:45 libedgetpu_16.0tf2.16.1-1_amd64.build
-rw-r--r--  1 fra fra   6539 Sep  8 09:45 libedgetpu_16.0tf2.16.1-1_arm64.buildinfo
-rw-r--r--  1 fra fra   1813 Sep  8 09:45 libedgetpu_16.0tf2.16.1-1_arm64.changes
Navigate there and then create the deb packages.
debuild -us -uc -tc -b -a arm64 -d
Copy on the raspberry and install.