The black active arm uses a 5V 6A power adapter, while the white passive arm uses a 12V 5A power adapter
The code in this tutorial repository is maintained at the stable version of Lerobot tested before March 1, 2026. Currently, Huggingface has made a very substantial upgrade to Lerobot, adding a large number of new features. If you need to experience the latest tutorial, please follow the official documentation for operation .
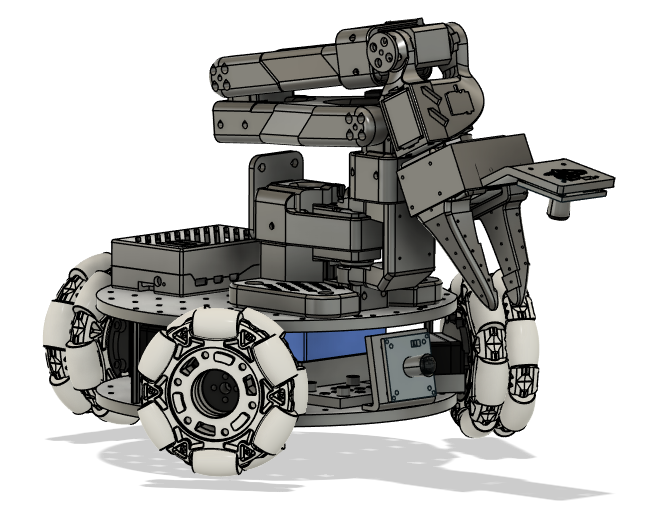
Lekiwi is a fully open-source robot car project initiated by SIGRobotics-UIUC. It includes detailed 3D printing files and operation guides, and is designed to be compatible with the LeRobot imitation learning framework. It supports the SO101 robotic arm, thereby enabling a complete imitation learning process.
- Open source and low cost: Lekiwi provides an open source, low cost robot car solution.
- Integration with LeRobot: Specifically designed for integration with the LeRobot platform.
- Abundant Learning Resources: Provide comprehensive open-source learning resources, including assembly and calibration guides, as well as tutorials on testing, data collection, training, and deployment, to help users quickly get started and develop robot applications.
- Compatible with Nvidia : Can be used in conjunction with reComputer Mini J4012 Orin NX 16 GB.
- Multi-scenario Application: Suitable for education, scientific research, automated production, and robotics fields, helping users achieve efficient and precise robot operations in various complex tasks.
JUXI is only responsible for the quality of the hardware itself. Tutorials are strictly updated in accordance with official documentation. If you encounter software issues or environment dependency issues that you are truly unable to resolve, please promptly report the issues to LeRobot Platform or LeRobot Discord Channel.
Attention
- All servos in the Lekiwi chassis require a 12V power supply. For users who use a 5V robotic arm, we provide a 12V to 5V step-down conversion module. Please note that you need to modify the circuit yourself.
- 12V Power Supply - If needed, you can select this option at checkout. If you already have a 12V power supply, simply convert the power output interface to a 5521 DC plug.
- Raspberry Pi controller and camera - these need to be purchased separately through the order interface.
| Component | Quantity | contains |
|---|---|---|
| STS3215 1:345 12V Servo Motor | 3 | ✅ |
| Omni Wheel/Universal Wheel | 3 | ✅ |
| Lekiwi 3D Printed Enclosure | 1 | ✅ |
| DC-DC Step-Down Power Supply Module - 24V/12V to 5V | 1 | ✅ |
| Steering Gear Driver Board | 1 | ✅ |
| DC Male to Dual DC Male 5521 Y-Type Cable | 1 | ✅ |
| USB 3.0 data cable, white; length 150mm | 1 | ✅ |
| M2 M3 M4 Mixed Screws | Sufficient Quantity | ✅ |
| USB Auto-Focus Camera | 1 | Optional |
| D405C Depth Camera, D435i Depth Camera | 2 | Optional |
| SO-ARM101 Pro版 | 1 | Optional |
| 12V 5100mAh Lithium-ion Battery Pack E351S | 1 | Optional |
For Ubuntu x86**:**
- Ubuntu 22.04
- CUDA 12+
- Python 3.10
- Torch 2.6
For Jetson Orin:
- Jetson JetPack 6.0
- Python 3.10
- Torch 2.3+
For Raspberry Pi**:**
- Raspberry Pi 5 4G~16G
After setting up the Raspberry Pi, you should enable and configure SSH (Secure Shell Protocol), so that you can log in to the Raspberry Pi from your laptop without connecting a screen, keyboard, and mouse to the Raspberry Pi. You can find a great tutorial here . You can log in to the Raspberry Pi via the command prompt (cmd), or if you use VSCode, you can use this extension.
We provide printable STL files for the following 3D printed parts. These parts can be printed on consumer-grade FDM printers using generic PLA filaments. We tested them on the Bambu Lab P1S printer. For all components, we simply loaded them into bambuslicer, automatically rotated and arranged them, enabled any recommended supports, and then printed.
| Project | Quantity | Remarks |
|---|---|---|
| Top of the base plate | 1 | |
| Bottom of the base plate | 1 | |
| Drive Motor Bracket | 3 | |
| Steering Gear Hub Compatible with 100mm Omni Wheel | 3 | Use Support |
| Top of Raspberry Pi Case | 1 | |
| Bottom of Raspberry Pi Case | 1 | |
| Arducam Base Bracket and Wrist Bracket | 1 | Compatible with this camera |
| WebcamBase Bracket, Clamp Insert and Wrist Bracket | 1 | Compatible with this camera |
The provided STL files can be directly printed on many FDM printers. The following are the tested and recommended settings; other settings may also work.
- Material: PLA+
- Nozzle diameter and accuracy: 0.2mm nozzle diameter, layer height 0.2mm
- Fill density: 15%
- Printing speed: 150 mm/s
- If necessary, upload the G-code (sliced file) to the printer and print
On your Raspberry Pi:
mkdir -p ~/miniconda3
wget https://repo.anaconda.com/miniconda/Miniconda3-latest-Linux-aarch64.sh -O ~/miniconda3/miniconda.sh
bash ~/miniconda3/miniconda.sh -b -u -p ~/miniconda3
rm ~/miniconda3/miniconda.shCopy and paste the following command in your Shell:source ~/.bashrc or for Mac users:source ~/.bash_profile or source ~/.zshrc (if you are using zshell)
conda create -y -n lerobot python=3.10Then activate your Conda environment (you need to do this every time you open the Shell to use LeRobot!):
conda activate lerobotgit clone https://github.com/huggingface/lerobot.git ~/lerobotWhen using miniconda, install ffmpeg in your environment:
conda install ffmpeg -c conda-forgeThis usually installs ffmpeg 7.X compiled with the libsvtav1 encoder for your platform. If libsvtav1 is not supported (you can check the supported encoders via ffmpeg -encoders), you can:
【For all platforms】Explicitly install ffmpeg 7.X:
conda install ffmpeg=7.1.1 -c conda-forge
[Linux only] Install the build dependencies for ffmpeg and compile ffmpeg with libsvtav1 support from source, and ensure that the ffmpeg executable used is correct, which can be confirmed via
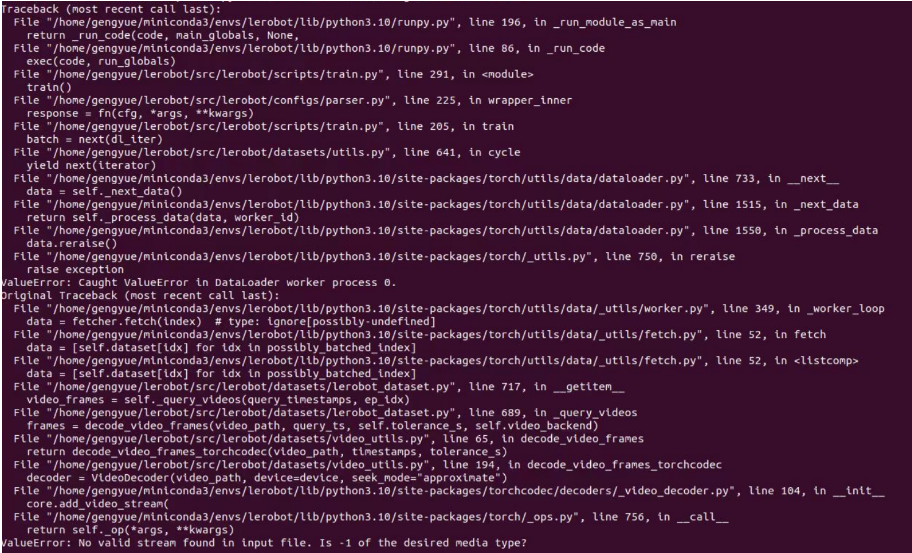
which ffmpeg.If you encounter the following error, you can also use the above command to resolve it.

cd ~/lerobot && pip install --no-binary=av -e ".[feetech]"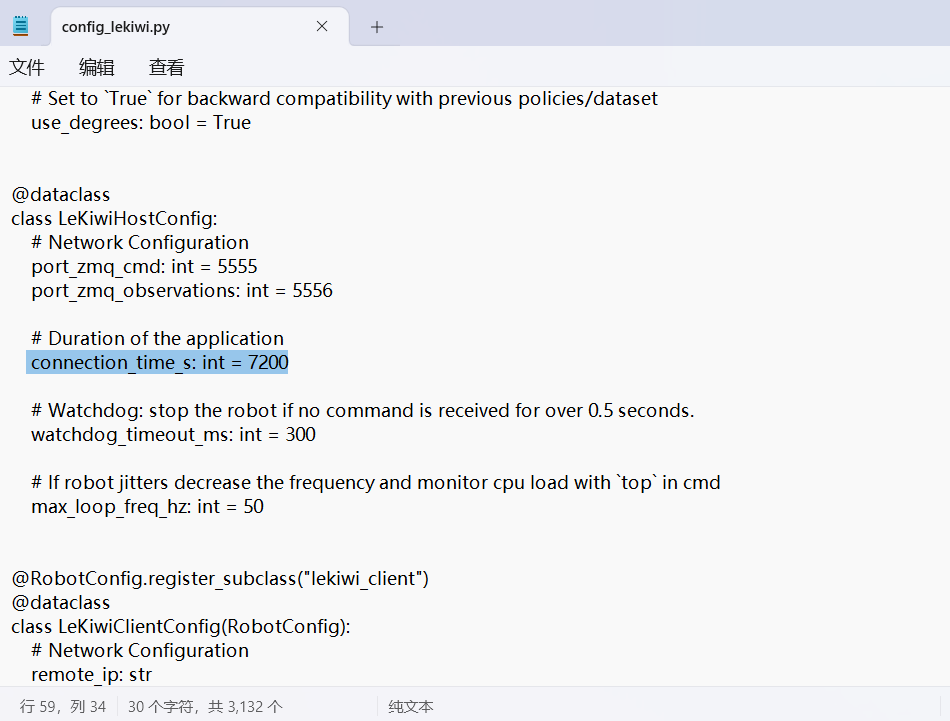
pip install -e ".[lekiwi]"Find config_lekiwi.py under the lerobot\src\lerobot\robots\lekiwi directory
set connection_time_s: int = 7200 # which is 2 hours
If you have already installed LeRobot on your laptop, you can skip this step; otherwise, please follow the same steps as we did on the Raspberry Pi to proceed .
[!Tip] We will frequently use the Command Prompt (cmd). If you are unfamiliar with using cmd or would like to review the use of the command line, you can refer to this:Command Line Crash Course
On your computer:
Copy and paste the following command in your shell:source ~/.bashrc or for Mac users:source ~/.bash_profile or source ~/.zshrc (if you are using zshell)
conda create -y -n lerobot python=3.10Then activate your Conda environment (you need to do this every time you open the Shell to use LeRobot!):
conda activate lerobotgit clone https://github.com/huggingface/lerobot.git ~/lerobotWhen using miniconda, install ffmpeg in your environment:
conda install ffmpeg -c conda-forgeThis usually installs ffmpeg 7.X compiled with the libsvtav1 encoder for your platform. If libsvtav1 is not supported (you can check the supported encoders via
ffmpeg -encoders), you can:【For all platforms】Explicitly install ffmpeg 7.X:
conda install ffmpeg=7.1.1 -c conda-forge[Linux only] Install the build dependencies for ffmpeg and compile ffmpeg with libsvtav1 support from source, and ensure that the ffmpeg executable used is correct, which can be confirmed via
which ffmpeg.If you encounter the following error, you can also use the above command to resolve it.
cd ~/lerobot && pip install --no-binary=av -e ".[feetech]"
pip install -e ".[lekiwi]"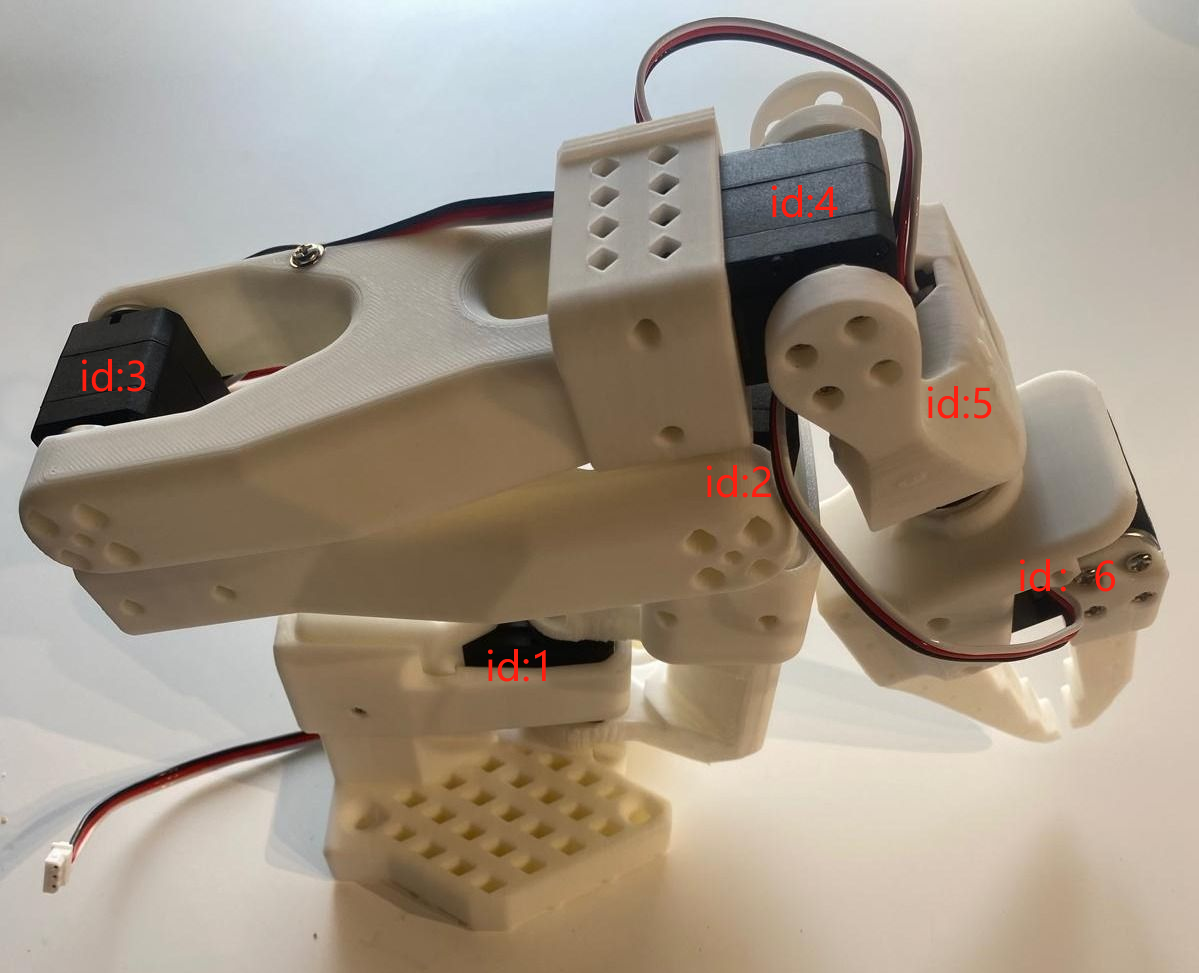
To find the correct port for a single motor, run the following utility script twice:
lerobot-find-portExample output (e.g., /dev/tty.usbmodem575E0031751 on Mac, or /dev/ttyACM0 on Linux):
Example output (e.g., /dev/tty.usbmodem575E0032081 on Mac, or /dev/ttyACM1 on Linux):
Troubleshooting: On Linux, you may need to grant USB port access via the following command:
sudo chmod 666 /dev/ttyACM0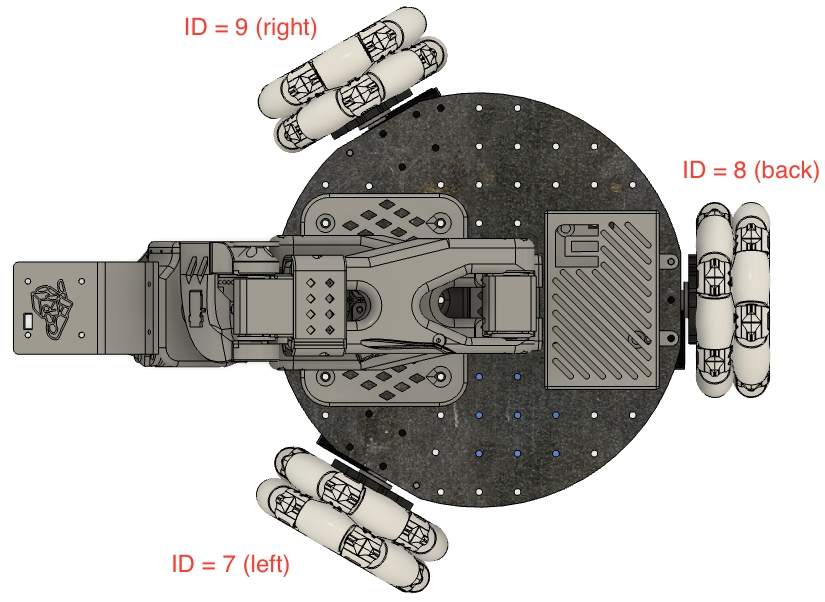
sudo chmod 666 /dev/ttyACM1Insert each motor of your chassis in sequence and run the following script. It will first initialize the servos of the robotic arm (ID 6..1), then initialize the chassis servos, setting their IDs to (ID 9..7). If you have already calibrated the robotic arm, you can continuously press Enter to overwrite and skip:
lerobot-setup-motors \
    --robot.type=lekiwi \
    --robot.port=/dev/tty.usbmodem58760431551 # <- paste here the port found at previous step
- Ubuntu
sudo nano ~/.bashrc

# 在文件末尾加入
export HF_ENDPOINT=https://hf-mirror.com
source ~/.bashrc
echo $HF_ENDPOINT

# 输出
# https://hf-mirror.com- Mac
sudo nano ~/.zshrc
# 在文件末尾加入
export HF_ENDPOINT=https://hf-mirror.com
source ~/.zshrc
# 输出
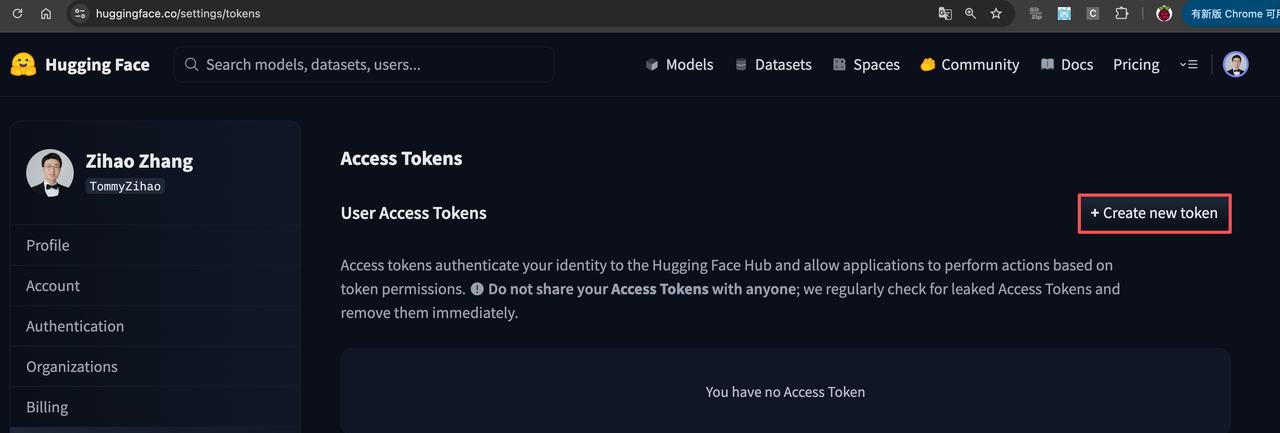
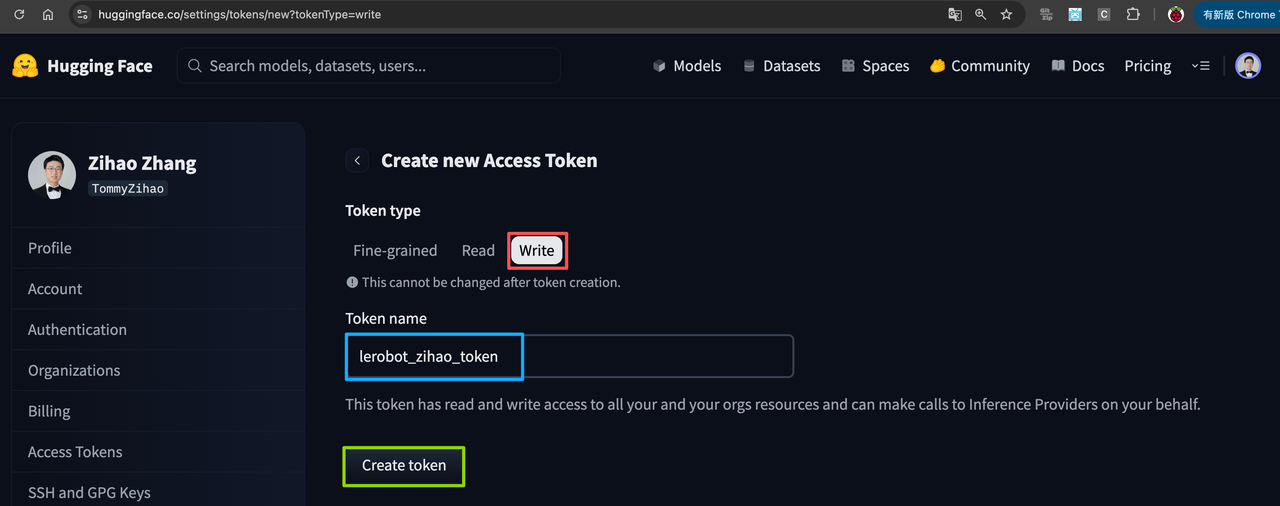
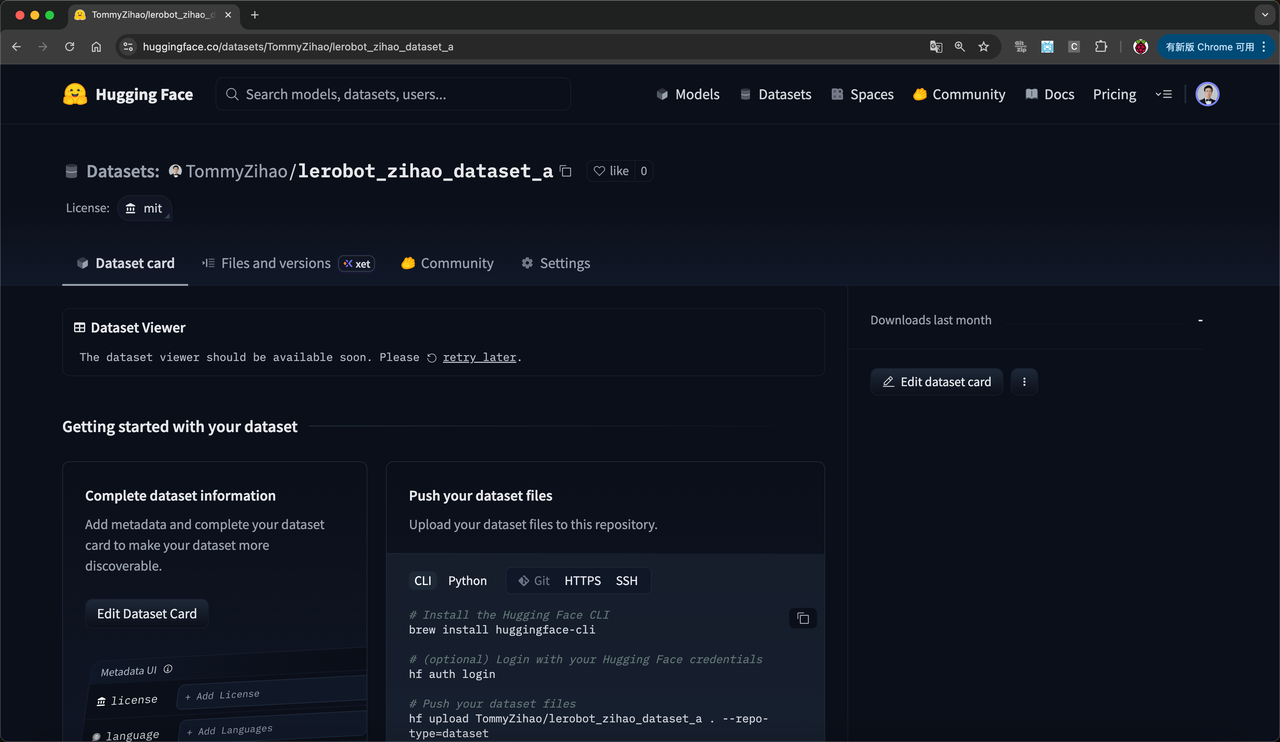
# https://hf-mirror.comhttps://huggingface.co/settings/tokens
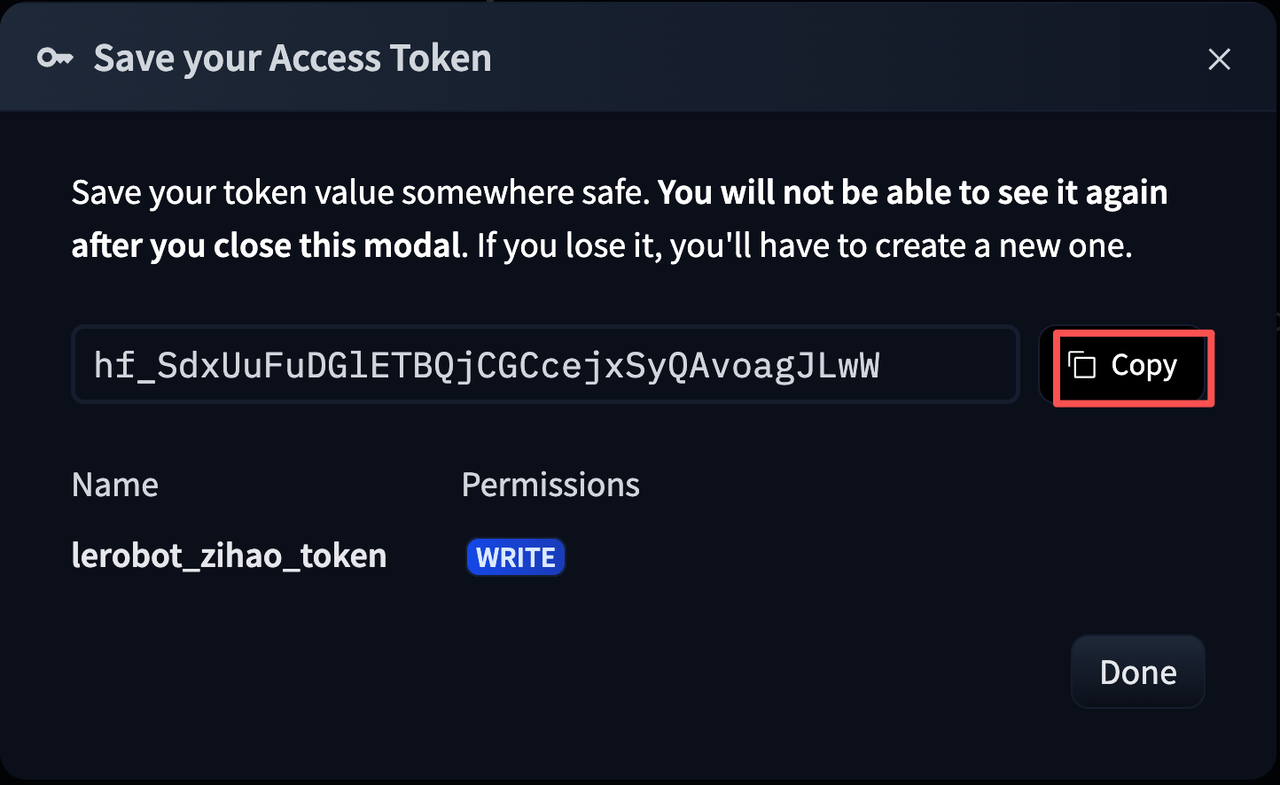
For example, mine is:
hf_XXXXXXXXXhf auth login
hf auth whoami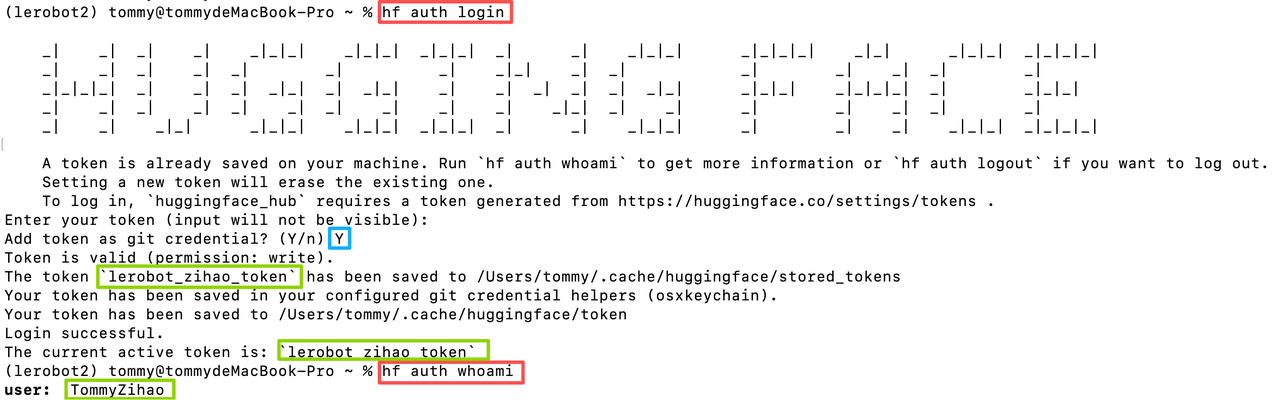
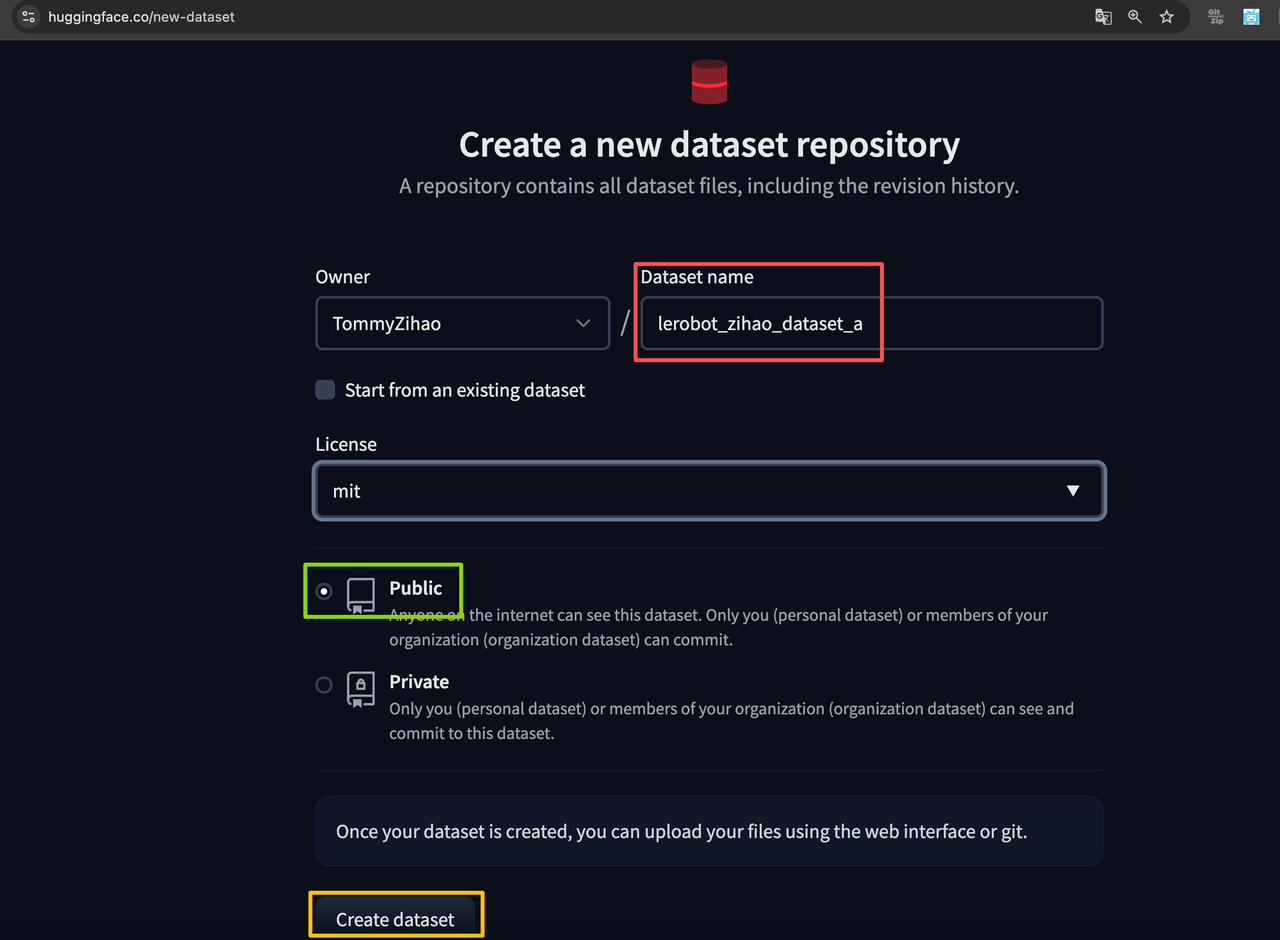
Record the Owner and Dateset name, which are the <hf_username> and <dateset_repo_id> required later
The configuration files on LeKiwi LeRobot and the laptop should be consistent. First, we need to find the IP address of the Raspberry Pi for the mobile robotic arm. This is the same IP address used for SSH. We also need to find the USB port of the active arm servo driver board on the laptop and the port of the servo driver board on LeKiwi. These ports can be found through the following script.
On Linux, you may need to grant access to the USB port by running the following command:
sudo chmod 666 /dev/ttyACM0
sudo chmod 666 /dev/ttyACM1
Important Note: Now that you have obtained the port number of the active arm and the IP address of the Lekiwi robotic arm, please update ip in the network configuration, update port in the active arm configuration, and update port, remote_ip in the LeKiwi configuration.
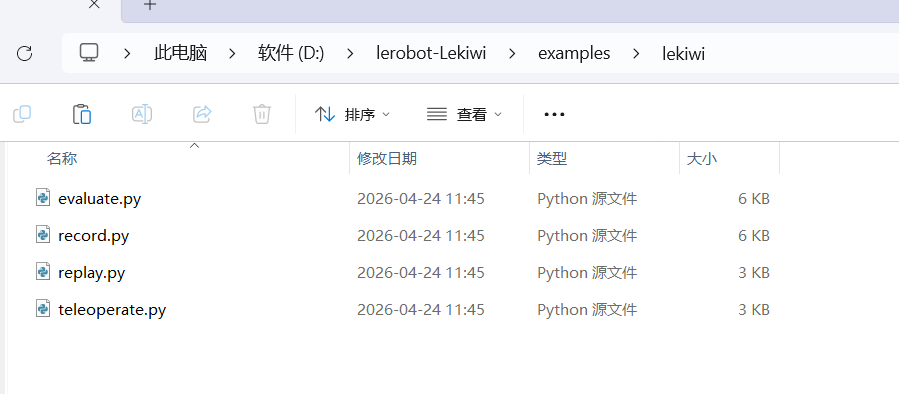
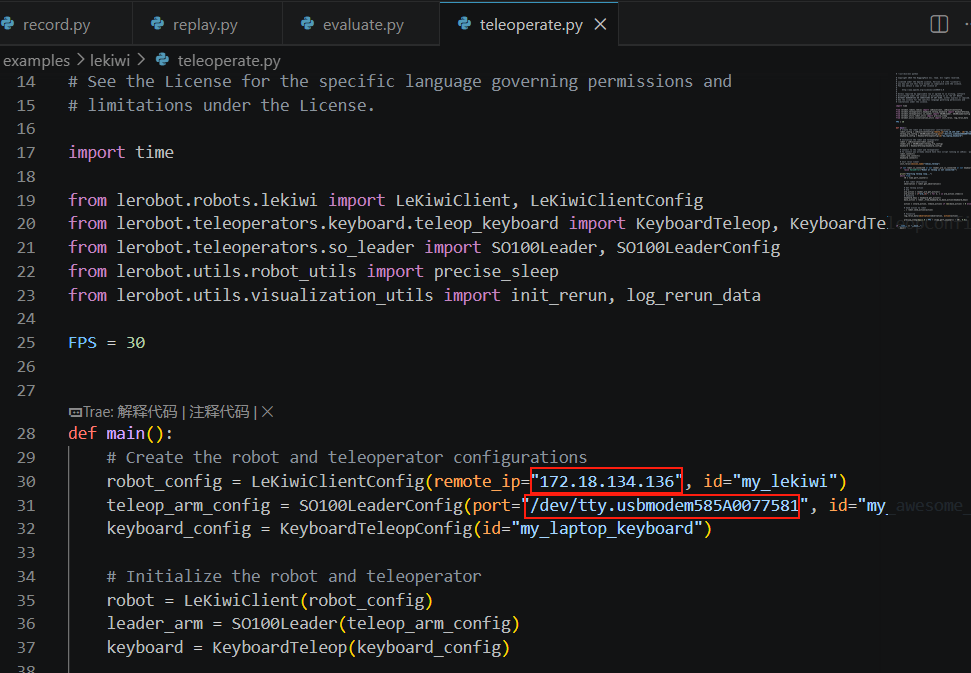
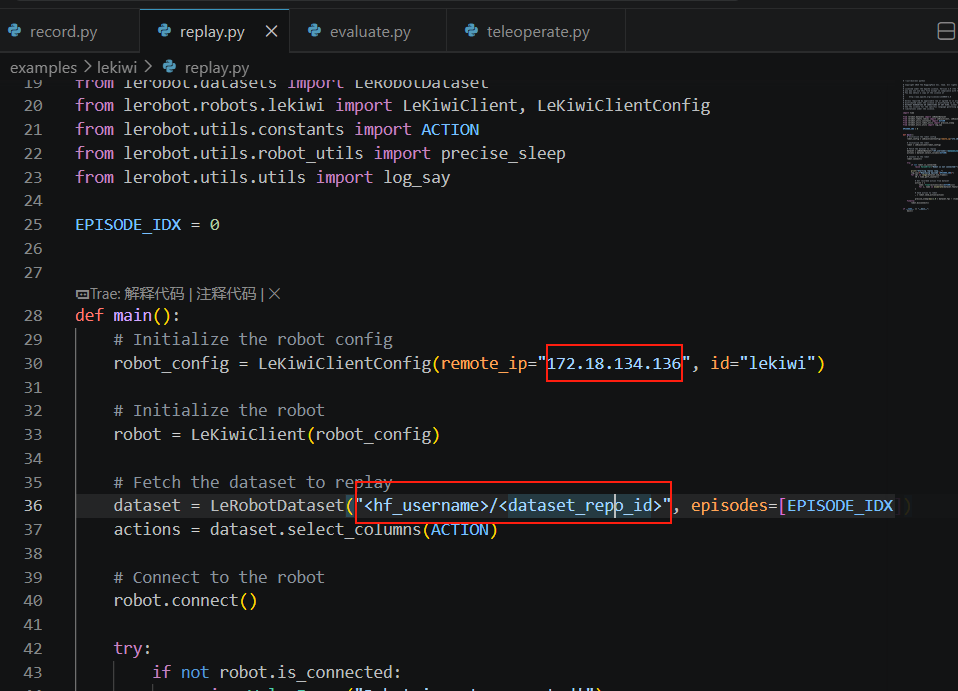
Modify these four files under the example\lekiwi directory
remote_ip: IP address of Raspberry Pi
port: Port Number when the active arm is connected to a computer or Linux
HF_REPO_ID:Username and Dataset Name on Hugging Face
remote_ip: IP address of Raspberry Pi
port: Port Number when the active arm is connected to a computer or Linux
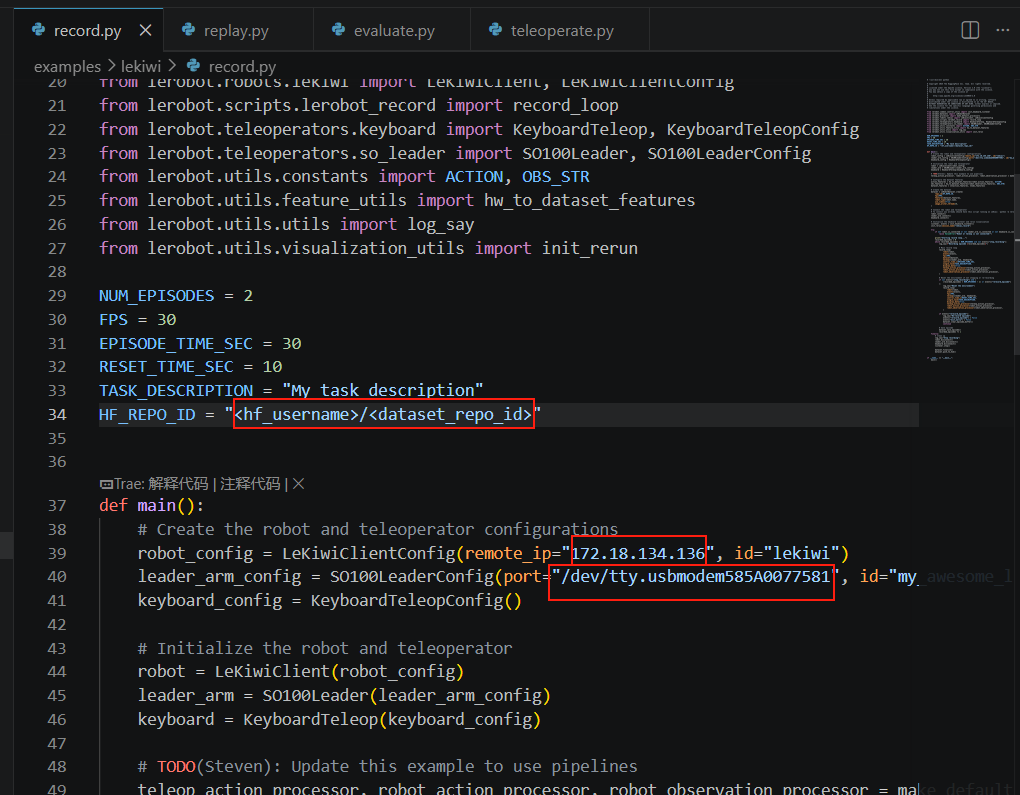
remote_ip: IP address of Raspberry Pi
<hf_username>/<dataset_repo_id>, i.e., the Hugging Face username and dataset name
Now we need to calibrate the active arm and the passive arm. The steering gear of the omnidirectional wheel does not need calibration.
Run the following command on your computer to calibrate the active arm. Note: The image shown here is an example for the SO101 model.
lerobot-calibrate \
    --teleop.type=so100_leader \
    --teleop.port=/dev/tty.usbmodem58760431551 \ #修改为找到的端口号
    --teleop.id=my_awesome_leader_arm
Now run the following command on your Raspberry Pi to calibrate the slave arm on LeKiwi. Ignore its current position on the table - normal calibration should be performed when installed on the Lekiwi chassis.
lerobot-calibrate \
    --robot.type=lekiwi \
    --robot.id=my_awesome_kiwi
We unified the calibration methods for most robots. First, we need to move the robot to a position where each joint is at its midpoint of the movable range , and then press the button. Second, we move all joints through their full movable range . You can find here Enter a video of the same calibration process for SO101 as a reference.
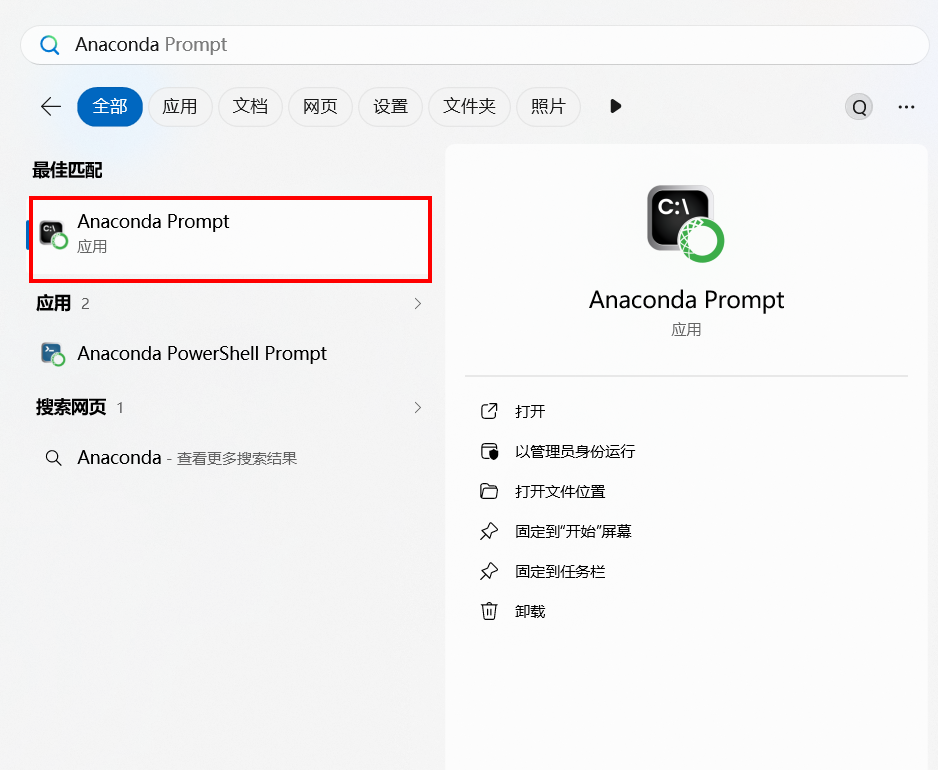
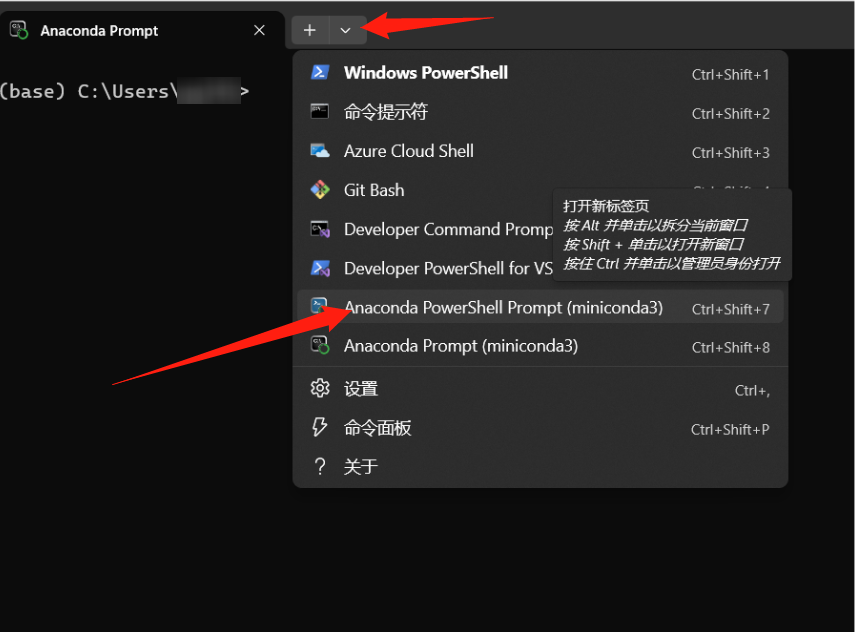
Open a new Anaconda Prompt
If you are using a Mac, you may need to grant "Terminal" permission to access the keyboard for remote operations. Please go to "System Preferences" > "Security & Privacy" > "Input Monitoring", and then check the "Terminal" checkbox.
To perform remote operations, log in to your Raspberry Pi via SSH and run the following command to activate the environmentconda activate lerobot, then run the following script:
python -m lerobot.robots.lekiwi.lekiwi_host --robot.id=my_awesome_kiwi
Next, on your laptop, also run the following command to activate the environment conda activate lerobot, and then run the following script:
python examples/lekiwi/teleoperate.pyYour laptop screen should display an interface similar to this:[INFO] Connected to remote robot at tcp://172.17.133.91:5555 and video stream at tcp://172.17.133.91:5556.Now you can move the control arm and use the (W, A, S, D) keys on the keyboard to control the robot to move forward, turn left, move backward, and turn right.Use the (Z, X) keys to control the robot to turn left or right. Use the (R, F) keys to increase or decrease the speed of the mobile robot. There are three speed modes in total, please refer to the following table:
| Speed Mode | Linear velocity (m/s) | Rotation speed (degrees/second) |
|---|---|---|
| Fast | 0.4 | 90 |
| Medium Speed | 0.25 | 60 |
| Slow | 0.1 | 30 |
| button | Action |
|---|---|
| W | Forward |
| A | Left Shift |
| S | Back |
| D | Shift Right |
| Z | Turn left |
| X | Turn right |
| R | Increase speed |
| F | Reduce speed |
If you use a different keyboard, you can change the key settings for each command in LeKiwiClientConfig .
If you encounter problems when connecting to the mobile robot SO101, please follow the steps below to diagnose and resolve the issue.
Ensure that the correct Raspberry Pi IP address is set in the configuration file. To check the IP address of the Raspberry Pi, run the following command (in the Pi's command line):
hostname -ITry to ping Raspberry Pi from the laptop:
ping <your_pi_ip_address>If ping fails:
- Ensure that Pi is powered on and connected to the same network.
- Check if SSH is enabled on Pi.
If you cannot log in to Pi via SSH, it may be due to an incorrect connection. Please use the following command:
ssh <your_pi_user_name>@<your_pi_ip_address>For example ssh pi@192.168.0.106
If a connection error occurs:
- To ensure that SSH is enabled on Pi, you can run the following command:
sudo raspi-config- Then navigate to:Interfacing Options -> SSH and enable it.
Ensure that the configuration files on the laptop/PC and Raspberry Pi are exactly the same.
After getting familiar with remote operation, you can use LeKiwi to record your first dataset.
To start the program on LeKiwi, connect to your Raspberry Pi via SSH and run the following commands to activate the environment and start the script:
conda activate lerobot

python -m lerobot.robots.lekiwi.lekiwi_host --robot.id=my_awesome_kiwi
If you wish to use the Hugging Face hub feature to upload a dataset and have not logged in previously, please ensure you log in with a token that has write permissions, which can be generated from Hugging Face settings :
hf auth loginStore your Hugging Face repository name in a variable to run the following command:
hf auth whoamiThen run the following command on your laptop to record 2 rounds and upload the dataset to the hub:
python examples/lekiwi/record.pyIf you have uploaded a dataset, you can visualize your dataset online and copy and paste the repository ID generated by the following command:
echo ${HF_USER}/my_lekiwi_datasetIf you have not uploaded a dataset, you can also perform visualization locally (the browser window can open the visualization tool via http://127.0.0.1:9090):
python lerobot/scripts/visualize_dataset_html.py \
  --repo-id ${HF_USER}/lekiwi_test \
--local-files-only 1echo ${HF_USER}/my_lekiwi_datasetIf you have uploaded a dataset, you can also visualize it locally using the following command:
lerobot-dataset-viz \
  --repo-id ${HF_USER}/my_lekiwi_dataset \
If you haven't uploaded a dataset, you can also visualize it locally using the following command:
lerobot-dataset-viz \
  --repo-id juxi/my_lekiwi_dataset \
Here, juxi is the custom repo_id name during data collection.
Once you are familiar with data recording, you can create larger datasets for training. A good starting task is to grasp objects from different positions and place them into containers. We recommend recording at least 50 segments, with 10 segments for each position. Keep the camera position fixed and maintain consistent grasping actions throughout the recording. Additionally, ensure that the objects you are manipulating are clearly visible in the camera frame. A simple criterion is that you should be able to complete this task just by observing the camera feed.
In the following chapters, you will train your neural network. After achieving reliable grasping performance, you can start introducing more variations during the Data Acquisition process, such as increasing grasping positions, adopting different grasping techniques, and changing camera positions.
Avoid adding too many changes too quickly, as this may affect your results.
If you want to dive deeper into this important topic, check out our blog post on what makes a great dataset .
In Linux systems, if the left and right arrow keys and the Esc key do not work during data acquisition, ensure that the $DISPLAY environment variable is set. See Limitations of pynput
Now try to replay the first round on your robot:
python examples/lekiwi/replay.pyCongratulations 🎉, your robot is ready for autonomous learning tasks. Please follow the training section of this tutorial to start training it: Introduction to Real-World Robots
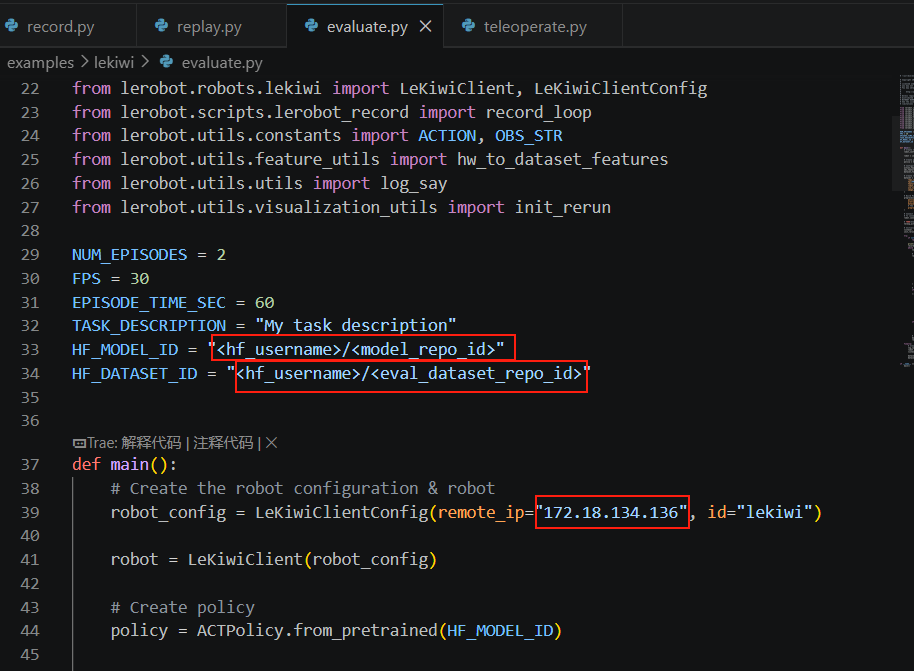
Ensure to change remote_ip, port, and HF_MODEL_ID
HF_MODEL_ID="<hf_username>/<model_repo_id>" should be modified to the name of the dataset uploaded to Hugging Face after training (if uploaded to Hugging Face) or the directory where the model is exported locally after training
HF_DATASET_ID = "< hf_username >/< eval_dataset_id >" Change the username and eval_ dataset name you created
remote_ip: Raspberry Pi IP address
Then run the following command:
python examples/lekiwi/evaluate.py- The name of the dataset starts with
evalto reflect that you are running inference (e.g.,${HF_USER}/eval_act_lekiwi_test). - If the evaluation phase encounters
File exists: 'home/xxxx/.cache/huggingface/lerobot/xxxxx/juxi/eval_xxxx'please first deletethe folder starting with eval_and then run the program again.
Simulation training can refer to
https://github.com/Ekumen-OS/lekiwi/tree/main
https://github.com/SIGRobotics-UIUC/LeKiwi-sim
For hardware issues, please contact customer service. For usage issues, please join Discord.