A privacy-conscious toolkit for document intelligence — local by default, cloud-capable
OnPrem.LLM (or “OnPrem” for short) is a Python-based toolkit for applying large language models (LLMs) to sensitive, non-public data in offline or restricted environments. Inspired largely by the privateGPT project, OnPrem.LLM is designed for fully local execution, but also supports integration with a wide range of cloud LLM providers (e.g., OpenAI, Anthropic).
Key Features:
- Fully local execution with option to leverage cloud as needed. See the cheatsheet.
- Analysis pipelines for many different tasks, including information extraction, summarization, classification, question-answering, and agents.
- Support for environments with modest computational resources through modules like the SparseStore (e.g., RAG without having to store embeddings in advance).
- Easily integrate with existing tools in your local environment like Elasticsearch and Sharepoint.
- A visual workflow builder to assemble complex document analysis pipelines with a point-and-click interface.
The full documentation is here.
Quick Start
# install
!pip install onprem[chroma]
from onprem import LLM, utils

# local LLM with Ollama as backend
!ollama pull llama3.2
llm = LLM('ollama/llama3.2')

# basic prompting
result = llm.prompt('Give me a short one sentence definition of an LLM.')

# RAG
utils.download('https://www.arxiv.org/pdf/2505.07672', '/tmp/my_documents/paper.pdf')
llm.ingest('/tmp/my_documents')
result = llm.ask('What is OnPrem.LLM?')

# switch to cloud LLM using Anthropic as backend
llm = LLM("anthropic/claude-3-7-sonnet-latest")

# structured outputs
from pydantic import BaseModel, Field
class MeasuredQuantity(BaseModel):
    value: str = Field(description="numerical value")
    unit: str = Field(description="unit of measurement")
structured_output = llm.pydantic_prompt('He was going 35 mph.', pydantic_model=MeasuredQuantity)
print(structured_output.value) # 35
print(structured_output.unit)  # mph

# Safely launch a sandboxed AI agent
from onprem.pipelines import AgentExecutor
executor = AgentExecutor(model='openai/gpt-5-mini', sandbox=True)
result = executor.run("""
Search this directory for all .md files and:
1. Extract all headings (# ## ###)
2. Count total words in each file
3. Create an index file 'documentation_index.md' with:
   - List of all markdown files
   - Word count for each
   - Main topics covered (from headings)
""")
Many LLM backends are supported (e.g., llama_cpp, transformers, Ollama, vLLM, OpenAI, Anthropic, etc.).

Install | Usage | Web UI | Examples | FAQ | How to Cite
Latest News 🔥
- [2026/03] v0.22.0 released and now includes the AgentExecutor: safely launch AI agents in a sandboxed environment to solve problems in two lines of code. See the example notebook on agents.
- [2026/01] v0.21.0 released and now includes support for metadata-based query routing. See the query routing example here. Also included in this release: provider-implemented structured outputs (e.g., structured outputs with OpenAI, Anthropic, and AWS GovCloud Bedrock).
- [2025/12] v0.20.0 released and now includes support for asynchronous prompts. See the example.
- [2025/09] v0.19.0 released and now includes support for workflows: YAML-configured pipelines for complex document analyses. See the workflow documentation for more information.
- [2025/08] v0.18.0 released and can now be used with AWS GovCloud LLMs. See this example for more information.
- [2025/07] v0.17.0 released and now allows you to connect directly to SharePoint for search and RAG. See the example notebook on vector stores for more information.
Once you have installed PyTorch, you can install OnPrem.LLM with:
pip install onpremChroma: If using RAG with the default Chroma “Dense” vectorstore
(instead of sparse
vectorstore),
run pip install[chroma].
AI Agents: If using OnPrem.LLM to launch AI
agents, run
pip install onprem[agent].
Llama-cpp-python is optional:
If using llama-cpp-python as the LLM backend:
- CPU:
pip install llama-cpp-python(extra steps required for Microsoft Windows) - GPU: Follow instructions below.
Installing llama-cpp-python is optional if any of the following is true:
- You are using Ollama as the LLM backend.
- You use Hugging Face Transformers (instead of llama-cpp-python) as the
LLM backend by supplying the
model_idparameter when instantiating an LLM, as shown here. - You are using OnPrem.LLM with an LLM being served through an external REST API (e.g., vLLM, OpenLLM).
- You are using OnPrem.LLM with a cloud LLM (see cheat sheet below).
When installing llama-cpp-python with
pip install llama-cpp-python, the LLM will run on your CPU. To
generate answers much faster, you can run the LLM on your GPU by
building llama-cpp-python based on your operating system.
- Linux:
CMAKE_ARGS="-DGGML_CUDA=on" FORCE_CMAKE=1 pip install --upgrade --force-reinstall llama-cpp-python --no-cache-dir - Mac:
CMAKE_ARGS="-DGGML_METAL=on" pip install llama-cpp-python - Windows 11: Follow the instructions here.
- Windows Subsystem for Linux (WSL2): Follow the instructions here.
For Linux and Windows, you will need an up-to-date NVIDIA driver along with the CUDA toolkit installed before running the installation commands above.
After following the instructions above, supply the n_gpu_layers=-1
parameter when instantiating an LLM to use your GPU for fast inference:
llm = LLM(n_gpu_layers=-1, ...)Quantized models with 8B parameters and below can typically run on GPUs
with as little as 6GB of VRAM. If a model does not fit on your GPU
(e.g., you get a “CUDA Error: Out-of-Memory” error), you can offload a
subset of layers to the GPU by experimenting with different values for
the n_gpu_layers parameter (e.g., n_gpu_layers=20). Setting
n_gpu_layers=-1, as shown above, offloads all layers to the GPU.
See the FAQ for extra tips, if you experience issues with llama-cpp-python installation.
from onprem import LLM

llm = LLM(verbose=False) # default model and backend are usedLocal Models: A number of different local LLM backends are supported.
-
Llama-cpp:
llm = LLM(default_model="llama", n_gpu_layers=-1) -
Llama-cpp with selected GGUF model via URL:
 # prompt templates are required for user-supplied GGUF models (see FAQ)
 llm = LLM(model_url='https://huggingface.co/TheBloke/zephyr-7B-beta-GGUF/resolve/main/zephyr-7b-beta.Q4_K_M.gguf',
           prompt_template= "<|system|>\n</s>\n<|user|>\n{prompt}</s>\n<|assistant|>", n_gpu_layers=-1)
-
Llama-cpp with selected GGUF model via file path:
 # prompt templates are required for user-supplied GGUF models (see FAQ)
 llm = LLM(model_url='zephyr-7b-beta.Q4_K_M.gguf',
           model_download_path='/path/to/folder/to/where/you/downloaded/model',
           prompt_template= "<|system|>\n</s>\n<|user|>\n{prompt}</s>\n<|assistant|>", n_gpu_layers=-1)
-
Hugging Face Transformers:
llm = LLM(model_id='Qwen/Qwen2.5-0.5B-Instruct', device='cuda') -
Ollama:
llm = LLM(model_url="ollama://llama3.2", api_key='na') -
Also Ollama:
llm = LLM(model_url="ollama/llama3.2", api_key='na') -
Also Ollama:
llm = LLM(model_url='http://localhost:11434/v1', api_key='na', model='llama3.2') -
vLLM:
llm = LLM(model_url='http://localhost:8666/v1', api_key='na', model='Qwen/Qwen2.5-0.5B-Instruct') -
Also vLLM:
llm = LLM('hosted_vllm/served-model-name', api_base="http://localhost:8666/v1", api_key="test123")(assumesserved-model-nameparameter is supplied tovllm.entrypoints.openai.api_server). -
vLLM with gpt-oss (assumes
served-model-nameparameter is supplied to vLLM):# important: set max_tokens to high value due to intermediate reasoning steps that are generated llm = LLM(model_url='http://localhost:8666/v1', api_key='your_api_key', model=served_model_name, max_tokens=32000) result = llm.prompt(prompt, reasoning_effort="high")
Cloud Models: In addition to local LLMs, all cloud LLM providers supported by LiteLLM are compatible:
-
Anthropic Claude:
llm = LLM(model_url="anthropic/claude-3-7-sonnet-latest") -
OpenAI GPT-4o:
llm = LLM(model_url="openai/gpt-4o") -
AWS GovCloud Bedrock (assumes AWS_ACCESS_KEY_ID and AWS_SECRET_ACCESS_KEY are set as environment variables)
from onprem import LLM
inference_arn = "YOUR INFERENCE ARN"
endpoint_url = "YOUR ENDPOINT URL"
region_name = "us-gov-east-1" # replace as necessary
# set up LLM connection to Bedrock on AWS GovCloud
llm = LLM( f"govcloud-bedrock://{inference_arn}", region_name=region_name, endpoint_url=endpoint_url)
response = llm.prompt("Write a haiku about the moon.")
The instantiations above are described in more detail below.
The default LLM backend is
llama-cpp-python, and the
default model is currently a 7B-parameter model called
Zephyr-7B-beta, which is automatically downloaded and used.
Llama.cpp run models in GGUF
format. The two other default models are llama and mistral. For
instance, if default_model='llama' is supplied, then a
Llama-3.1-8B-Instsruct model is automatically downloaded and used:
# Llama 3.1 is downloaded here and the correct prompt template for Llama-3.1 is automatically configured and used
llm = LLM(default_model='llama')
Choosing Your Own Models: Of course, you can also easily supply the
URL or path to an LLM of your choosing to
LLM (see the
FAQ for an example).
Supplying Extra Parameters: Any extra parameters supplied to
LLM are forwarded
directly to
llama-cpp-python, the
default LLM backend.
If default_engine="transformers" is supplied to
LLM, Hugging Face
transformers is used as
the LLM backend. Extra parameters to
LLM (e.g.,
‘device=’cuda’) are forwarded diretly totransformers.pipeline. If supplying amodel_id`
parameter, the default LLM backend is automatically changed to Hugging
Face transformers.
# LLama-3.1 model quantized using AWQ is downloaded and run with Hugging Face transformers (requires GPU)
llm = LLM(default_model='llama', default_engine='transformers')

# Using a custom model with Hugging Face Transformers
llm = LLM(model_id='Qwen/Qwen2.5-0.5B-Instruct', device_map='cpu')
See here for more information about using Hugging Face transformers as the LLM backend.
You can also connect to Ollama, local LLM APIs (e.g., vLLM), and cloud LLMs.
# connecting to an LLM served by Ollama
lm = LLM(model_url='ollama/llama3.2')

# connecting to an LLM served through vLLM (set API key as needed)
llm = LLM(model_url='http://localhost:8000/v1', api_key='token-abc123', model='Qwen/Qwen2.5-0.5B-Instruct')`

# connecting to a cloud-backed LLM (e.g., OpenAI, Anthropic).
llm = LLM(model_url="openai/gpt-4o-mini")  # OpenAI
llm = LLM(model_url="anthropic/claude-3-7-sonnet-20250219") # Anthropic
OnPrem.LLM suppports any provider and model supported by the LiteLLM package.
See here for more information on local LLM APIs.
More information on using OpenAI models specifically with OnPrem.LLM is here.
Extra parameters supplied to
LLM and
LLM.prompt
are passed directly to the LLM backend. Parameter names will vary
depending on the backend you chose.
For instance, with the default llama-cpp backend, the default context
window size (n_ctx) is set to 3900 and the default output size
(max_tokens) is set 512. Both are configurable parameters to
LLM. Increase if
you have larger prompts or need longer outputs. Other parameters (e.g.,
api_key, device_map, etc.) can be supplied directly to
LLM and will be
routed to the LLM backend or API (e.g., llama-cpp-python, Hugging Face
transformers, vLLM, OpenAI, etc.). The max_tokens parameter can also
be adjusted on-the-fly by supplying it to
LLM.prompt.
On the other hand, for Ollama models, context window and output size are
controlled by num_ctx and num_predict, respectively.
With the Hugging Face transformers, setting the context window size is
not needed, but the output size is controlled by the max_new_tokens
parameter to
LLM.prompt.
By default, the LLM backend employed by OnPrem.LLM is
llama-cpp-python, which
requires models in GGUF format.
As of v0.5.0, it is now possible to use Hugging Face
transformers as the LLM
backend instead. This is accomplished by using the model_id parameter
(instead of supplying a model_url argument). In the example below, we
run the
Llama-3.1-8B
model.
# llama-cpp-python does NOT need to be installed when using model_id parameter
llm = LLM(model_id="hugging-quants/Meta-Llama-3.1-8B-Instruct-AWQ-INT4", device_map='cuda')
This allows you to more easily use any model on the Hugging Face hub in
SafeTensors format
provided it can be loaded with the Hugging Face transformers.pipeline.
Note that, when using the model_id parameter, the prompt_template is
set automatically by transformers.
The Llama-3.1 model loaded above was quantized using
AWQ,
which allows the model to fit onto smaller GPUs (e.g., laptop GPUs with
6GB of VRAM) similar to the default GGUF format. AWQ models will require
the autoawq package to be
installed: pip install autoawq (AWQ only supports Linux system,
including Windows Subsystem for Linux). If you do need to load a model
that is not quantized, you can supply a quantization configuration at
load time (known as “inflight quantization”). In the following example,
we load an unquantized Zephyr-7B-beta
model that will be
quantized during loading to fit on GPUs with as little as 6GB of VRAM:
from transformers import BitsAndBytesConfig
quantization_config = BitsAndBytesConfig(
    load_in_4bit=True,
    bnb_4bit_quant_type="nf4",
    bnb_4bit_compute_dtype="float16",
    bnb_4bit_use_double_quant=True,
)
llm = LLM(model_id="HuggingFaceH4/zephyr-7b-beta", device_map='cuda',
          model_kwargs={"quantization_config":quantization_config})
When supplying a quantization_config, the
bitsandbytes
library, a lightweight Python wrapper around CUDA custom functions, in
particular 8-bit optimizers, matrix multiplication (LLM.int8()), and 8 &
4-bit quantization functions, is used. There are ongoing efforts by the
bitsandbytes team to support multiple backends in addition to CUDA. If
you receive errors related to bitsandbytes, please refer to the
bitsandbytes
documentation.
OnPrem.LLM includes a built-in Web app to access the LLM. To start it, run the following command after installation:
onprem --port 8000Then, enter localhost:8000 (or <domain_name>:8000 if running on
remote server) in a Web browser to access the application:
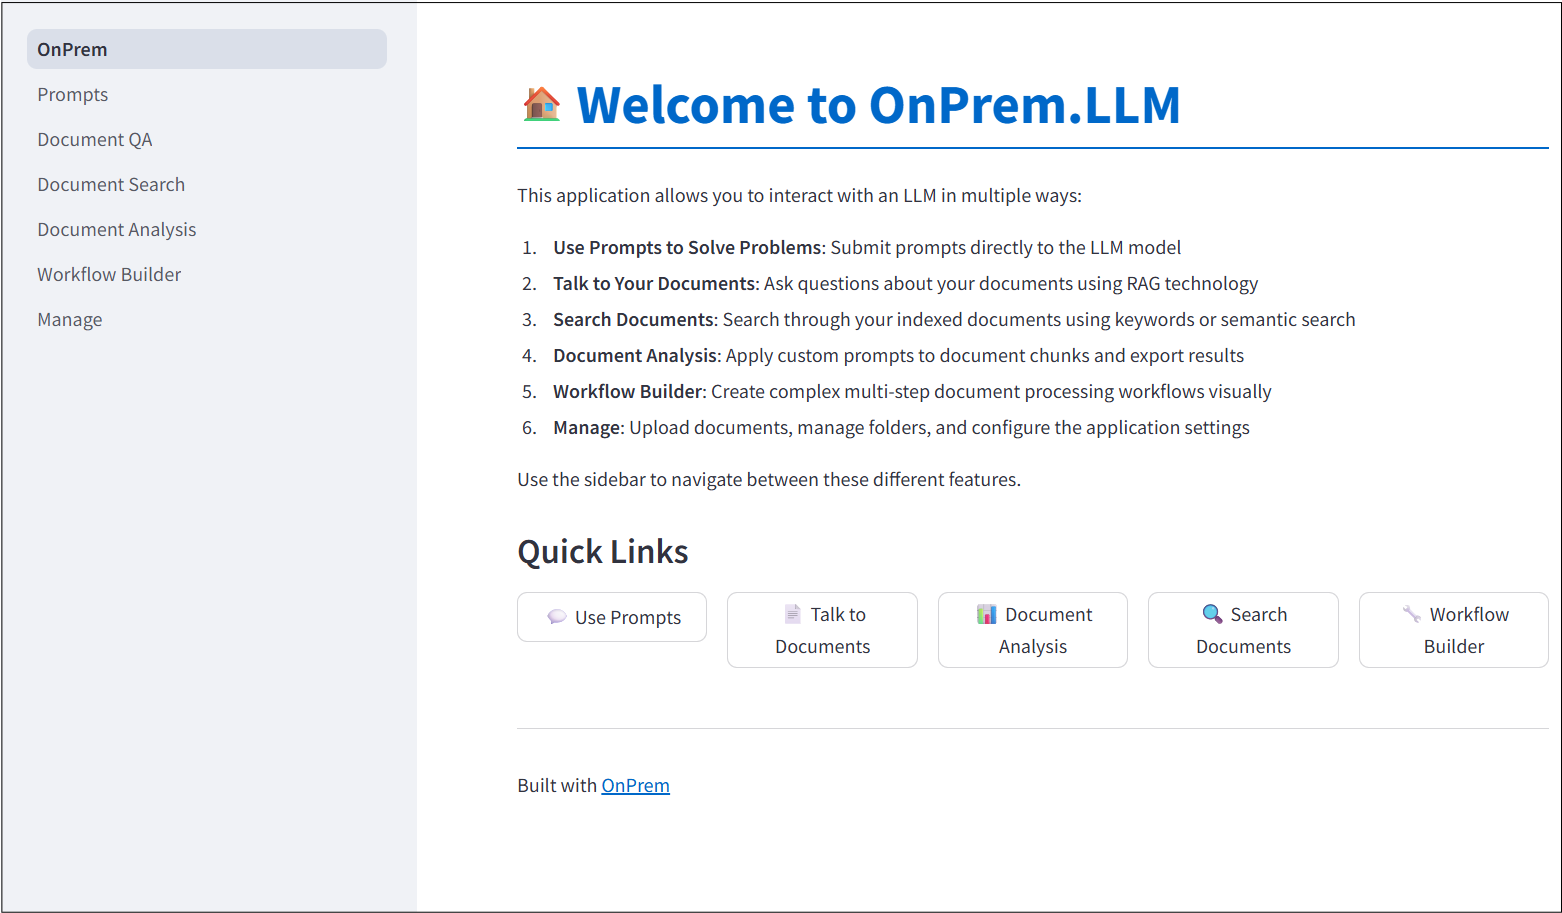
For more information, see the corresponding documentation.
The documentation includes many examples.
| Documentation Link | Example |
|---|---|
| Prompting Examples | Problem-Solving With Prompts |
| Documentation Link | Example |
|---|---|
| Text Extraction | Document Text Extraction (PDFs, Word, PowerPoint) |
| Document Summarization | Document Summarization |
| Information Extraction | Information Extraction from Documents |
| Documentation Link | Example |
|---|---|
| RAG Example | Question-Answering with RAG |
| Vector Stores Tutorial | Using Different Vector Stores |
| Semantic Similarity | Computing Semantic Similarity Between Texts |
| Documentation Link | Example |
|---|---|
| Text Classification | Few-Shot Text Classification |
| Survey Analysis | Auto-Coding Qualitative Survey Responses |
| Legal Analysis | Legal and Regulatory Document Analysis |
| Documentation Link | Example |
|---|---|
| Agent Examples | Agent-Based Task Execution with Tools |
| Structured Outputs | Structured and Guided Outputs with Pydantic Models |
| Workflow Builder | Workflow Builder for Document Analysis |
-
How do I use other models with OnPrem.LLM?
You can supply any model of your choice using the
model_urlandmodel_idparameters toLLM(see cheat sheet above).Here, we will go into detail on how to supply a custom GGUF model using the llma.cpp backend.
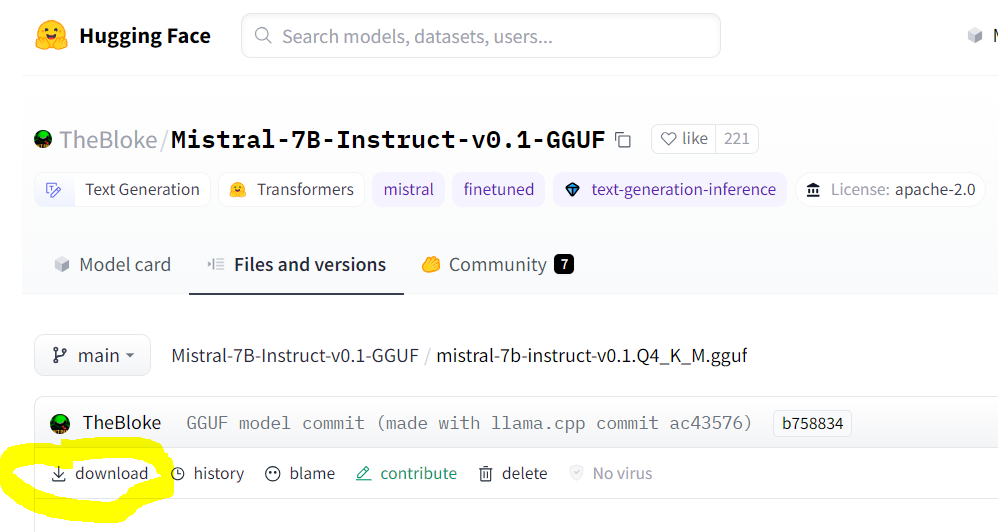
You can find llama.cpp-supported models with
GGUFin the file name on huggingface.co.Make sure you are pointing to the URL of the actual GGUF model file, which is the “download” link on the model’s page. An example for Mistral-7B is shown below:
When using the llama.cpp backend, GGUF models have specific prompt formats that need to supplied to
LLM. For instance, the prompt template required for Zephyr-7B, as described on the model’s page, is:<|system|>\n</s>\n<|user|>\n{prompt}</s>\n<|assistant|>So, to use the Zephyr-7B model, you must supply the
prompt_templateargument to theLLMconstructor (or specify it in thewebapp.ymlconfiguration for the Web app).# how to use Zephyr-7B with OnPrem.LLM llm = LLM(model_url='https://huggingface.co/TheBloke/zephyr-7B-beta-GGUF/resolve/main/zephyr-7b-beta.Q4_K_M.gguf', prompt_template = "<|system|>\n</s>\n<|user|>\n{prompt}</s>\n<|assistant|>", n_gpu_layers=33) llm.prompt("List three cute names for a cat.")
Prompt templates are not required for any other LLM backend (e.g., when using Ollama as backend or when using
model_idparameter for transformers models). Prompt templates are also not required if using any of the default models. -
When installing
onprem, I’m getting “build” errors related tollama-cpp-python(orchroma-hnswlib) on Windows/Mac/Linux?See this LangChain documentation on LLama.cpp for help on installing the
llama-cpp-pythonpackage for your system. Additional tips for different operating systems are shown below:For Linux systems like Ubuntu, try this:
sudo apt-get install build-essential g++ clang. Other tips are here.For Windows systems, please try following these instructions. We recommend you use Windows Subsystem for Linux (WSL) instead of using Microsoft Windows directly. If you do need to use Microsoft Window directly, be sure to install the Microsoft C++ Build Tools and make sure the Desktop development with C++ is selected.
For Macs, try following these tips.
There are also various other tips for each of the above OSes in this privateGPT repo thread. Of course, you can also easily use OnPrem.LLM on Google Colab.
Finally, if you still can’t overcome issues with building
llama-cpp-python, you can try installing the pre-built wheel file for your system:Example:
pip install llama-cpp-python==0.2.90 --extra-index-url https://abetlen.github.io/llama-cpp-python/whl/cpuTip: There are pre-built wheel files for
chroma-hnswlib, as well. If runningpip install onpremfails on buildingchroma-hnswlib, it may be because a pre-built wheel doesn’t yet exist for the version of Python you’re using (in which case you can try downgrading Python). -
I’m behind a corporate firewall and am receiving an SSL error when trying to download the model?
Try this:
from onprem import LLM
LLM.download_model(url, ssl_verify=False)
You can download the embedding model (used by
LLM.ingestandLLM.ask) as follows:wget --no-check-certificate https://public.ukp.informatik.tu-darmstadt.de/reimers/sentence-transformers/v0.2/all-MiniLM-L6-v2.zip
Supply the unzipped folder name as the
embedding_model_nameargument toLLM.If you’re getting SSL errors when even running
pip install, try this:pip install –-trusted-host pypi.org –-trusted-host files.pythonhosted.org pip_system_certs
-
How do I use this on a machine with no internet access?
Use the
LLM.download_modelmethod to download the model files to<your_home_directory>/onprem_dataand transfer them to the same location on the air-gapped machine.For the
ingestandaskmethods, you will need to also download and transfer the embedding model files:from sentence_transformers import SentenceTransformer model = SentenceTransformer('sentence-transformers/all-MiniLM-L6-v2') model.save('/some/folder')
Copy the
some/folderfolder to the air-gapped machine and supply the path toLLMvia theembedding_model_nameparameter. -
My model is not loading when I call
llm = LLM(...)?This can happen if the model file is corrupt (in which case you should delete from
<home directory>/onprem_dataand re-download). It can also happen if the version ofllama-cpp-pythonneeds to be upgraded to the latest. -
I’m getting an
“Illegal instruction (core dumped)error when instantiating alangchain.llms.Llamacpporonprem.LLMobject?Your CPU may not support instructions that
cmakeis using for one reason or another (e.g., due to Hyper-V in VirtualBox settings). You can try turning them off when building and installingllama-cpp-python:# example CMAKE_ARGS="-DGGML_CUDA=ON -DGGML_AVX2=OFF -DGGML_AVX=OFF -DGGML_F16C=OFF -DGGML_FMA=OFF" FORCE_CMAKE=1 pip install --force-reinstall llama-cpp-python --no-cache-dir
-
How can I speed up
LLM.ingest?By default, a GPU, if available, will be used to compute embeddings, so ensure PyTorch is installed with GPU support. You can explicitly control the device used for computing embeddings with the
embedding_model_kwargsargument.from onprem import LLM llm = LLM(embedding_model_kwargs={'device':'cuda'})
You can also supply
store_type="sparse"toLLMto use a sparse vector store, which sacrifices a small amount of inference speed (LLM.ask) for significant speed ups during ingestion (LLM.ingest).from onprem import LLM llm = LLM(store_type="sparse")
Note, however, that, unlike dense vector stores, sparse vector stores assume answer sources will contain at least one word in common with the question.
Please cite the following paper when using OnPrem.LLM:
@article{maiya2025generativeaiffrdcs,
      title={Generative AI for FFRDCs},
      author={Arun S. Maiya},
      year={2025},
      eprint={2509.21040},
      archivePrefix={arXiv},
      primaryClass={cs.CL},
      url={https://arxiv.org/abs/2509.21040},
}