Reverse‑engineered and modified an Android phone-blocking app's Smali code for personal productivity use by increasing the block duration from 1 hour to 12 hours and by adding an hour count to the countdown timer.
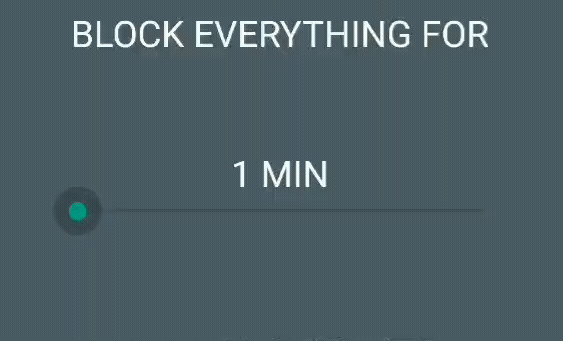
Here was the original app in action (cropped since this was for personal use, and to respect the developer):
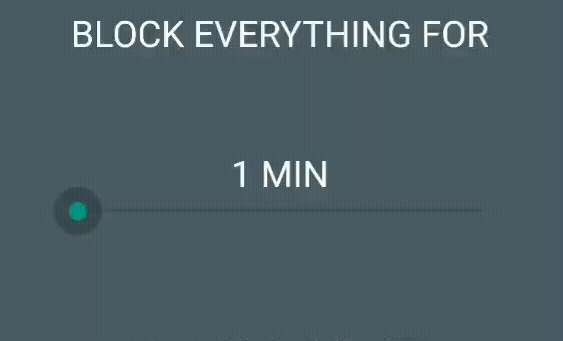
And here is the modified app in action:
Since I modified this app for personal use, and to respect the developer, the code and the app itself will not be published.
You can read the full project description on my blog or you can read it below.
I like to use a variety of tricks and tools to maximize my productivity. One such trick is that, on my laptop, when I intend to work on something, I use a program to block all distracting programs and websites that I do not need, unblocking only the ones I need to use to complete my tasks. I also have two smartphones: one relatively modern “fun” phone and an old Galaxy S5 that I use as my “study” phone. When I go to the library to study or to work on personal projects, I only bring my Galaxy S5. I have blocked most apps on it, except important ones such as the default calendar, notes, and messaging apps.
The problem is that, even with most apps being blocked, I still sometimes tend to check the phone as if by reflex, looking through my notes and calendar entries, when I should instead be studying. To fix this, I have been using an old Android app that blocks the phone in its entirety. It hasn’t been updated for more modern Android versions, but it works perfectly on my Galaxy S5 with Android Marshmallow.
This app is the only one I have found that blocks the phone entirely while also being hard to bypass on Android Marshmallow. Most apps would allow force closing the app to end the block.
The app’s only drawback is that the maximum block duration is 60 minutes. I often work or study for 4 to 12 hours and having to restart the block every hour can sometimes make me lose focus, providing me with an opportunity to check my text messages in the middle of a study session. I, therefore, decided to increase the maximum block limit to 12 hours by myself.

I made a post on Reddit asking how easy such a task would be. One person said that, for someone who has never done app development before, it could take weeks, or even months, because one would have to become familiar with Smali and certificates, among other things. Another person commented that it would be as easy as modifying an int.
The first comment gave me a list of terms to Google. I went at it, and quickly learned about useful tools: apktool to decompile and build APKs, SignApk to sign APKs, and jadx to represent Smali code in more readable Java form.
If you have ever extracted an APK using a tool like 7-Zip, you may have noticed DEX files with unreadable binary code. Smali is a human-readable intermediate representation of those DEX files.
I first need to get the APK of the app that was installed on my phone. As I said, the app is not on the Play Store anymore. However, I use an app that automatically makes a backup of my apps and uploads them to Google Drive. Therefore, I already have the APK on hand.
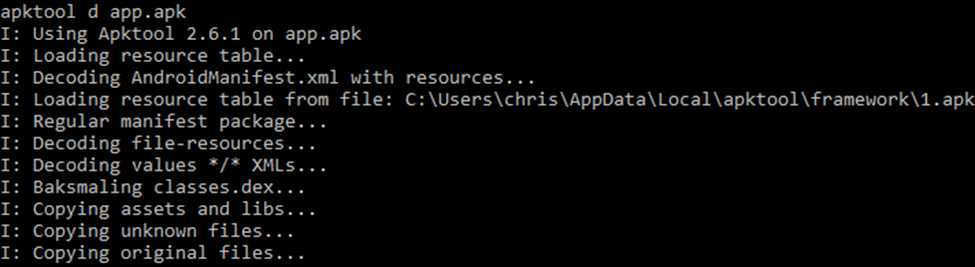
I then use apktool to decompile the APK and have access to the Smali files:
There are often multiple Smali files for a single Java file because DEX files cannot have more than 64K (65,536) methods. Smali code is human-readable, but not very user-friendly. It is similar to Assembly. I am using jadx to convert the Smali code into more readable Java code.
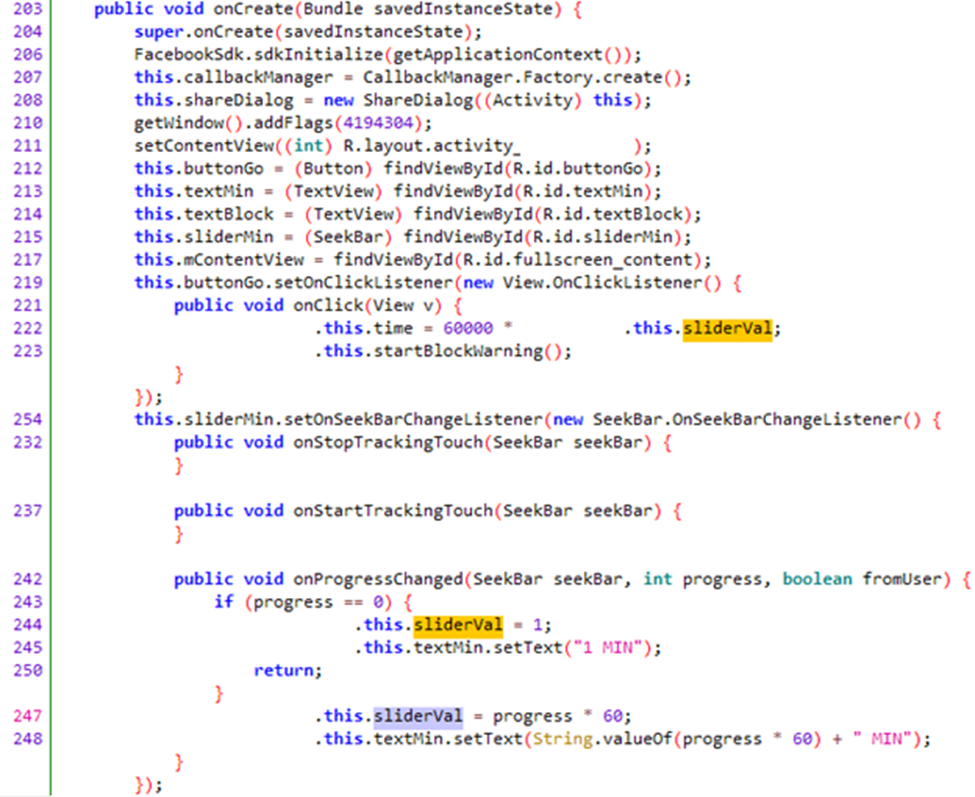
By browsing the jadx Java representation, looking for methods that would modify the duration of the block, I found this method:
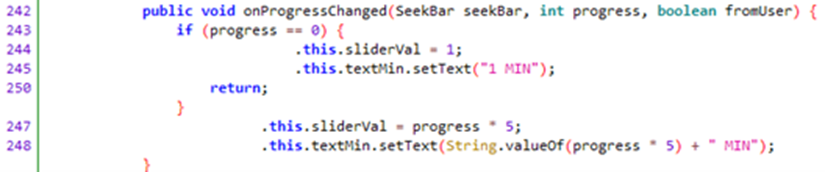
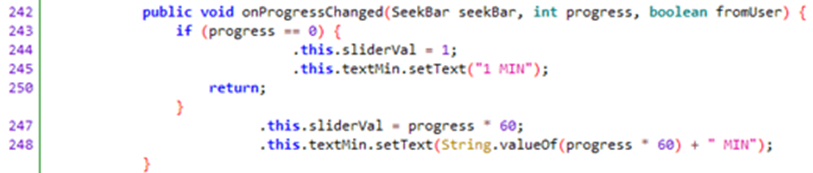
So progress represents the position of the slider, from 0 to 12. At its initial position, the block duration is 1 minute. From 1 to 12, sliderVal is the value of progress multiplied by 5, and the text is updated similarly. To increase the maximum block duration, all I must do is increase the value that progress is multiplied by from 5 to 60. This way, increasing the position by 1 will increase the block duration by 1 hour. At position 12, the block duration will be 720 minutes (12 hours).
I will keep the initial block duration at 1 minute so that I can test and demonstrate the app without blocking my phone for an extended length of time.
Let’s look for this method in the Smali files. I realized the Java code line values are represented in the Smali code. I want to modify lines 247 and 248, so I simply have to search for .line 247 and .line 248:

The Dalvik bytecode documentation is quite helpful to understand the meaning of instructions iget, iput, invoke, const, move, and mul. mul is a multiplication instruction. mul-int/lit8 v1, p2, 0x5 is a multiplication instruction where the value of register p2 is multiplied by an 8-bit signed int constant, in this case, 0x5 (5 in hexadecimal), and the result is placed in register v1.
Therefore, all I must do is replace 0x5 with 0x3c (60 in hexadecimal) in both locations. I can then save the file and reopen it in jadx to check if my change had the expected effect:
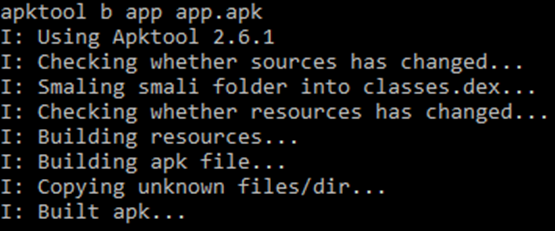
It did! Now I can build the APK and test it. Let’s build it with apktool:
And sign it using SignApk:

Now let’s install and test the app:
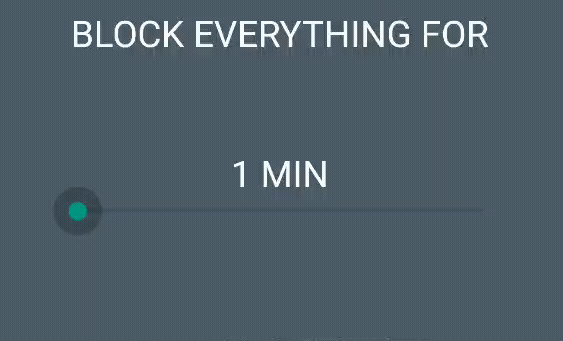
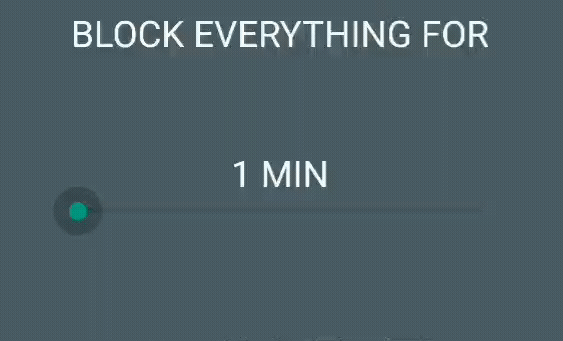
The slider works!
However, there is an issue. When I start a 2-hour to 12-hour block, the block-start warning displays the correct time, but the block countdown timer only displays the minutes and the seconds left, not the hours.
Is the block duration only 60 minutes or is the countdown timer simply not displaying the hours remaining? I positioned the slider at the third interval, which used to be 10 minutes and is now 120 minutes. The countdown timer is displaying a full hour remaining, not 5 minutes, so it seems like my Smali modification did modify the actual length of the block. Thus, it is likely that the countdown timer is not displaying the hours. Let’s verify:
sliderVal modifies an attribute called time. When the slider is set at its third position, the value of the progress attribute is 2 (because it is 0 at the initial position). Thus, sliderVal = progress * 60 = 2 * 60 = 120.
Lines 219 to 223 seem to indicate that when buttonGo (the button that starts the block) is clicked, the time attribute is set to the value of sliderVal multiplied by 60,000 (so 7,200,000 in the 120-minute case) and the block warning begins. The time attribute seems to convert the duration to milliseconds. 120 minutes is 7,200,000 milliseconds or 7200 seconds.
Okay. Is time used elsewhere?
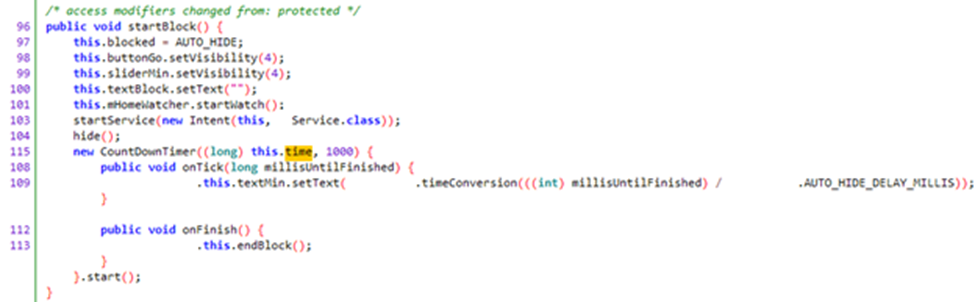
Yes, in the startBlock method, as an argument of the CountDownTimer class. It seems like I am getting closer to the solution! What does CountDownTimer do?

Therefore, the countdown timer lasts for 7,200,000 milliseconds (in the 120-minute case) and onTick callbacks are received every 1000 milliseconds, so every second. Let’s analyze onTick:

A quick search of the code informs me that textMin is an instance of the TextView class, which displays text to the user. In this case, it displays the countdown timer. setText sets the displayed text to the value returned by the timeConversion method.
The argument passed to the timeConversion method is millisUntilFinished (the number of milliseconds left until the block is finished, converted from a long to an int) divided by AUTO_HIDE_DELAY_MILLIS. Another search of the code informs me that it is a final static int with a value of 1000. Thus, the division by 1000 converts millisUntilFinished from milliseconds to seconds.
Therefore, the timeConversion argument is the number of seconds remaining until the block is finished. In the 120-minute case, the argument passed to timeConversion is 7,200,000 / 1000 = 7200.
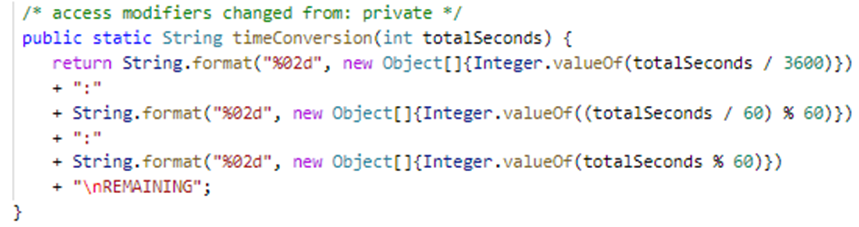
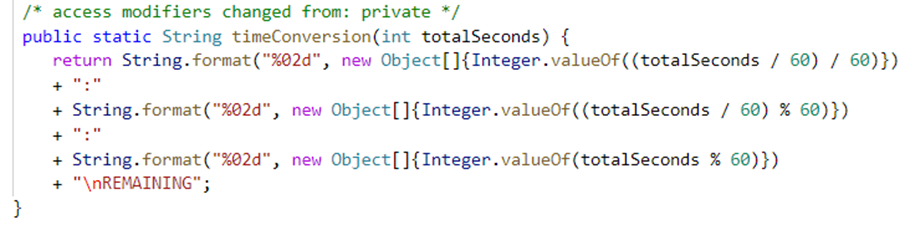
Let’s analyze timeConversion:

This method returns the time in the form of an "xx:xx" string. It seems straightforward, but let’s look up what "%02d" does. String.format has two parameters: a format string followed by an argument list.
"%02d" is the format string. It indicates what the formatted string must look like. For "%02d" in particular, 2d indicates that the Integer must be formatted with two digits and 0 indicates that it must be left-padded with zero. For example, the Integer 59 would be formatted to the String "59", but 9 would be formatted to "09".
((totalSeconds / 60) % 60) converts seconds to minutes and (totalSeconds % 60) is the remaining number of seconds. For example, for the 120-minute case, if 51 seconds have passed since the countdown began, the value of totalSeconds is 7200 – 51 = 7149.
(7149 / 60) % 60 = 59.15. Integer.valueOf will get rid of anything after the decimal point and only 59 will be left. String.format will convert this Integer to the String "59".
7149 % 60 = 9. The Integer will have only one digit, so String.format will left-pad it with zero, converting it to the String "09".
Thus, timeConversion will return "59" + ":" + "09" + "\nREMAINING", so "59:09\nREMAINING", \n being the newline character.
There’s our problem! As I expected, the actual block duration is correct, but the timer does not display the hours left.
This should be quite an easy fix. All I must do is append a string representing the hours left, followed by ":", followed by the pre-existing string. To convert seconds to hours, I must simply divide totalSeconds by 3600. Integer.valueOf will only keep the digits before the decimal point, and String.format will left-pad the result with zero if needed.
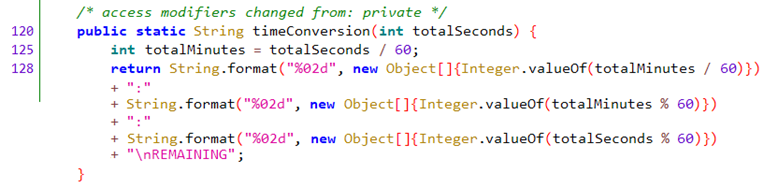
The final code should look like:
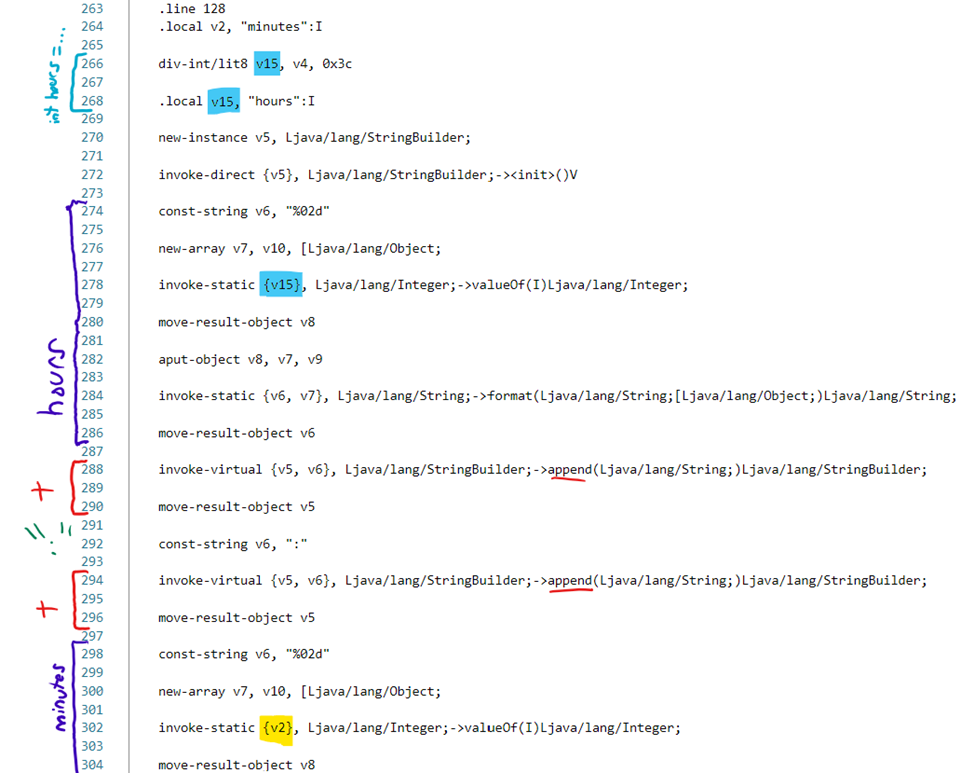
Let’s analyze the Smali code:
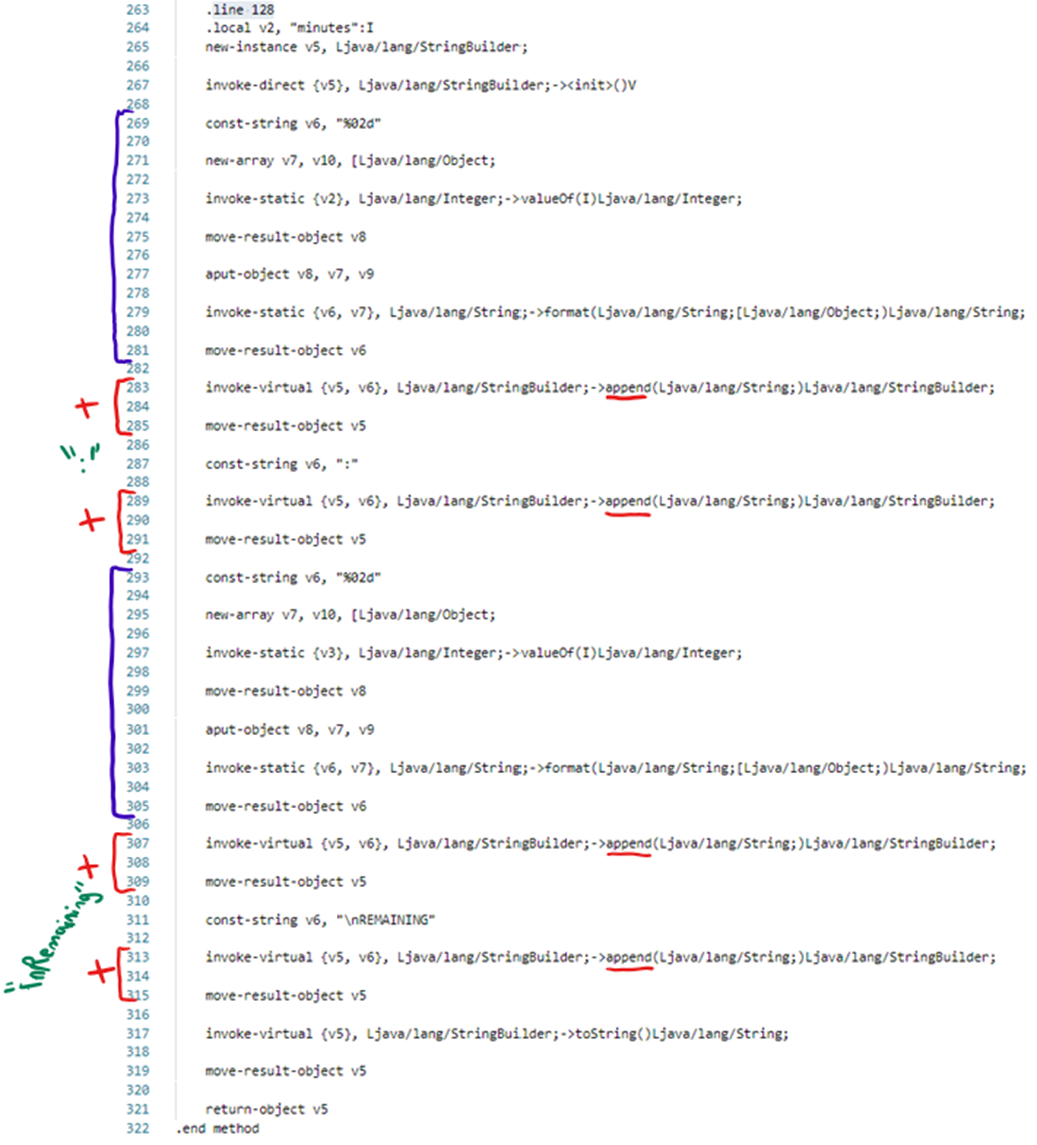
The Smali code of the two String.format methods is in purple. The Smali code of the append (+) is in red. Let’s look at the Dalvik bytecode documentation to understand what some of this terminology means. invoke calls a method. move-result stores the result of the method and must be done immediately after invoke. new-array constructs a new array. aput stores a value (an object in the case of aput-object) into a specified index of a given array.
Notice that the code of the two String.format sections, in purple, barely differs. The only difference is at line 273 and line 297, where the static methods invoked are in registers v2 and v3, respectively. Notice also that there seems to be no code indicating a division or a modulo operation, which seems to indicate that those will be defined elsewhere and stored in v2 and v3.
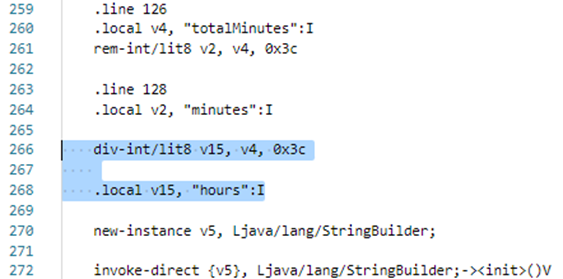
According to the Dalvik bytecode documentation, a division is represented by div, and modulo is represented by rem. Let’s search the code for "div":
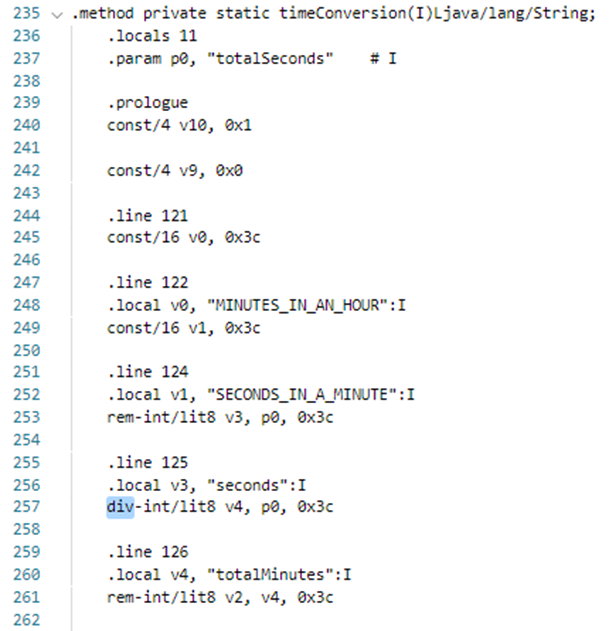
Ah ha! The actual code of the timeConversion method seems to have local variables that didn’t appear in the jadx Java representation: MINUTES_IN_AN_HOUR, SECONDS_IN_A_MINUTE, seconds, and totalMinutes. There was also a local variable called minutes in the .line 128 code:

Let’s try to convert this Smali code to Java code by hand:
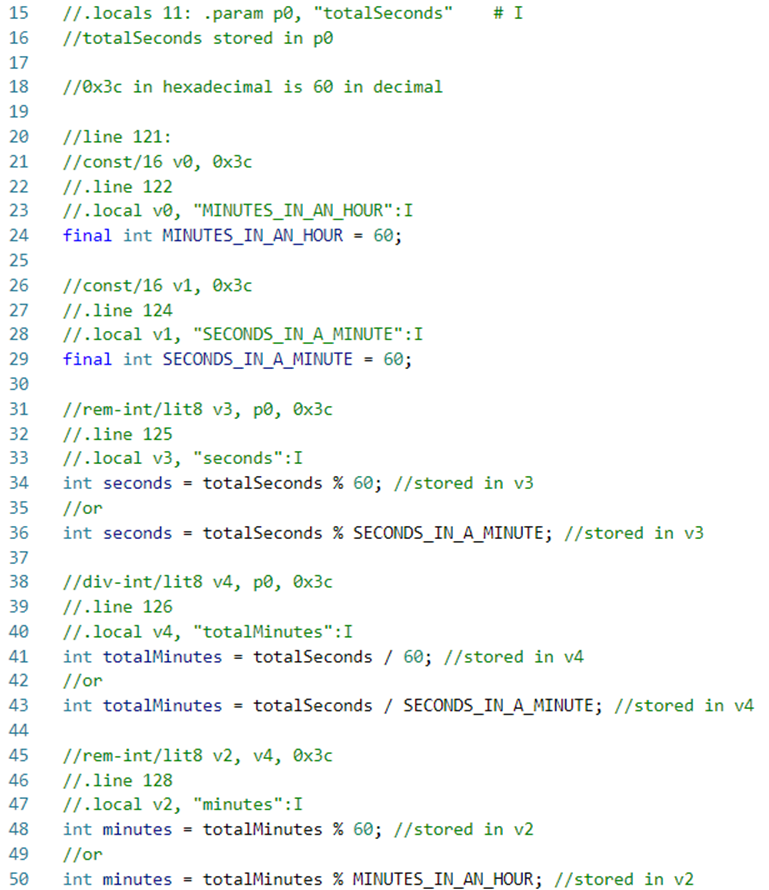
It seems like the original code had the constants MINUTES_IN_AN_HOUR and SECONDS_IN_A_MINUTE, but the Smali simply uses their value directly.
The full Java code of the initial timeConversion method most likely looked like:

and the updated code should be:
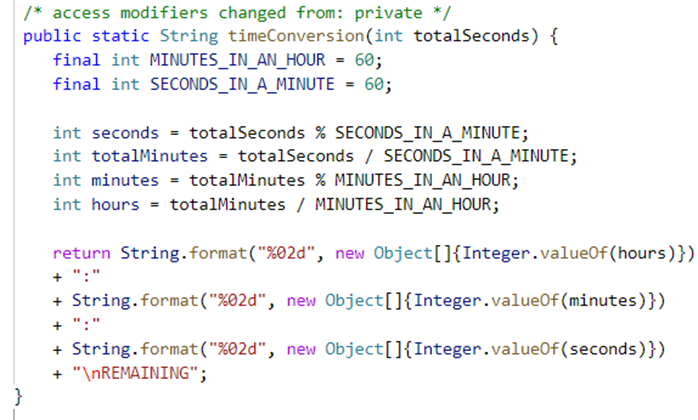
However, since jadx represented the method with no variables or constants, I expect the final jadx Java representation to look like:
Let’s modify the Smali code to reach this result! First, let’s add the hours variable.
.line n is used for debugging and stacktraces and it does not need to be modified or used when adding Smali code. It will make debugging more difficult, but it is not required for our small change.
The Dalvik bytecode documentation indicates that many methods only address the first 16 registers. The code doesn’t use any registers higher than v10, but I will use v15 to be safe:
Now all I have left to do is to copy the section equivalent to String.format and + ":" +, and modify the invoke-virtual method reference index to {v15}:
That is it! Let’s open the file with jadx to check the result:
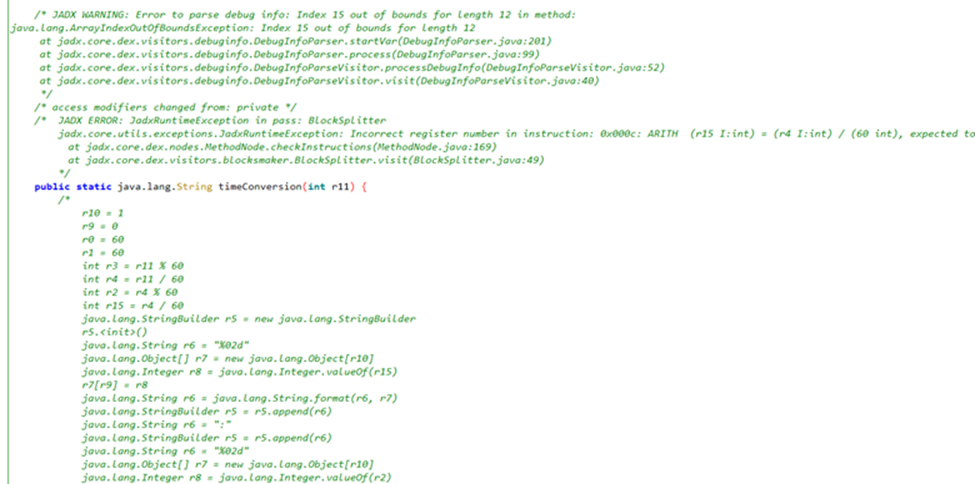
Oops! Index 15 out of bounds for length 12, Incorrect register number. Okay, so I can only use 12 registers (0 to 11) here. Register v11 isn’t used in the code. Let’s modify v15 to v11 everywhere, save, and open the file with jadx again:
It looks as expected! Interestingly, the initial jadx representation didn’t include any variable except totalSeconds, whereas, for this modified version, it includes totalMinutes, but not the other variables.
Let’s recompile and sign the APK as I did previously, and observe the result:
I did it! This was a fun way to learn more about reverse-engineering mobile apps!