This repository provides code for the CMPUT 622 Project, Measuring Bias in Image Captioning models using Counterfactuals. In this project, we present a way to measure counterfactual fairness in Image Captioning models. We generate counterfactuals by minimally changing the sensitive attribute in the images and measure fairness by comparing the captions from original and counterfactual iamges.
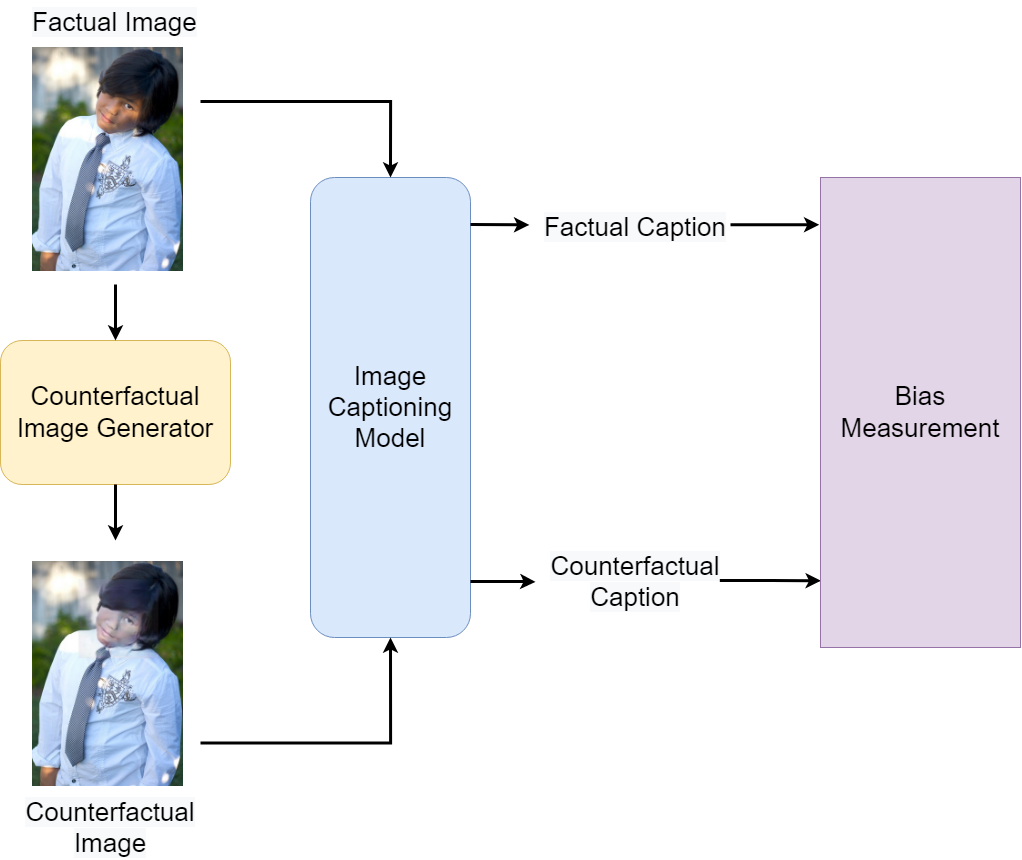
First create two virtual environments. One for STGAN using the stgan_requirements.txt file and the other for everything else, using the main_requirements.txt file.
Download the MS COCO Captions 2014 Validation dataset, along with its annotations, by following the instructions here.
Extract both val2014.zip and annotations_trainval2014.zip in the same root directory.
Then filter the dataset by using the following script to extract all images that have people in them:
python data/coco_filter_people.py --root_dir <path to the root directory>This will create a new dir val2014_people inside your root dir with all the people images.
We use ReticaFace from this repo for facial detection. First download the weights by following instructions in the ReticaFace repo and place them inside ./Pytorch_Retinaface/weights dir. Then run the following script to detect faces:
cd Pytorch_Retinaface
python test_widerface.py --root_dir <path to the root directory>
cd ..
This will create a new dir val2014_faces_txt inside your root dir with one text file for each image containing the bounding boxes and keypoints of all detected faces.
Then run the following script to filter the detected faces in each image, based on their confidence scores, relative sizes and orientation. This script will also expand the bounding box to include the complete face and resize the extracted face image to 128x128 to be used in STGAN:
python data/filter_faces.py --root_dir <path to the root directory>This will create a new dir val2014_faces inside your root dir with all the face images.
We use Face Attribution Manipulation model, STGAN, from this repo to generate counterfactual images. First download the weights by following the instructions in the STGAN repo, and extract them inside ./STGAN/output/ dir. Then run the following script to generate counterfactual faces (Make sure to use the separate env created for STGAN in the beginning):
cd STGAN
python manipulate_faces.py --gpu 1 --orig_att dark --root_dir <path to the root directory>
cd ...
This will create a new dir stgan/val2014_faces_dark inside your root dir. This dir would have counterfactual faces (light-skinned) from all the dark-skinned faces in the COCO Val dataset.
Then, run the following script to attach the counterfactual faces to original images to generate counterfactual images:
python data/attach_faces.py --root_dir <path to the root directory>This will create two new dirs, stgan/val2014_dark_mod and stgan/val2014_dark_orig. The dir ending in mod, has the counterfactual images, the dir ending in orig has the original images.
We also use StarGAN, but the performance is not as good as STGAN. To run StarGAN, first download the weights follow the instruction from /StarGAN/readme.md. And put the input data in /StarGAN/data/{your data folder name}/{images001.jpg, images002.jpg, ...}, then run the following command:
python main.py --mode test --dataset {your data folder name} --image_size 128 --c_dim 5 \
               --selected_attrs Black_Hair Blond_Hair Brown_Hair Male Young \
               --model_save_dir='stargan_celeba_128/models' \
               --result_dir='stargan_celeba_128/results'

# crop the images with gender manipulation
python crop_image.py
Then the generated images will be in the /stargan_celeba_128/results
We ClipCap model from his repo to generate captions. First download both pretrained models (trained on COCO and Conceptual Captions datasets) from the ClipCap repo, and place them in the ./CLIP_prefix_caption/pretrained_models dir. Then run the following script to generate captions using both models:
cd CLIP_prefix_caption
python generate_captions.py --root_dir <path to the root directory> --model coco
python generate_captions.py --root_dir <path to the root directory> --model conceptual-captions
cd ...
This will create json files for captions of both dark-skinned (original) and light-skinned (counterfactual) images, and save them in the ./captions/ dir.
Racial descriptor and Profane words detection, Sentimental Analysis, Bleu, and Semantic Texutal Simialrity are under the folder /analyze_captions/analyze_race
To perform these analyses, upload your data to /captions_stgan_race (or with default path) and run the following commands:
cd analyze_captions/analyze_race

# Racial descriptor and Profane words detection
python check_racial_profane.py

# Sentimental Analysis
python SA_VADER.py              # this would output the average Positive scores and average Negative scores
python SA_VADER_distribution.py # this would output the percentage of neutral captions

# Bleu
python BLEU.py

# Semtimental Textual
python STS.py                   # the results of every pairs of captions would be write to STS_result.json
python sort_STS_result.py # sort the pairs with smallest STS scoresTo perform WEAT Analysis, run the following commands and scripts, once you have generated the captions:
python -m spacy download en_core_web_sm
python -m spacy download en_core_web_trf
python weat_analysis.pyThis code is based on these repos: Pytorch_Retinaface, STGAN, CLIP_prefix_caption, enhanced-subject-verb-object-extraction, stargan, vaderSentiment, fairseq Special thanks to the authors.