


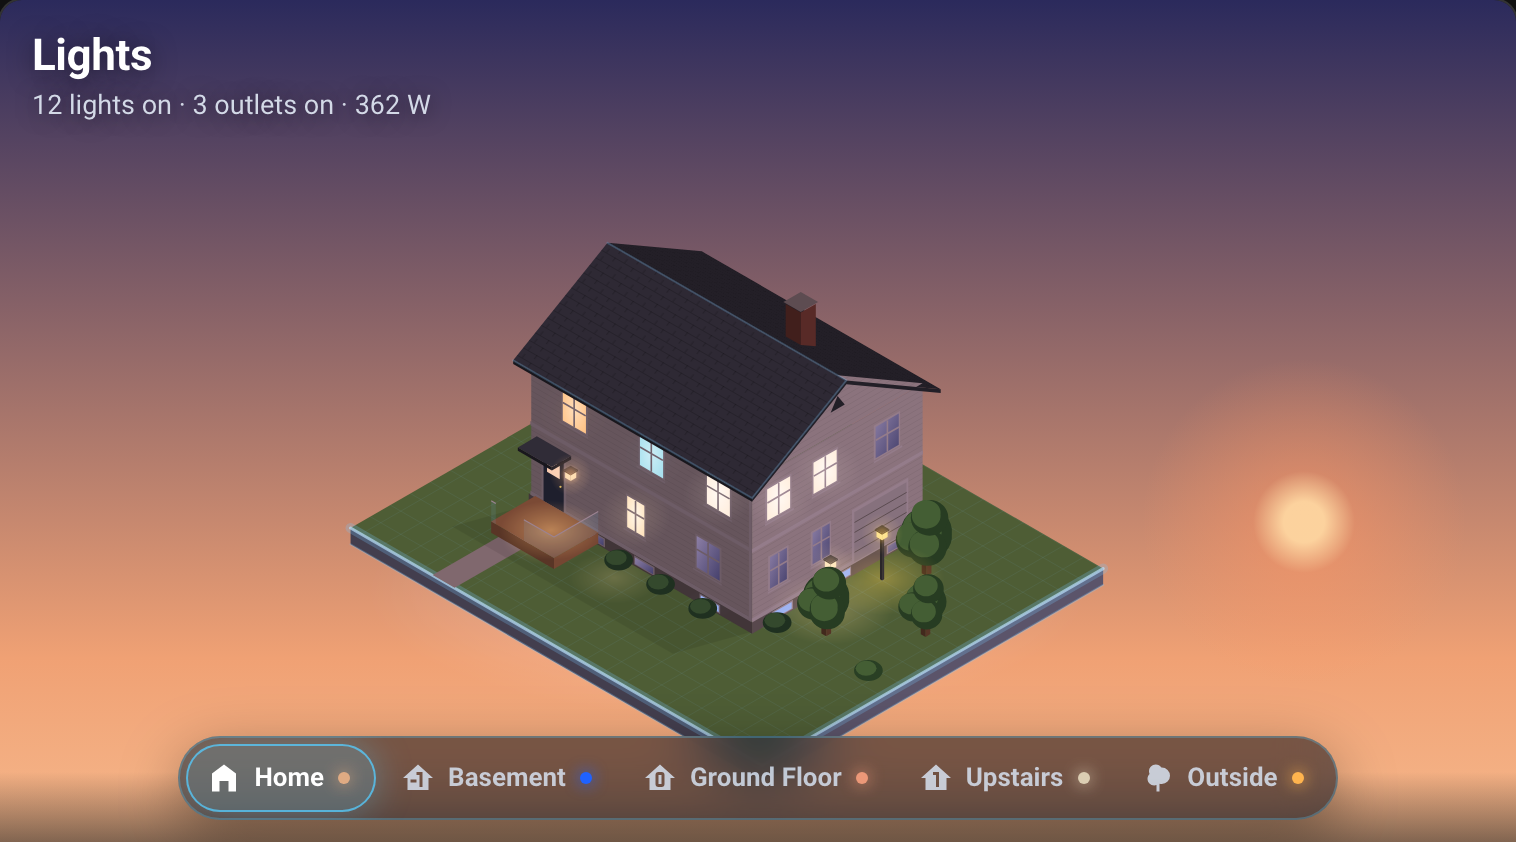
Every light and outlet in your home, found automatically and shown in a 3D model of your house. Open a floor like a dollhouse, watch each room light up as you switch it, and control lights and outlets separately for the whole home, a floor or a single room.
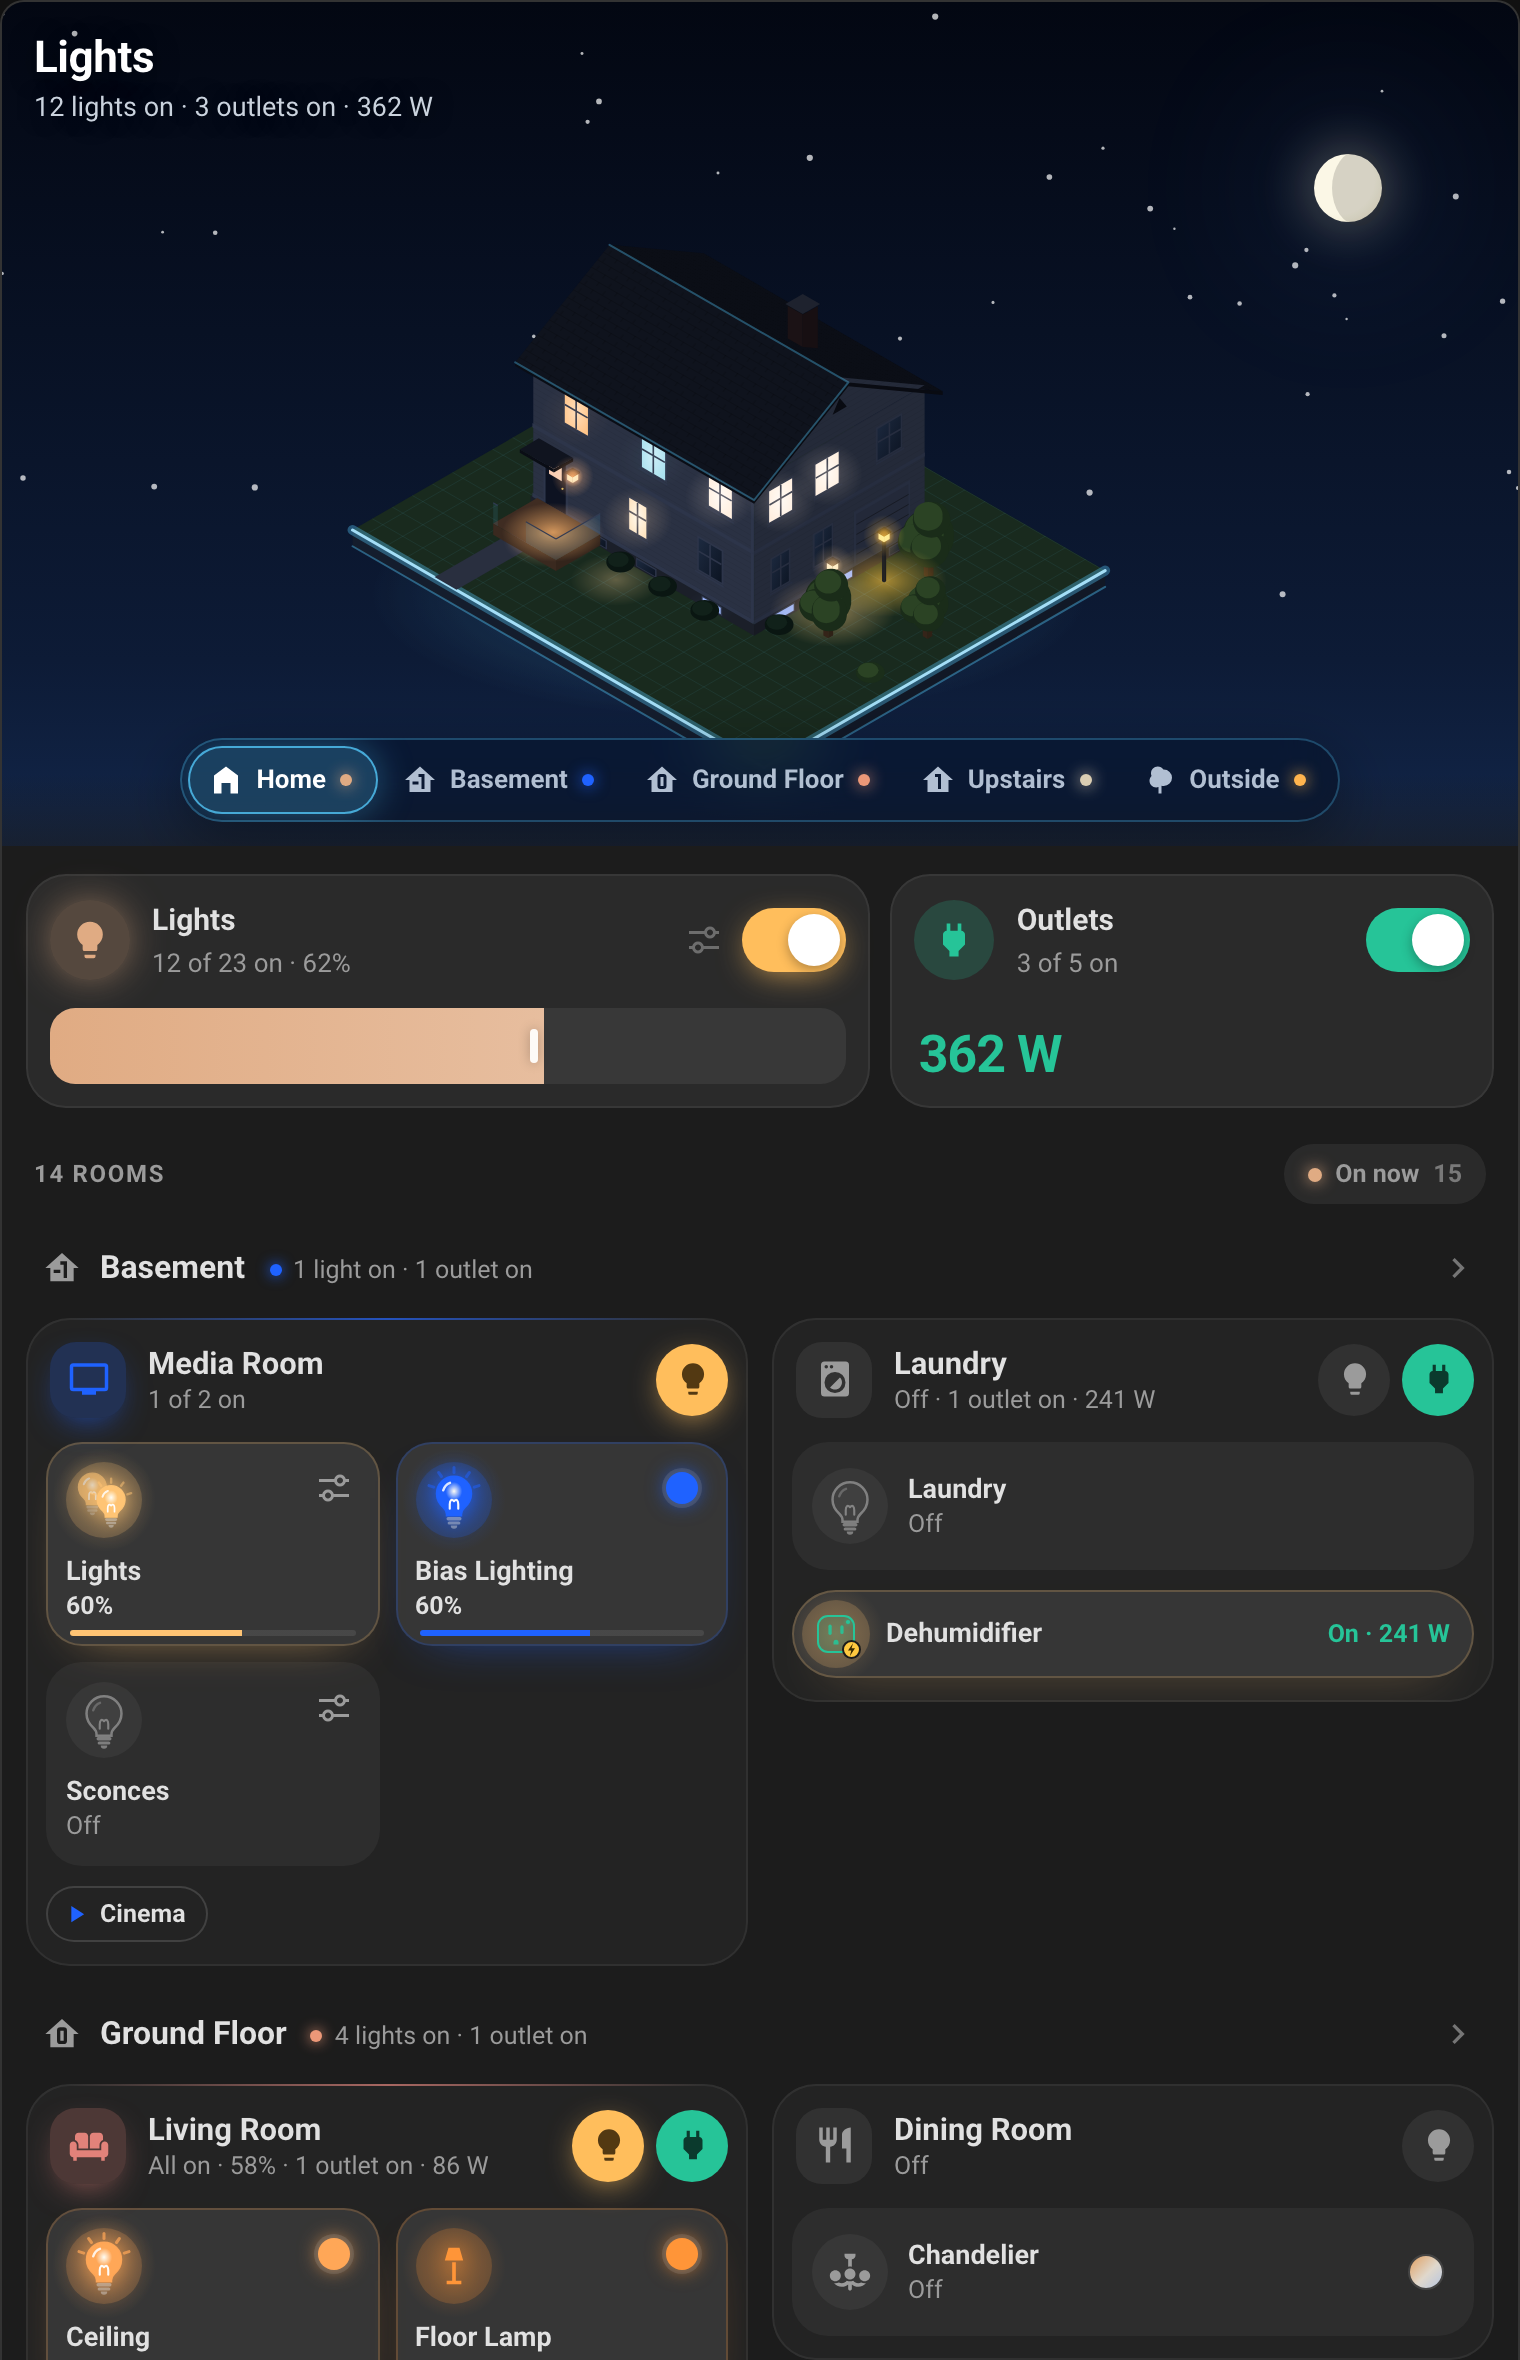
- Your home in 3D. The card builds a model of your house from your Home Assistant floors and areas. Every room has windows that glow in the real color and brightness of its lights, outdoor areas become a garden, a porch or a driveway with their own lamps, and the sky follows the sun from day to dusk to night.
- Open any floor like a dollhouse. Pick a floor and the roof lifts away. Rooms are furnished so you can tell the kitchen from the bedroom, and every lamp throws its own pool of light. Tap a room to see it up close.
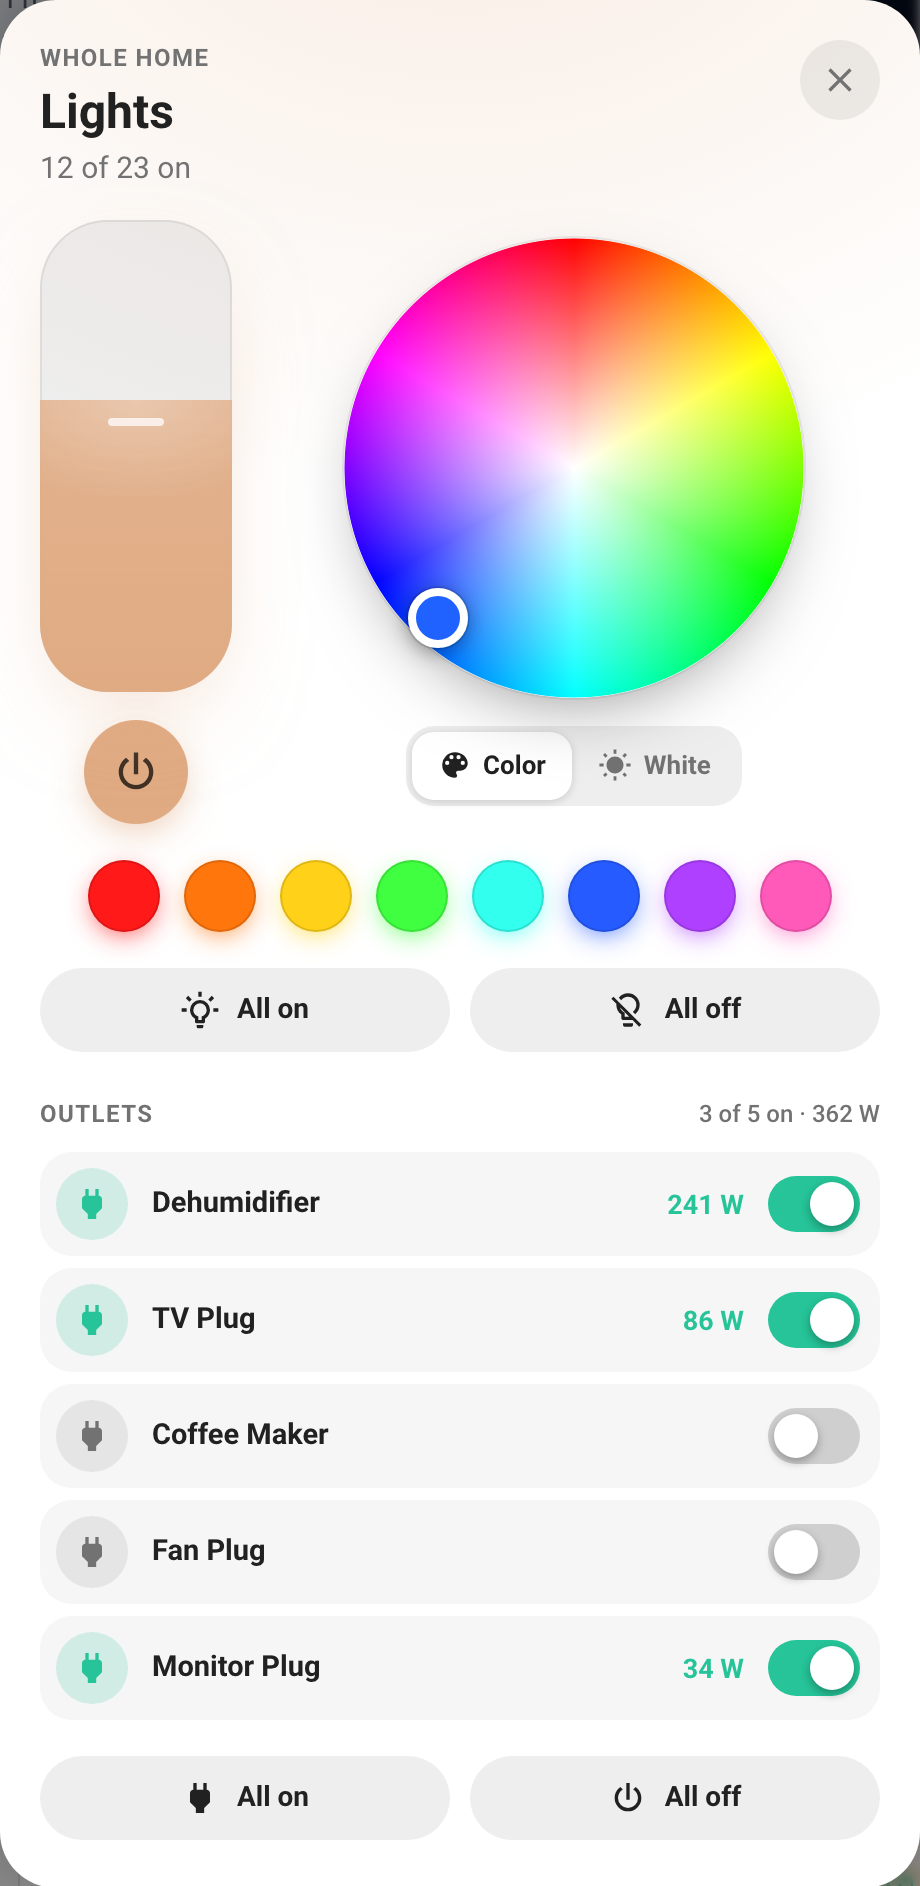
- Lights and outlets, separately. The whole home, each floor and each room have their own Lights and Outlets controls, so switching the lights never cuts power to a fridge or a computer. Turning several outlets off at once takes a second tap, and everything can be undone.
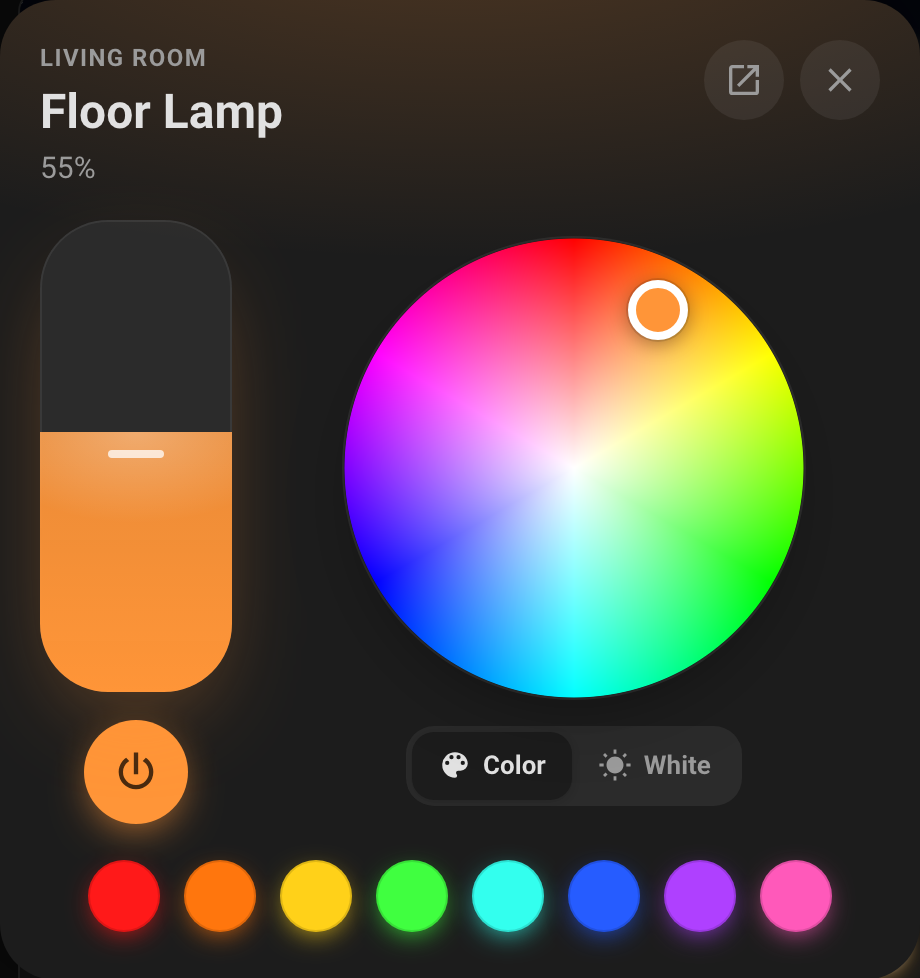
- On, dim and color for every light. Tap a tile to switch it, slide across it to dim, or press and hold for brightness, color, white temperature and effects. In a room up close, every light has its own switch, slider and color button.
- Calm, even with a lot of devices. Rooms are grouped by floor, outlets sit on a line of their own under the lights, and On now shows only what is on.
- No entity lists to maintain. Lights and outlets are discovered from your areas and floors. New devices appear on their own, and removed ones disappear.
- Fits any screen. Rooms sit side by side on a wide dashboard, two tiles to a row on a phone, and the controls move beside the color wheel on short wall tablets.
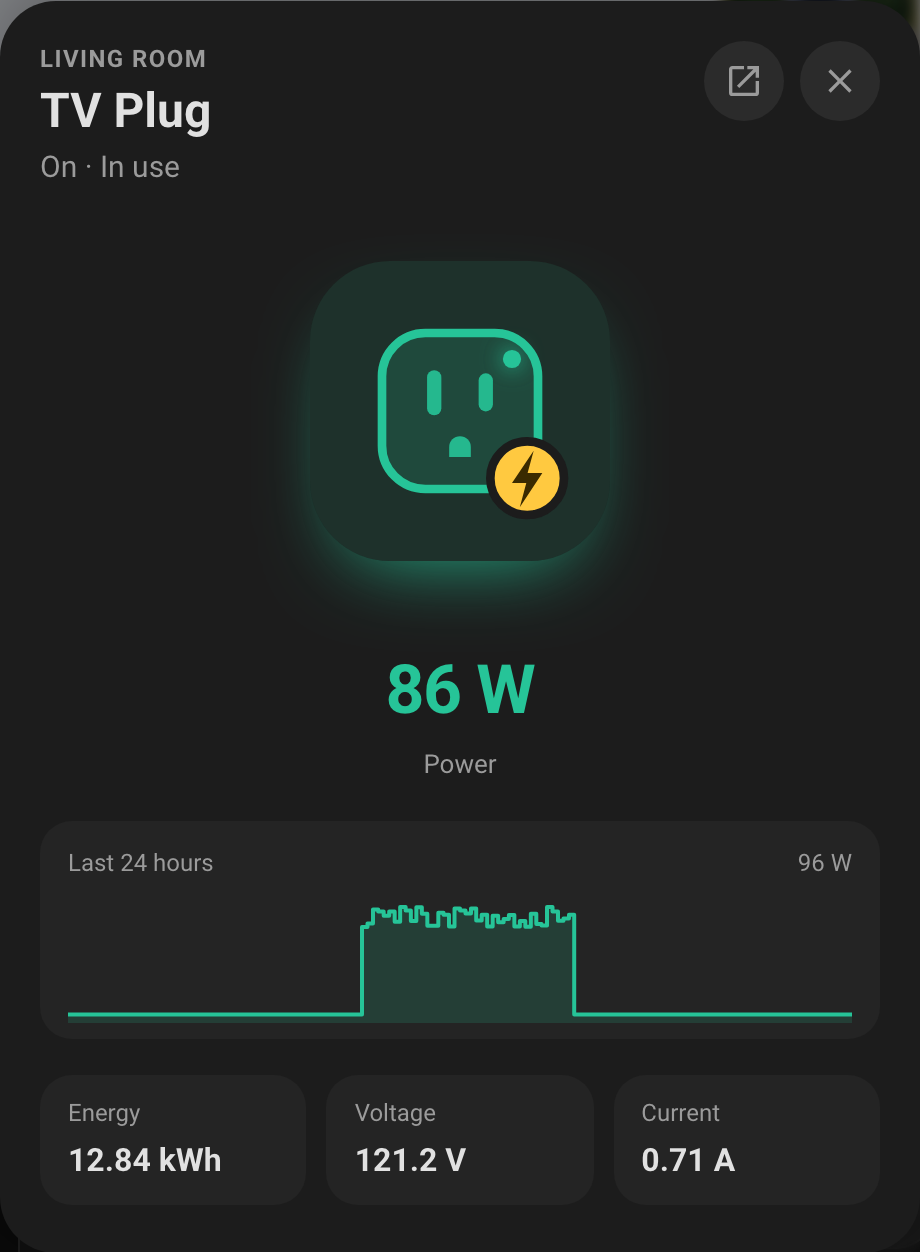
- Smart plugs done right. Live wattage, a 24-hour power chart, energy, voltage and current, on a faceplate drawn in your country's socket style.
- Undo. Switching lights or outlets off remembers each light's brightness and color, so one tap brings everything back.
- Instant feedback. Tiles and the house react immediately, even while slow Zigbee or cloud bulbs catch up.
- Eight languages. English, Deutsch, Nederlands, Français, Español, Italiano, Polski and Português, following each person's Home Assistant language.
- Accessible. Keyboard control, screen-reader labels, reduced-motion support, and light and dark themes.
| A floor, opened up | One room up close |
|---|---|
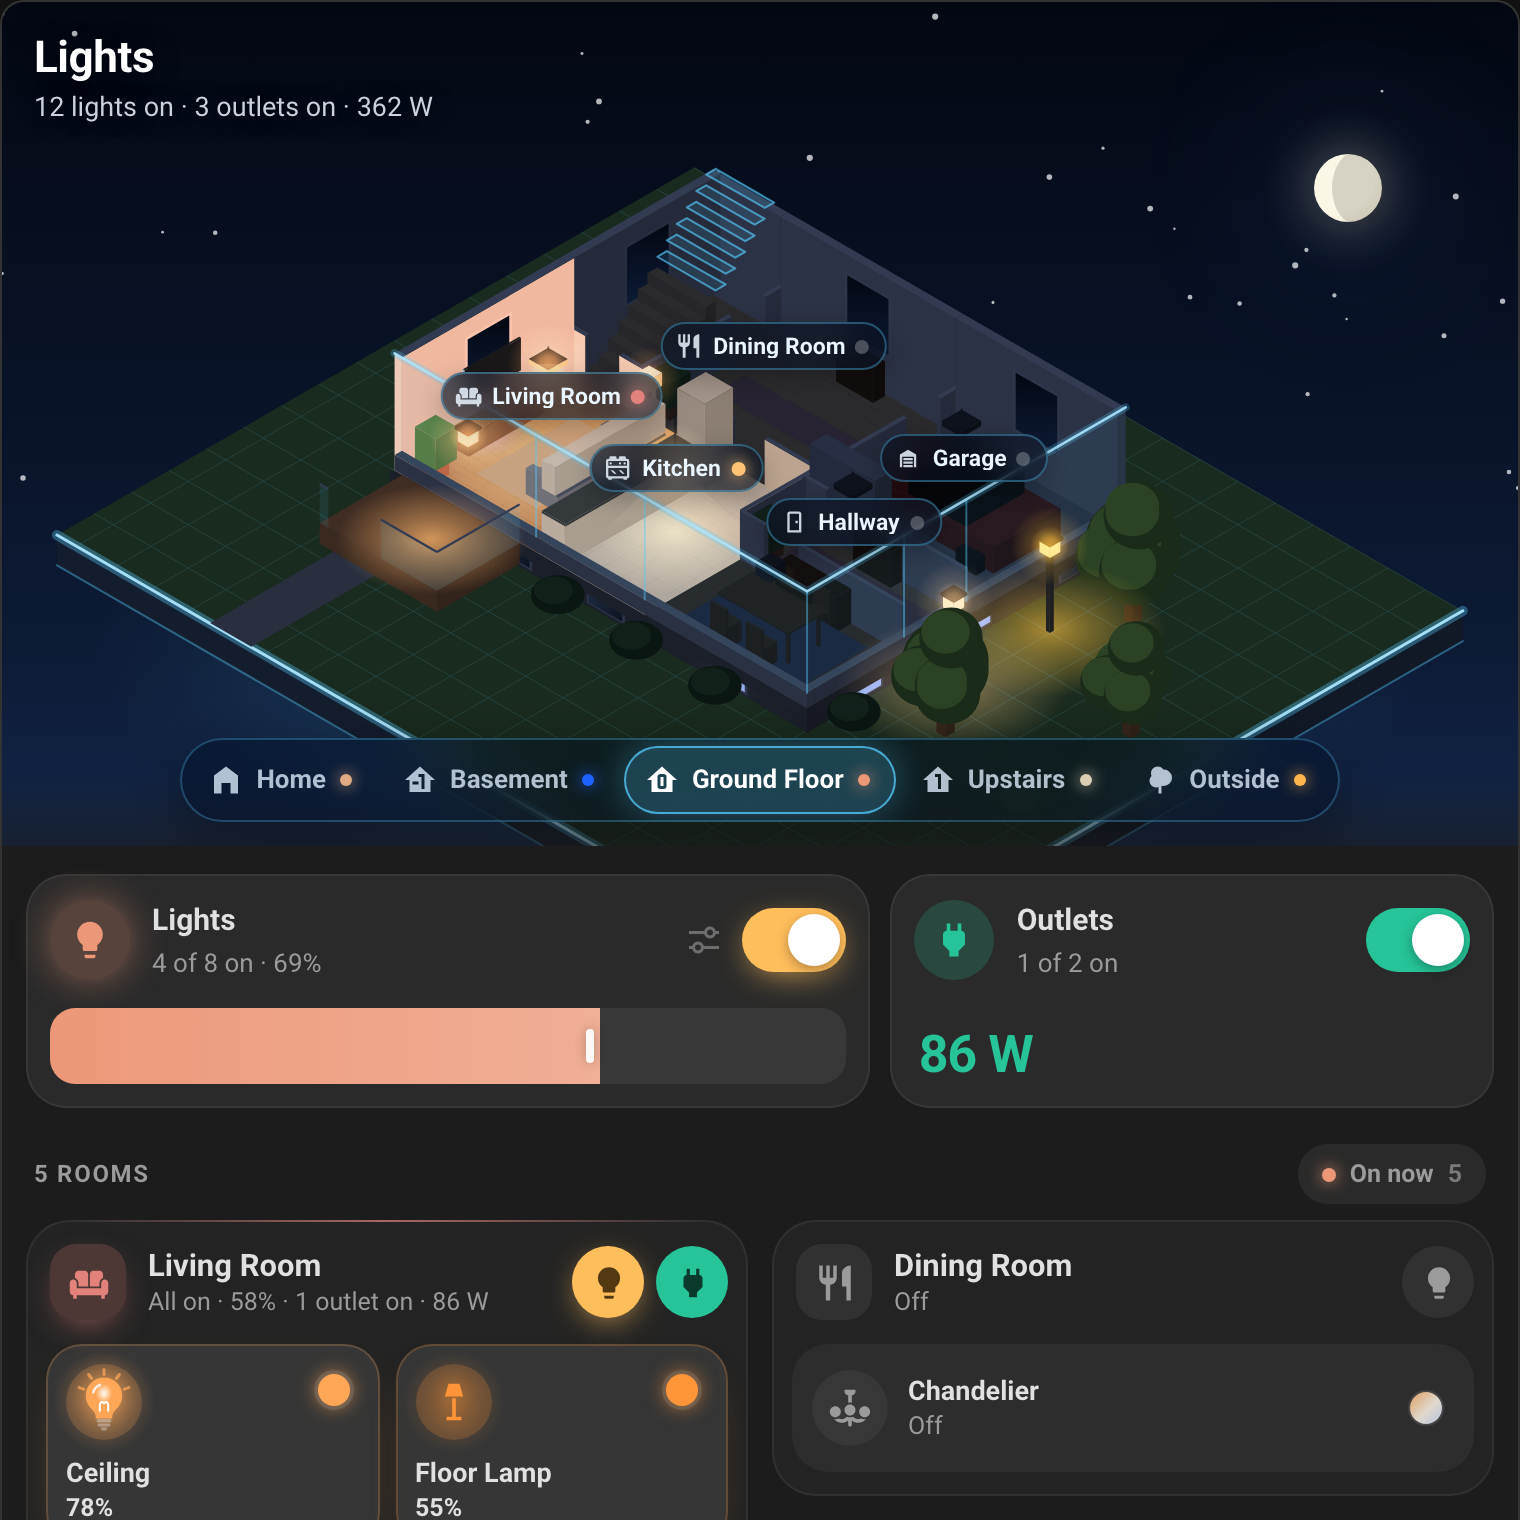 |
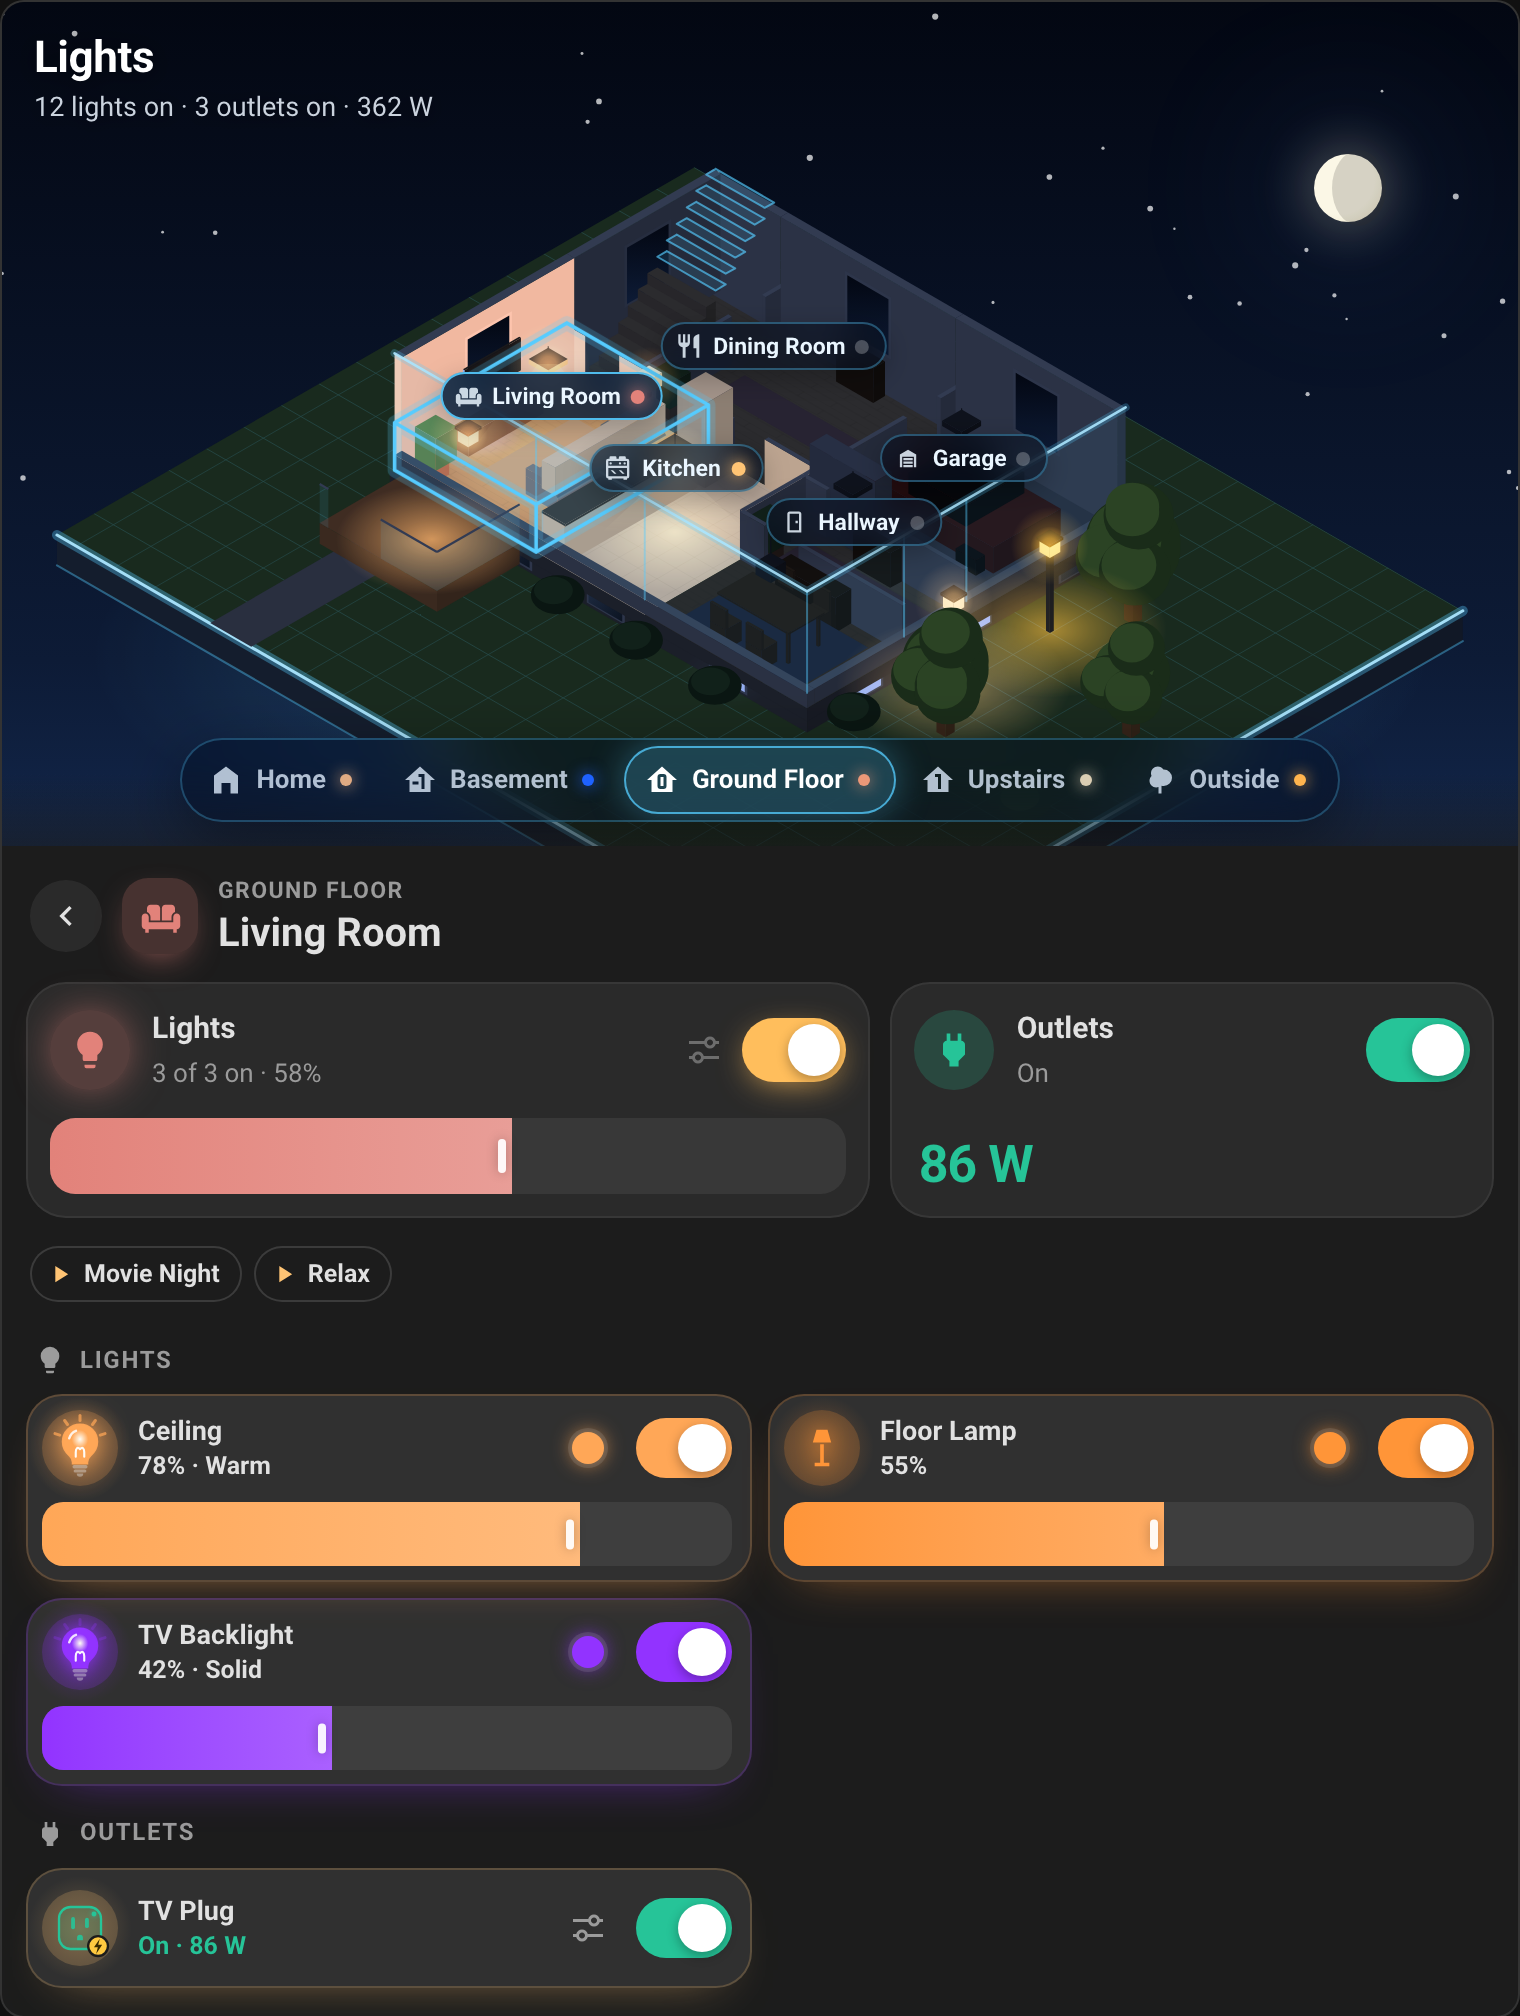 |
| Upstairs, in daylight | At dusk |
|---|---|
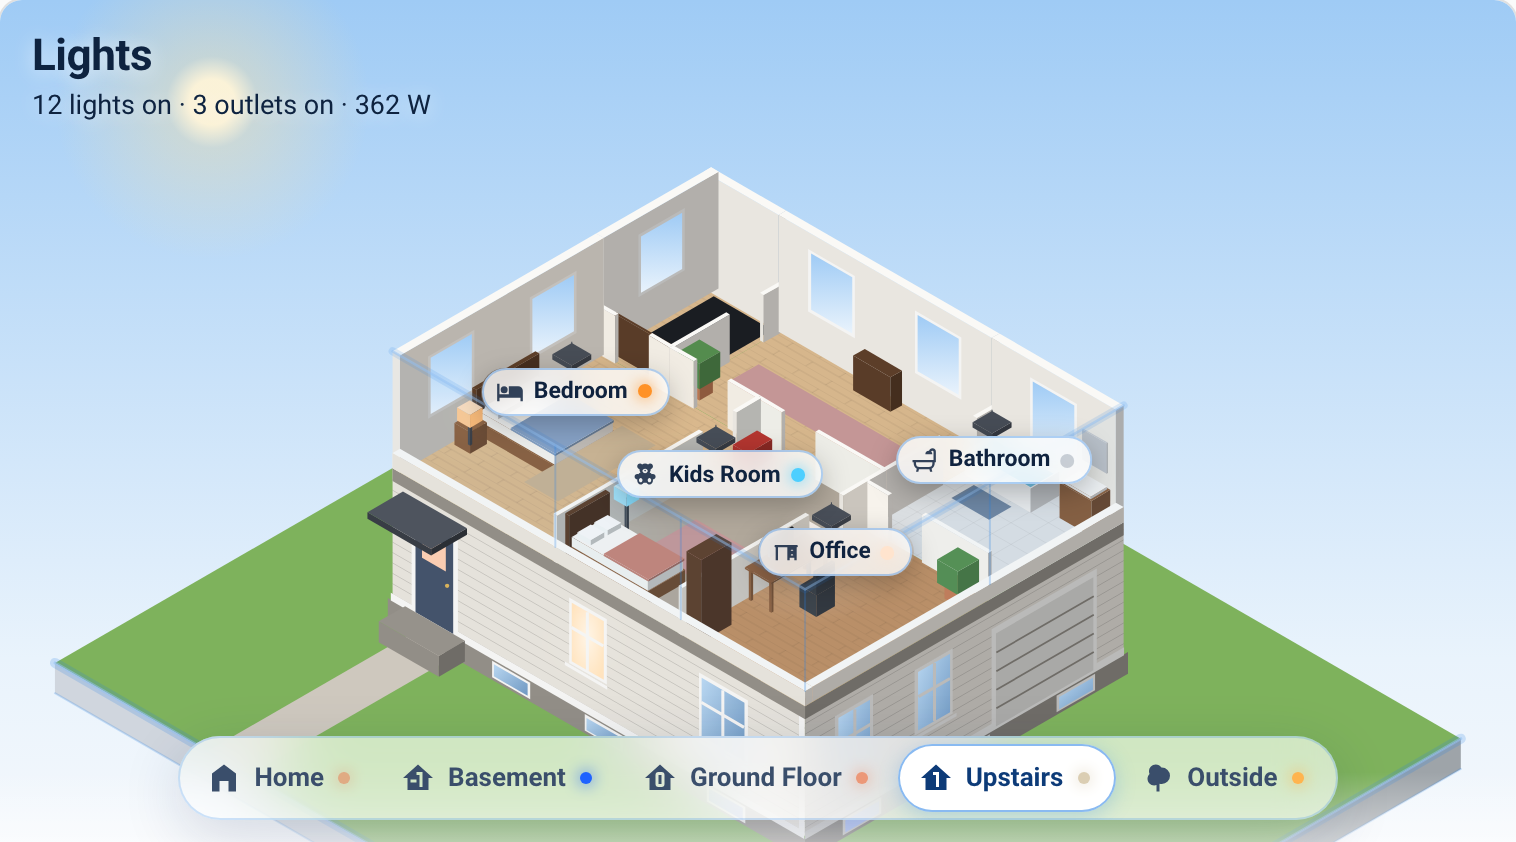 |
 |
| Color and white | Smart plugs | Lights and outlets for the whole home |
|---|---|---|
 |
 |
 |
| Daytime, light theme | On a phone |
|---|---|
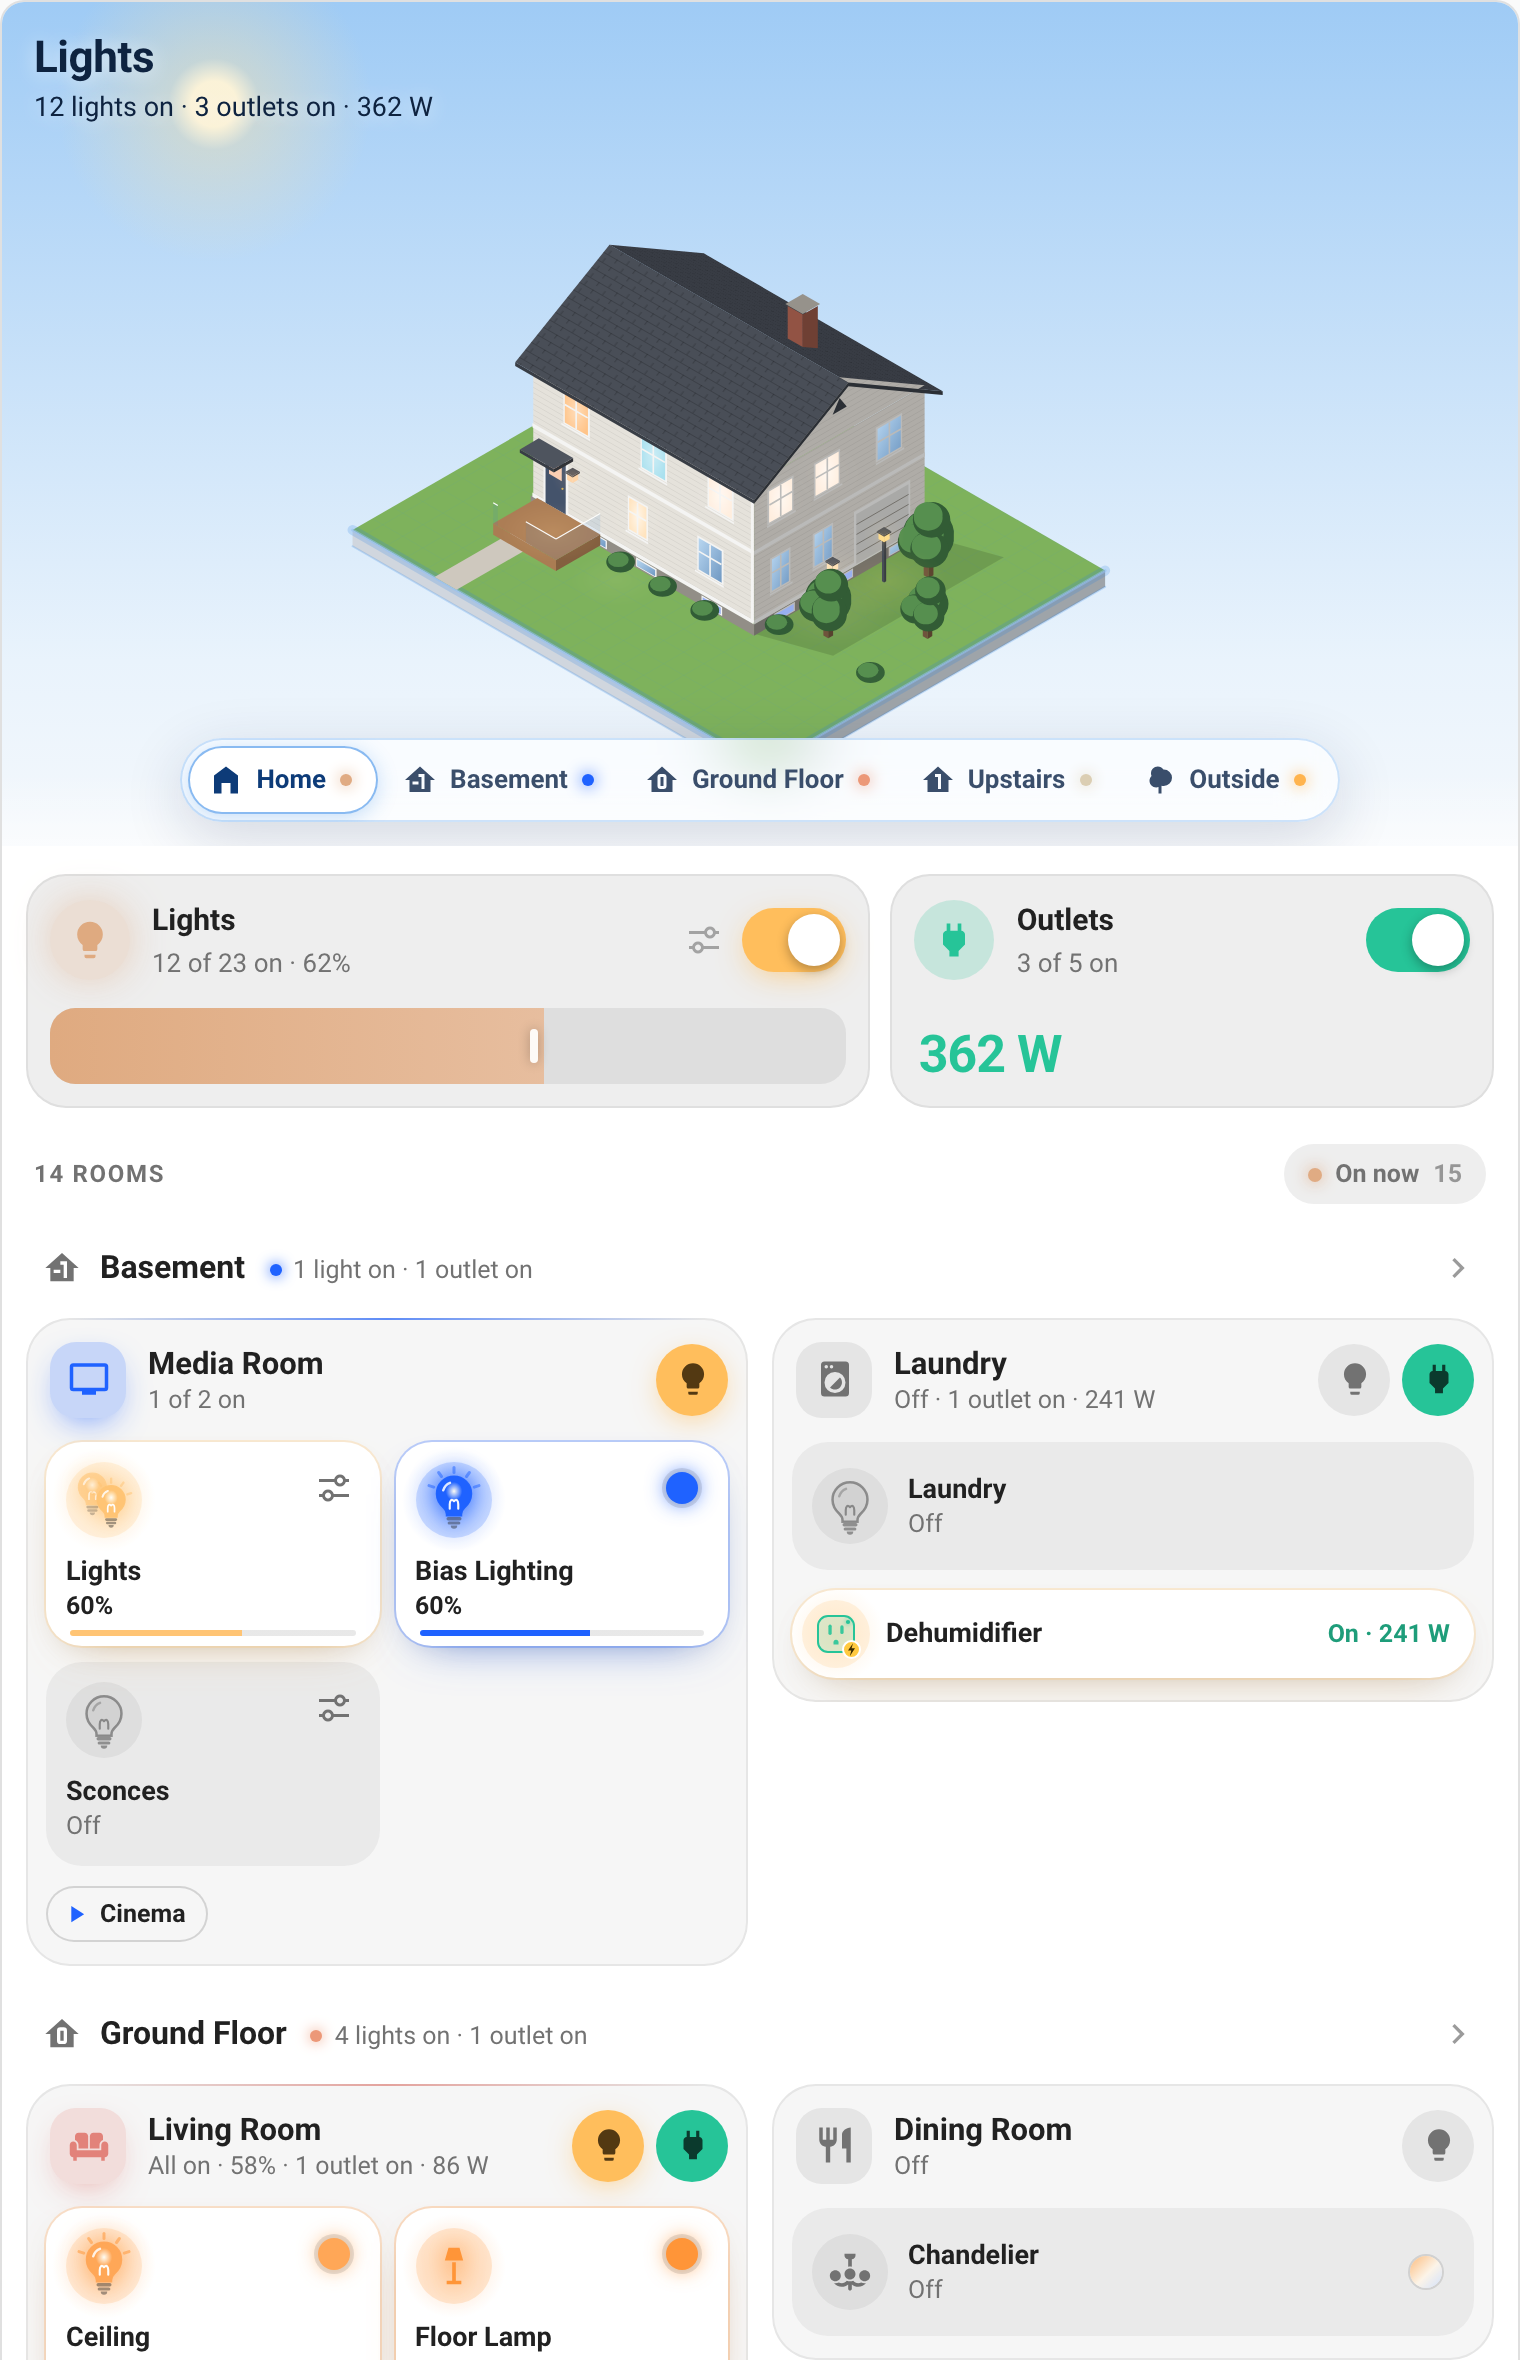 |
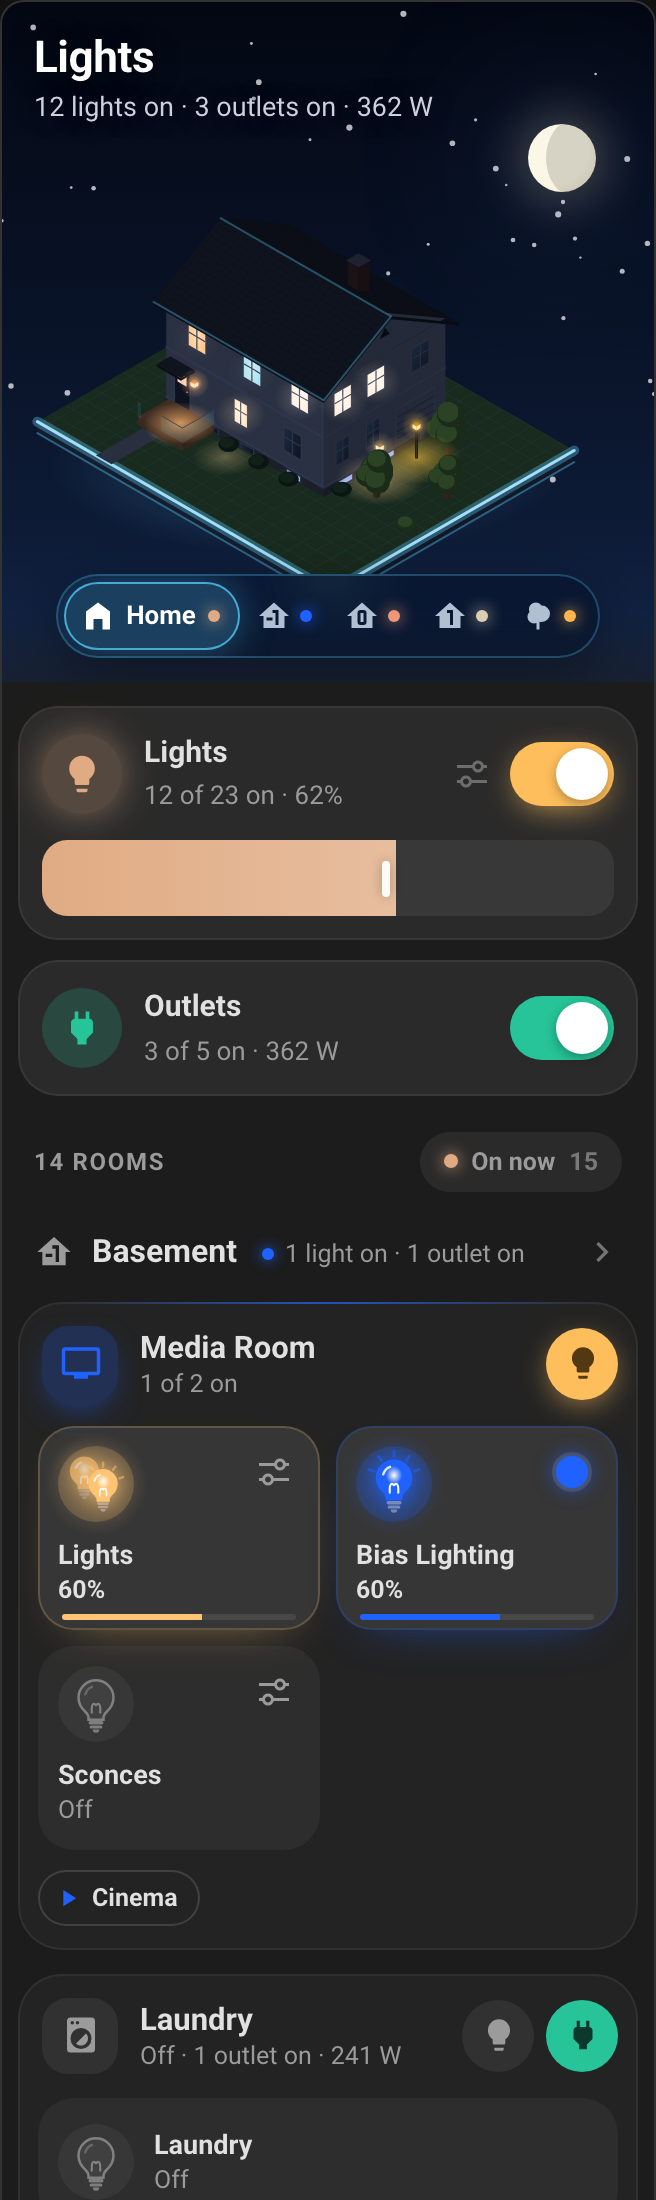 |
| In a panel view |
|---|
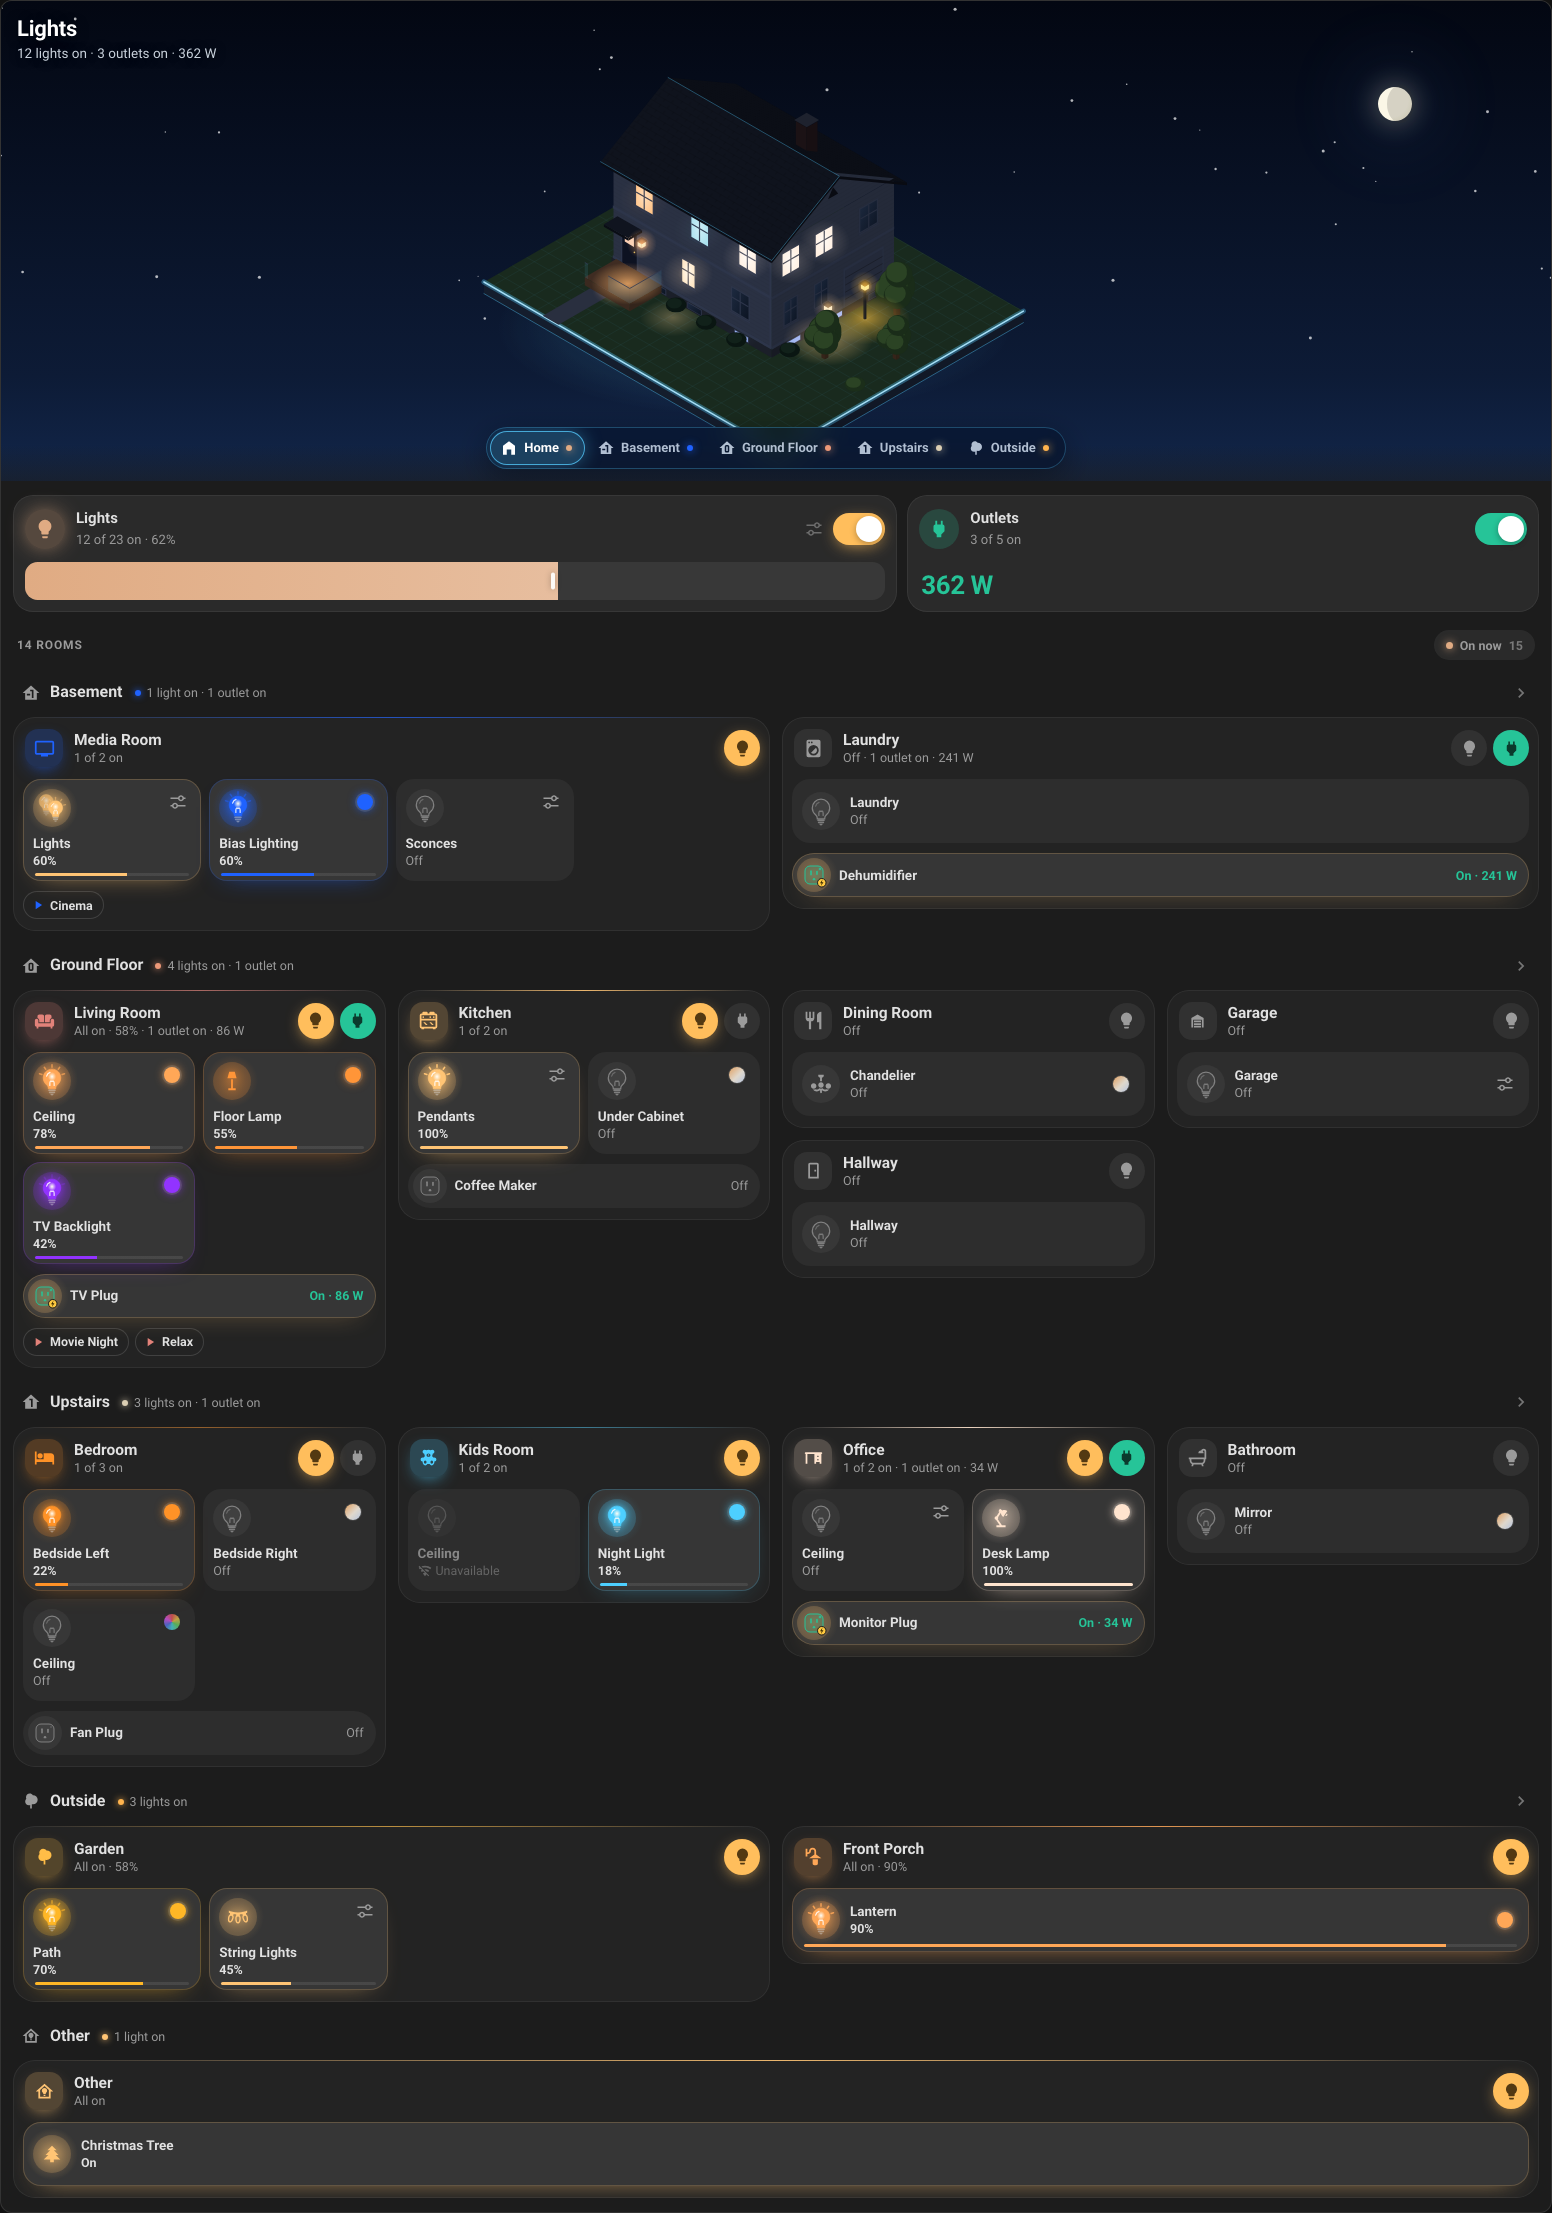 |

- Select the button above. Alternatively, open HACS, open the ⋮ menu, choose Custom repositories, and add
https://github.com/kedube/ha-light-controlwith the type Dashboard. - Search for Light Control Card and select Download.
- Reload the browser. In the companion app, clear the frontend cache from Settings → Companion app → Debugging.
HACS registers the dashboard resource for you and offers updates whenever a new version is released.
- Download
ha-light-control.jsfrom the latest release. - Copy it to
config/www/ha-light-control.jsin your Home Assistant configuration folder. - Go to Settings → Dashboards, open the ⋮ menu, choose Resources, and add
/local/ha-light-control.jsas a JavaScript module. (Resources appear only with Advanced mode turned on in your user profile.) - Reload the browser.
When you update manually, add a version to the resource URL (for example /local/ha-light-control.js?v=0.4) so browsers fetch the new file.
Requirements: Home Assistant 2024.11 or newer.
Edit a dashboard, select Add card, and search for Light Control. The whole configuration is one line:
type: custom:light-control-cardEvery option is also available in the visual editor, grouped into Display, Plugs & outlets, Rooms, Entities and Behavior.
The card works in any view and adapts to the space it gets. For a whole-house lighting dashboard, give it a Panel view or a wide section, and the rooms sit side by side in columns.
Places. The switcher over the house moves between the whole home, each floor from the lowest up, and the outdoors. The house follows: the whole home from outside, a floor opened up like a dollhouse, or the garden.
Lights and Outlets. Under the house, two controls act on the place you are looking at:
| Control | What it does |
|---|---|
| Lights | The switch turns every light off (with Undo), or all of them on. The slider dims the lights that are on and leaves the others off; with nothing on, it turns them all on at that level. Tap Lights for color, white temperature and more. |
| Outlets | The switch turns the outlets on or off, and shows how much power they draw. When it would turn off more than one, the first tap asks and the second one does it. |
Every room card has the same two switches in small: a bulb for its lights and a plug for its outlets.
Rooms. Tap a room's name, a window in the house, or a room on an open floor to see it up close: the house shows where it is, and every light gets its own switch, brightness slider and color button. The arrow goes back to its floor.
| Gesture on a tile | On a light | On an outlet |
|---|---|---|
| Tap | Turn on or off | Turn on or off |
| Slide sideways | Set the brightness; slide to the far left to turn it off | — |
| Press and hold, right-click, or tap the round button | Open the controls: brightness, color, white temperature, effects | Open power, energy and a 24-hour chart |
| Elsewhere | What it does |
|---|---|
| Scene chips | Activate a scene assigned to the room. |
| On now | Shows only the lights and outlets that are on. |
With a keyboard, Tab moves between tiles, Enter or Space toggles, and the arrow keys change brightness in 10% steps. The arrow keys also move between the places over the house, and every slider and color wheel works with them.
The 3D house comes from the floors and areas you already have in Home Assistant, so there is nothing to draw.
- Floors become stories, in the order of their levels: basements below the grass, the ground floor with the front door, and the floors above. Rooms without a floor move in on the ground floor. A home without floors becomes a one-story house.
- Rooms are recognized by name, in any of the card's languages, or by their area icon: living rooms get a sofa and a TV, kitchens counters and an island, bedrooms a bed and nightstands, garages a car. The kind of room also decides how big it is.
- Every room gets a place on an outside wall, so its windows show from outside. Closets and storage go in the middle, and the stairs sit in the same spot on every floor.
- Outdoor areas (a garden, a porch, a driveway, a pool) become the grounds around the house, and their lights become lamp posts and path lights.
- Each light becomes a fixture from its name: ceiling lights, pendants over the table and the kitchen island, lamps beside the sofa and the bed, and LED strips along the wall behind the TV.
Organizing your home in Settings → Areas, labels & zones, with floors and clear area names, gives you the most faithful house.
The card reads Home Assistant's own registries, so organizing your home in Settings → Areas, labels & zones is all the setup it needs.
- Lights: every
light.*entity. - Plugs and outlets:
switch.*entities that Home Assistant shows as an outlet, plus, in the default smart mode, switches whose device name or model says plug, outlet, socket or power strip (in any of the supported languages). Settings switches on those devices, such as child lock or LED indicator, stay out. - Rooms: an entity's own area, or else its device's area. Floors are listed from the lowest up, by their level in Home Assistant, and the rooms on each floor follow your area order there, which you can drag to reorder. Entities without an area appear under Other.
- Left out automatically: hidden entities, configuration and diagnostic entities, and entities the integration no longer provides.
- Names: the room name is removed from the start of each tile, so "Living Room Floor Lamp" in the Living Room reads "Floor Lamp".
- Related sensors: power, energy, voltage and current sensors on the same device as a plug are attached to it. On power strips, a sensor is attached only when it is clearly named after that outlet.
A plug is missing? Open the switch in Home Assistant, go to its settings, and set Show as to Outlet. It will always count as a plug from then on. You can also add it to include.
Something shows up that shouldn't? Hide the entity in Home Assistant, or add it to exclude or exclude_patterns.
All options are optional.
| Option | Default | Description |
|---|---|---|
title |
Lights |
Card title. Set to "" to hide it. |
show_house |
true |
Show the 3D house. |
show_summary |
true |
Show the status line under the title. |
show_room_filter |
true |
Show the switcher for the whole home, each floor and the outdoors. |
show_scenes |
true |
Show scenes assigned to each room. |
icon_style |
auto |
auto: the card's artwork unless an entity has its own icon. graphic: always the card's artwork. entity: always Home Assistant icons. |
show_outlets |
true |
Include smart plugs and outlets, with their own Outlets controls. |
outlet_detection |
smart |
smart: outlets plus switches on plug devices. device_class: only switches shown as Outlet. all_switches: every switch. |
areas |
all | Show only these area IDs, in this order. |
floors |
all | Show only areas on these floor IDs. |
exclude_areas |
none | Area IDs to leave out. |
show_unassigned |
true |
Show entities that have no area. |
unassigned_name |
Other |
Name of the section for entities without an area. |
include |
none | Entity IDs to always show, even hidden ones or other domains such as input_boolean and fan. |
exclude |
none | Entity IDs to always hide. |
exclude_patterns |
none | Wildcard patterns to hide, such as switch.*_led. A pattern without a domain (*_child_lock) matches every domain. |
show_unavailable |
true |
Show unavailable entities, dimmed. Entities the integration no longer provides are always hidden. |
show_light_groups |
true |
Show light group entities (listed first in their room). |
strip_area_names |
true |
Remove the room name from the start of entity names. |
tap_action |
toggle |
What tapping a tile does: toggle, controls (open the controls sheet), or more-info (Home Assistant's dialog). |
live_brightness |
false |
Update lights continuously while sliding. Leave off on slow Zigbee networks. |
room_switch_outlets is no longer needed: outlets now have their own switches for every room, floor and the whole home, and the lights switches never touch them. It is still accepted, so existing dashboards keep working, but it has no effect.
One card per floor:
type: custom:light-control-card
title: Upstairs
floors:
  - upstairs
Just the lights, most-used rooms first:
type: custom:light-control-card
show_outlets: false
areas:
  - living_room
  - kitchen
  - bedroom
A compact card without the house, where tapping opens the controls:
type: custom:light-control-card
title: ''
show_house: false
tap_action: controls
exclude_patterns:
  - '*_indicator'
- 'switch.*_child_lock'The card uses the language set in each person's Home Assistant profile. It includes English, German, Dutch, French, Spanish, Italian, Polish and Portuguese, and falls back to English for other languages. Numbers and units follow the same locale.
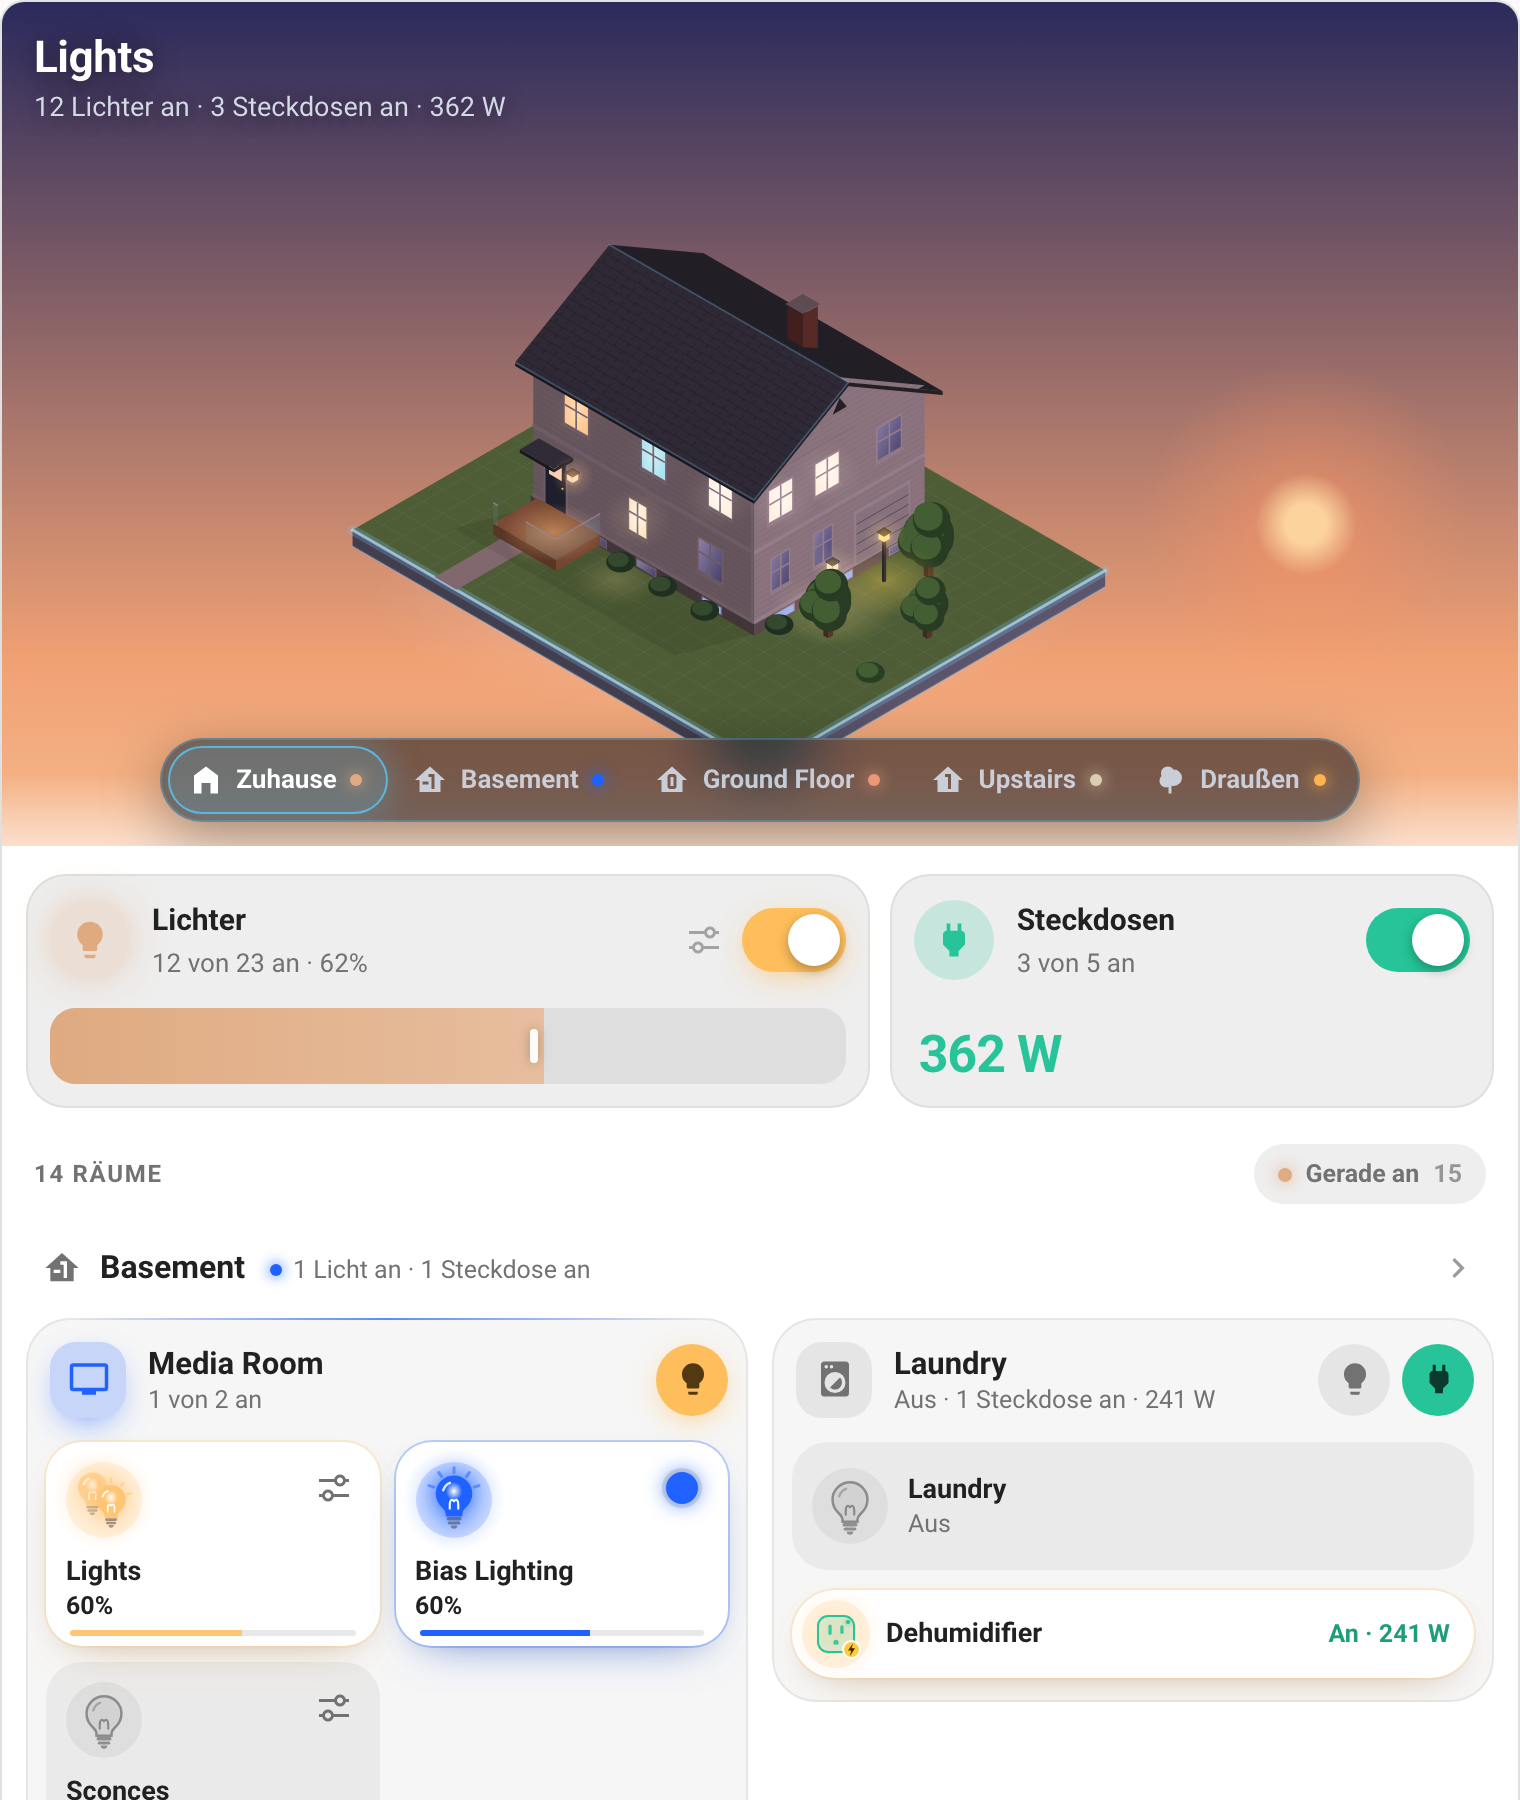
Translations live in src/translations. To add a language, copy en.ts, translate the strings, and register it in src/localize.ts; the tests check that nothing is missing.
The card uses your Home Assistant theme's colors, fonts, card background and radius. A few extra variables fine-tune it, each as comma-separated RGB:
| Variable | Default | Used for |
|---|---|---|
--lc-holo-rgb |
86, 204, 255 |
The holographic accents: the platform's edge, the floor switcher, labels. |
--lc-on-rgb |
255, 190, 92 |
Light switches that are on. |
--lc-outlet-rgb |
38, 196, 152 |
Outlets that are on. |
my-theme:
  lc-holo-rgb: '160, 120, 255'
lc-outlet-rgb: '0, 150, 255'The repository includes a simulated home (13 areas on three floors, 24 lights and 5 outlets, plus a few hidden and retired devices the card has to skip) for trying the card and for automated tests:
npm ci
npm run dev
Then open http://localhost:5173/demo/. The page can also lay the same home out without floors, or without any areas, to show what the card does with them.
Every change merged into main is tested and released automatically as the next version: 0.1, 0.2 … 0.9, then 1.0, 1.1 and so on. Each release lists what changed, and HACS offers it as an update.
Bug reports, ideas and translations are welcome. See CONTRIBUTING.md for how to build, test and release the card.