5. Event
React에서 이벤트를 사용하는 방법에 대해 알아보겠습니다.
원문 - React Event 튜토리얼 링크
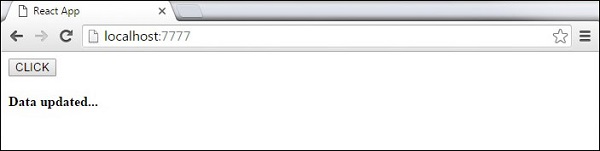
먼저 하나의 컴포넌트만 사용하여 이벤트를 추가하는 단순한 예제 소스코드입니다.
버튼을 클릭하면 updateState 함수를 트리거하는 onClick 이벤트를 추가하는 예제입니다.
import React from 'react';

class App extends React.Component {

   constructor(props) {
      super(props);

      this.state = {
         data: 'Initial data...'
      }

      this.updateState = this.updateState.bind(this);

   };

   updateState() {
      this.setState({data: 'Data updated...'})
   }

   render() {
      return (
         <div>
            <button onClick = {this.updateState}>CLICK</button>
            <h4>{this.state.data}</h4>
         </div>
      );
   }
}

export default App;
위의 소스코드를 간단하게 풀이하자면, updateState() 라는 함수를 선언하여
render() 함수 내에서 button 컴포넌트에 html에서 제공되는 이벤트 리스너를
카멜표기법(camelCase)으로 현재 컴포넌트에 선언한 함수명을 명시한 예제입니다.
버튼 클릭 시, updateState() 함수를 수행하게 됩니다.
* 실행결과
위의 1.의 소스에서 한 컴포넌트 내에서 이벤트를 호출하는 로직을 구성하였는데,
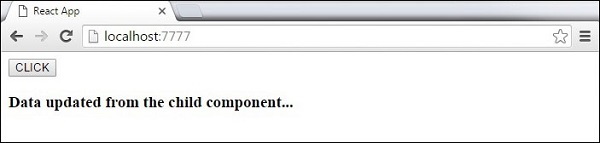
이번에는 A 컴포넌트에 실제 이벤트 처리부를 구현해놓고
B 컴포넌트에서 A 컴포넌트의 이벤트 처리부를 호출 할 수 있는 예제 코드를 보겠습니다.
import React from 'react';

class App extends React.Component {

   constructor(props) {
      super(props);

      this.state = {
         data: 'Initial data...'
      }

      this.updateState = this.updateState.bind(this);
   };

   updateState() {
      this.setState({data: 'Data updated from the child component...'})
   }

   render() {
      return (
         <div>
            <Content myDataProp = {this.state.data}
               updateStateProp = {this.updateState}></Content>
         </div>
      );
   }
}

class Content extends React.Component {

   render() {
      return (
         <div>
            <button onClick = {this.props.updateStateProp}>CLICK</button>
            <h3>{this.props.myDataProp}</h3>
         </div>
      );
   }
}

export default App;
위의 소스코드를 간단하게 풀이하자면
App 컴포넌트를 부모 컴포넌트, Content 컴포넌트를 자식 컴포넌트라고 가정 하고
자식 컴포넌트가 부모 컴포넌트 상태를 업데이트해야 할 때,
부모 컴포넌트에서 먼저 이벤트 처리기 updateState() 를 만들고
자식 컴포넌트를 render() 하여 이벤트 처리기 updateState() 를
자식 컴포넌트에 prop(updateStateProp) 으로 전달 해 준 후,
자식 컴포넌트에는 전달 받은 prop(updateStateProp)으로
부모 컴포넌트의 이벤트를 호출 하는 예제입니다.
* 실행결과