
3Dpass is an OpenSource decentralized WEB 3.0 P2P Layer 1 blockchain platform for tokenization of real physical and virtual objects and its transformation into digital assets. The main idea of 3Dpass is to make it possible for people to use real world objects in digital within smart-contracts and dApps and have full control over its copies (learn more about 3Dpass features ). This allows to establish 1:1 correspondence between an object and its asset and define ownership as an additional property of the asset providing zero-knowledge proof. Follow the White Paper for the details.
Every object, transformed by 3Dpass, has its own unique and sustainable identity called HASH ID the object might be recognized by. The algorithm is flexible enough to adjust the definition of error to certain level of scanning precision.
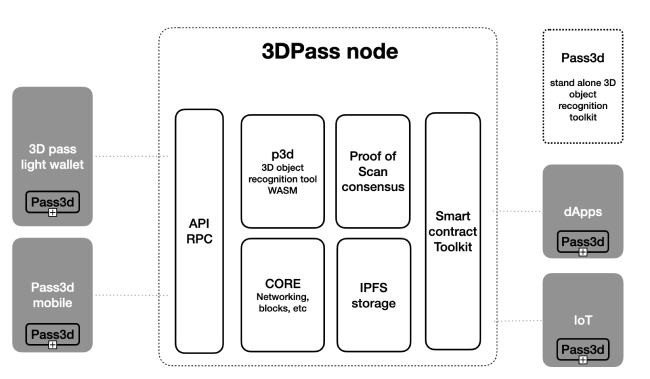
3DPass NODE is a Layer 1 blockchain based on Substrate with brandnew consensus Proof of Scan leveraging 3D object shape recognition algorithm called Grid2d, which is implemented as pass3d tool. 3Dpass NODEs are designed to provide object authenticity check. We call it "The Ledger of Unique Things". In order to encourage users to maintain the network and to solve issues there is a cryptocurrency 3Dpass Coin.
Contribution program | Contributing guidelines | Discord
This is an eco-system scheme, which represents general functional elements:
-
3Dpass NODE (based on Substrate) - wallets, dApps, smart-contracts, IoT devices integration using API and RPC
-
Pass3d and p3d recognition toolkit - recognition algorithms integration
-
Proof of Scan consensus - the logic, using 3D objects recognition toolkit, that allows network participants to agree on the state of the blockchain
-
3Dpass light wallet - desktop users and 3D printing labs integration
-
Pass3d mobile - smartphone and tablets users integration
-
Smart contracts toolkit - Substrate based smart contract tools using ink, a Rust-based embedded domain specific language (eDSL) for writing WebAssembly smart contracts. Learn more about how it compares to Solidity. As well, it allows unmodified EVM code to be executed in the 3DPass blockchain. Some special Substrate features are designed to closely emulate the functionality of executing contracts on the Ethereum mainnet within the 3DPass network.
-
IPFS storage - embedded decentralized storage for assets
-
RPC (remote procedure call) - the capabilities that allow blockchain users to interact with the network. The NODE provides HTTP and WebSocket RPC servers.
-
Networking: we use the
libp2pnetworking stack to allow for the nodes in the network to communicate with one another.
wget https://github.com/3Dpass/3DP/releases/download/v8/poscan-consensus-x86_64-unknown-linux-gnu.tar.gz
tar xzf poscan-consensus-x86_64-unknown-linux-gnu.tar.gzIf you need to build the Node on your own you have to set up the environment. First, complete the basic Rust setup instructions. You can also use this command to clone 3DP folder and set up Rust:
cd ~
git clone https://github.com/3Dpass/3DP.git
cd 3DP
curl https://sh.rustup.rs -sSf | sh -s -- -y --default-toolchain nightly-2023-05-20
source $HOME/.cargo/env
rustup target add wasm32-unknown-unknown --toolchain nightly-2023-05-20
sudo apt-get install -y libclang-dev libssl-dev clangThe provided cargo run command will launch a temporary node and its state will be discarded after
you terminate the process. After the project has been built, there are other ways to launch the
node.
cargo run --release -- --dev --tmpThe cargo run command will perform an initial build. Use the following command to build the node
without launching it:
cargo build --releaseOnce the project has been built, the following command can be used to explore all parameters and subcommands:
./target/release/poscan-consensus -hGenerate youur mining address and keys:
./target/release/poscan-consensus generate-mining-key --base-path ~/3dp-chain/ --chain mainnetSpecRaw.jsonRegister your mining key in the keystore:
./target/release/poscan-consensus import-mining-key 'your secret phrase' --base-path ~/3dp-chain/ --chain mainnetSpecRaw.jsonGenerate your GRANDPA keys for finalization. Use the same secret phrase as it's used for mining address (The account is defined by the secret phrase):
./target/release/poscan-consensus import-mining-key 'your secret phrase' --base-path ~/3dp-chain/ --chain mainnetSpecRaw.json
## Development
Insert Grandpa key into the keystore:
./target/release/poscan-consensus key insert --base-path ~/3dp-chain/ --chain mainnetSpecRaw.json --scheme Ed25519 --suri <secret seed from Grandpa> --key-type granMake sure you have both keys in the keystore ~/3dp-chain/chains/3dpass/keystore
Start the Node with the following command:
./target/release/poscan-consensus --base-path ~/3dp-chain/ --chain mainnetSpecRaw.json --name MyNodeName --validator --telemetry-url "wss://submit.telemetry.3dpscan.io/submit 0" --author <your mining address or pub key> --threads 2 --no-mdnsRun miner (You have to install Bun before):
bun install
bun miner.js --host 127.0.0.1 --port 9933
Make sure you can see your node in the list. Use this tutorial for more details.
This procedure will build and run the Node and Miner automatically with Docker.
First, install Docker and Docker Compose.
Run the following command:
cd ~
git clone https://github.com/3Dpass/3DP.git
cd 3DP
cp docker-compose.override.yml.example docker-compose.override.yml
// TODO: put your `MEMO_SEED` and `ADDRESS` in `docker-compose.override.yml`
docker compose build
docker compose up
docker-compose.override.yml example:
version: "3.9"

  services:
      node:
        environment:
          - MEMO_SEED=[PLACE MEMO SEED HERE]
          - ADDRESS=[PLACE MINER ADDRESS HERE]
          - THREADS=2
- INTERVAL=100THREADS=2is the amount of threads you are about to use for miningINTERVAL=100is the amount of time in milliseconds between the last and the next one objects being sent towards the Node. Depending on how much threads are you mining with, reduce the interval until you reach desired proc load.
You can generate your ADDRESS and MEMO_SEED phrase in the wallet (add new address). Make sure you can see your node in the list. Use this tutorial for more details.
Open the wallet page: https://wallet.3dpass.org/. In order to connect your Node to the wallet in local you need to set up your local API endpoint as ws://127.0.0.1:9944 in the Settings.
Follow this guidelines for more details.
This command will start the single-node development chain with persistent state:
./target/release/poscan-consensus --devPurge the development chain's state:
./target/release/poscan-consensus purge-chain --devStart the development chain with detailed logging:
RUST_BACKTRACE=1 ./target/release/poscan-consensus -ldebug --devClear keystore for Alice and Bob:
rm -R /tmp/alice/ /tmp/bob/Import mining key for Alice into the keystore:
target/release/poscan-consensus import-mining-key //Alice --base-path /tmp/aliceRun the first Node with the Alice's pub key:
target/release/poscan-consensus --base-path /tmp/alice --chain local --alice --port 30333 --ws-port 9944 --rpc-port 9933 --unsafe-rpc-external --node-key 0000000000000000000000000000000000000000000000000000000000000001 --validator -lposcan=debug --author 0xd43593c715fdd31c61141abd04a99fd6822c8558854ccde39a5684e7a56da27dRun the second Node:
target/release/poscan-consensus --base-path /tmp/bob --chain local --bob --port 30334 --ws-port 9945 --rpc-port 9934 --bootnodes /ip4/127.0.0.1/tcp/30333/p2p/12D3KooWEyoppNCUx8Yx66oV9fJnriXwCcXwDDUA2kj6vnc6iDEp --validatorCopyright (C) 2002-2023 3Dpass https://3dpass.org/